Workflow and ServiceDesk Community

 View Only

Single Value Mapping 

Jun 13, 2012 09:44 AM

Single Value Mapping

Component definition

This component lets you map process variables and properties into a data type. The Single Value Mapping component takes in data from various sources (Web forms, databases, and other components). It uses each data element to redefine a correlating data element in a data type. The component has a visual mapping editor with internal validation and conversion.

Component icon

Description of component output paths

Unknown

The component output paths are described in the following table:

Property

Description

Unknown

Unknown

Unknown

Unknown

Description of component tabs and their properties

The properties on the Configuration tab in the Single Value Mapping component are listed and described in the following table:

Property

Description

Mapping Definition

Lets you set the specific mapping definition for your convergence.

You can select which values of a datatype are mapped. Click an arrow on the line under Data definitions. While you hold the mouse button, drag to an arrow on the line under chosen datatype and let go of the mouse button. More arrows appear under Data definitions when you expand data definitions.

You can click Validate to see if your mapping is valid. This option only appears after you enter the Target Type.

Optional

Lets you select how your data is handled if it can be handled in more than one way; for example, in two different resource types.

For example, mapping your data is inconvenient in that way that you propose. You can select this control to cause this component to opt out of mapping the data and handle the data in its original form.

Target Type

Lets you set the type of array you want to map your source array into.

For example, if you transfer from type A to B, set the B to this option.

Map Into Existing Value

Lets you select to overwrite an existing variable with the output data.

You can then select the target variable in the Target Variable Name option.

Target Variable Name

Lets you select the variable to overwrite with the output data. This variable holds the output, mapped array, and must be the same datatype as the target type.

This option appears if you check Map Into Existing Value.

Output Variable Name

Lets you select the output variable name. This variable holds the output, mapped array, and must be the same datatype as the target type.

This option only appears after you enter the Target Type and if Map Into Existing Value is unchecked.

The properties on the Settings tab in the Single Value Mapping component are listed and described in the following table:

Property

Description

Component Class Name

The class name of this component. This property is not editable, but useful if you call Symantec support.

Description

The description of this component. This property lets you describe how the component is used. You can use it to provide any wanted documentation for this component.

This description is included in the model reports that are created when you click Plugins > Generate Business Model.

Location

The physical location of the top left point of this component on the workflow model.

Name

The name of this component. You can change the name.

If you changed the component name when you double-clicked it on the workflow model, the changed name appears here.

Override Background Color

This property lets you change the background color of this component.

To Do

This property lets you record what you still need to do with the component. Use this property to help you remember the configuration that you want to apply to this component.

The text that you enter for this property appears at the bottom of the component editor. If you enter text for this property, a checklist symbol appears on the component in the workflow model.

Is Enabled

This property lets you enable or disable the component. By default, components are enabled. When a component is disabled, it has no effect on the Project. Uncheck Is Enabled to disable the component.

  • Execution Outcome

    If a component with more than one outcome path is disabled, you must select which outcome path you want the component to take. Click the Execution Outcome drop-down list and select the outcome path for the workflow to follow.

  • Disabled Mapping

    If the component has output parameters, you must configure all output parameters with fixed data to pass on. This configuration can be performed in the Disabled Mapping option.

Connection information

Not applicable

Component settings

Unknown

Use cases

An example for the Single Value Mapping component is as follows:

  • Database update

    A Single Value Mapping component maps new car data into a database.

Database update

Scenario: A car dealership uses a Web form to enter data about new cars. When an employee inputs data and clicks Save, the data is uploaded onto the database. The database entry is saved in a custom data type called Vehicle. The values from the Web form must be mapped into this data type before the database can recognize it.

Process: This process is created as a Forms (Web) Project type.

The following screen shot shows the process:

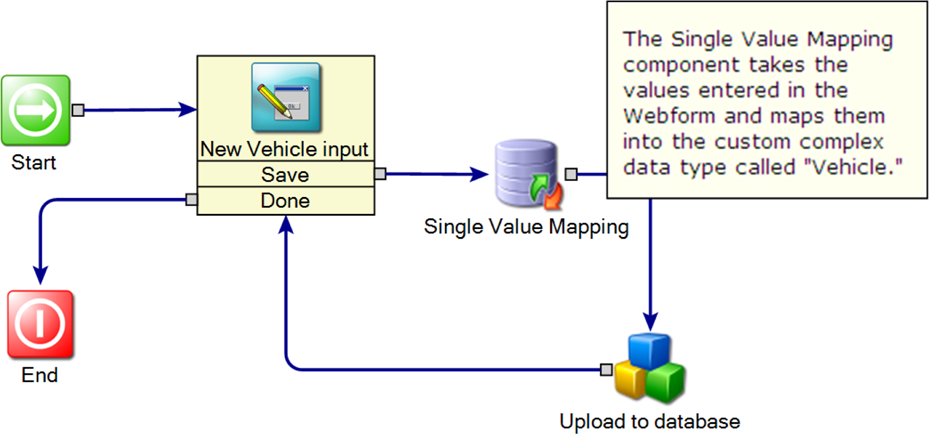
The Web form that is presented in the "New Vehicle input" form contains fields for Make, Model, Color, and some other descriptions of the vehicle.

When the user clicks Save, the process moves to the Single Value Mapping component. This component takes the values that are entered in the Web form and maps them into a custom complex data type called Vehicle.

This data type was created using the integration engine.

For more information on the integration engine, see the Workflow Solution Administrator's Guide.

www.altiris.com/support/documentation.aspx

The following screen shot shows the editor for the mapping component:

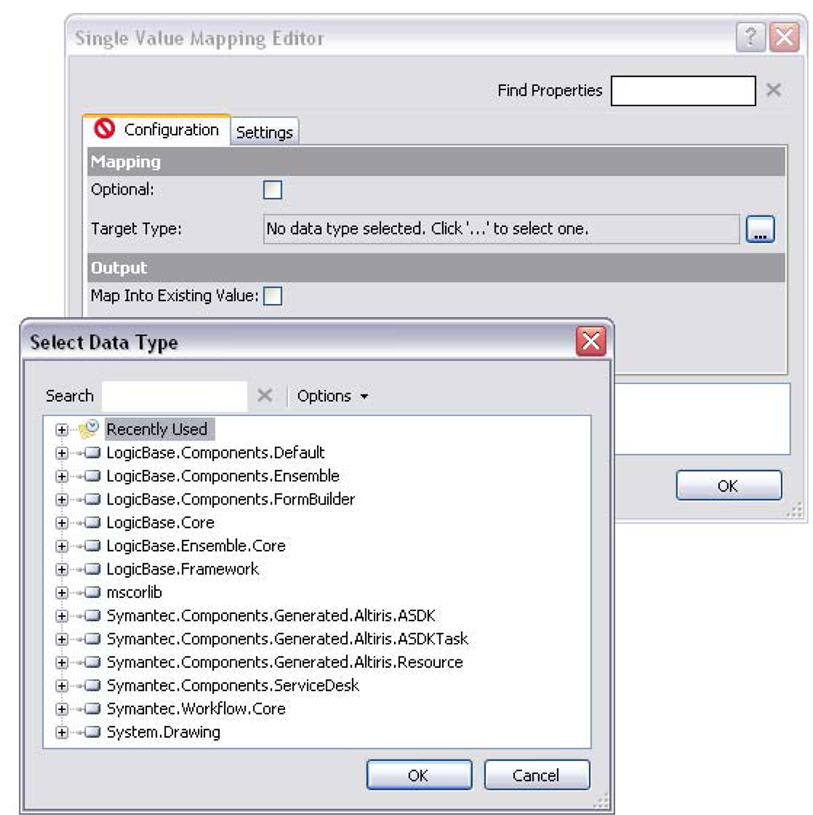
The main component editor and a dialog to select the target data type. This second dialog opens when you click the [...] button for Target Type. After you select a data type to map into, a mapping definition property appears in the main editor. Click the [...] button for mapping definition to open the mapping editor.

The following screen shot shows the mapping editor:

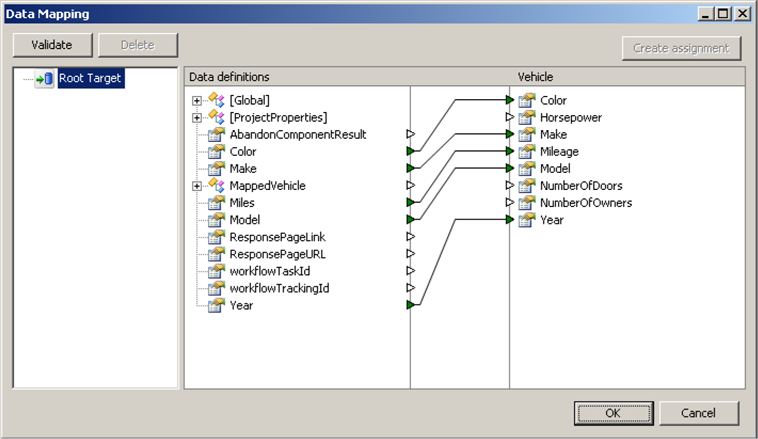
Here we see the data variables from the Web form being mapped into the correlating data type property. Not all of the possible data elements were added.

A custom database component then uploads the mapped values into the database. The workflow returns the user to the form for another entry. The user can continue adding vehicles, or click Done to end the process.

Other components in this example are as follows:

  • Form Builder

  • Custom component

    This component is a custom component created with the integration engine.

    For more information on the integration engine, see the Workflow Solution Administrator's Guide.

    www.altiris.com/support/documentation.aspx

Here's another idea for using this component: using data from linked models. One difficulty of using linked models is that the data that is used within the model stays within the model. Other models cannot see the data. You can expose linked model data to the rest of the workflow by mapping it into global data.

Statistics
0 Favorited
0 Views
0 Files
0 Shares
0 Downloads

Tags and Keywords

Related Entries and Links

No Related Resource entered.