Dialog Workflow
Component definition
This component stops the workflow process to get information from a user. The Dialog Workflow component creates a specific task that requires a user to complete a Web form. Once this form is complete, the component returns the gathered data and resumes the workflow process.
Component icon

The Dialog Workflow component contains three internal models: a start process, a dialog model, and a finish process. These three models perform different functions within the component. The start process determines how the dialog is presented to the user who needs to interact with it. It answers the question, "How do we get the necessary user see this page?". For example, the start process may send an email to a group of employees. This email may notify them that certain actions are required and may provide a link to the Web form where they can complete the actions. The component can also be used to create a task that appears in a user's Web portal task list (for example, Process Manager or SharePoint).
The dialog model contains the form that a user sees.
The finish process lets you include a process that runs after the dialog model. This feature is used, but it is useful for some situations, such as removing permissions immediately after a user has completed an assigned task.
Description of component output paths
Unknown
The component output paths are described in the following table:
Property |
Description |
|
timed out
|
If the time in the Timeout Time Span option (in the Event Configuration tab) is reached, the workflow follows this output path.
|
|
[Links]
|
An output path is created for each end component that is added in the Dialog Model (accessed in the Interaction Setup tab).
|
Description of component tabs and their properties
The properties on the Assignments tab in the Dialog Workflow component are listed and described in the following table:
The properties on the Interaction Setup tab in the Dialog Workflow component are listed and described in the following table:
The properties on the Event Configuration tab in the Dialog Workflow component are listed and described in the following table:
The properties on the Expose As Webservice tab in the Dialog Workflow component are listed and described in the following table:
The properties on the Settings tab in the Dialog Workflow component are listed and described in the following table:
The properties on the Message Listeners tab in the Dialog Workflow component are listed and described in the following table:
Connection information
Not applicable
Component settings
Unknown
Use cases
Some examples for the Dialog Workflow component are as follows:
Vacation approval
Scenario: In a Web form, an employee submits a vacation request. A manager is notified about the pending request by an email that includes a link to view the request. The requester is notified about the manager's decision by email.
Process: This process is created as a Workflow Project type.
The following screen shot shows the process:
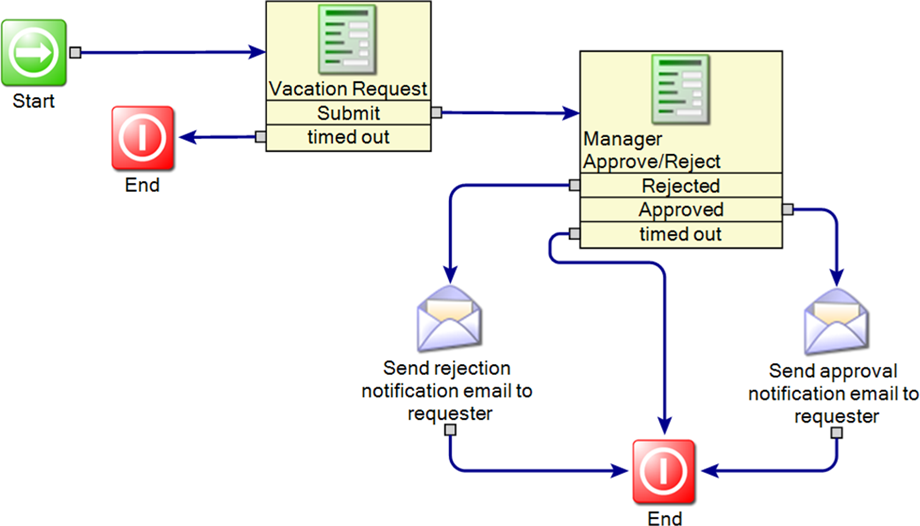
In the first Dialog Workflow component - "Vacation Request" - the start and the finish processes are in a blank configuration. The start and the finish processes are located in the Event Configuration tab in the component's editor. Blank configuration means there is only a start and an end component in them. The dialog model (located in the Interaction Setup tab) contains a form.
The following screen shot shows the dialog model:
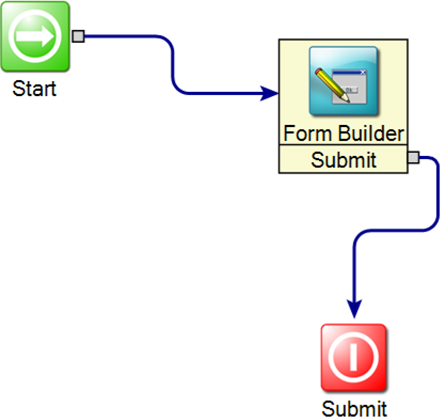
The outcome path on the Form Builder component is Submit because that is the name of the button in the form.
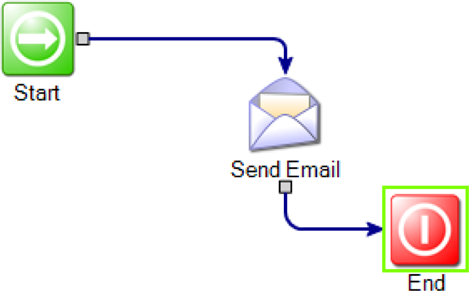
In the second Dialog Workflow component - "Manager Approve/Reject" - the start model sends an email to the manager.
The following screen shot shows the start model:
The dialog model contains the form, and the finish process is blank.
After the manager responds to the request, an email notifies the requester of the manager's decision.
Other components in this example are as follows:
Server request
Scenario: In a large company, a branch office requests a new server from the company's hardware supply. Once the request has been received, it goes through numerous steps before it is filled.
Process: This process is created as a Workflow Project type. A series of Dialog Workflow components control the progress of the request.
The following screen shot shows the process:

The four Dialog Workflow components stop the process at each crucial point, and they proceed after the necessary information is received.
In this example, the Single Path Demo component represents the procurement process to obtain the requested server. In reality, this component would probably be a linked or embedded model component that contained the procurement process.
Other components in this example are as follows:
You can include a Web form in a Workflow Project type only by using the Dialog Workflow component. The Dialog Workflow component uses the same form builder that Forms (Web) Project types use.
For more information on the Dialog Workflow component, see the Workflow Solution User's Guide.
www.altiris.com/support/documentation.aspx
Presenting a Dialog Workflow dialog to a user with an email
Many of the example processes in this document use a Dialog Workflow component to present a Web form to a user. The Web form is most often presented by sending the user an email with a link to the Web form.
Dialog Workflow components stop a process to present a Web dialog to a user to obtain necessary information.
Before the user can input the necessary information in the Web dialog, the user must first access the dialog. Dialog Workflow components contain a start process for the purpose of presenting the user with the Web dialog. One common way to present the end user with the Web dialog is to send an email with a link to it. The Send Email component sends the email.
To present a dialog to a user with the Send Email component
In your process, double-click the Dialog Workflow component to open its editor.
Click the Event Configuration tab.
-
Click the Start Process [...] button.
The Start Process editor opens, which by default contains only a start and an end component.
Add a Send Email component and connect all three components.
-
Configure the Send Email component.
Set the From Address, To Address, and Subject.
Click on the HTML content [...] button.
-
From the left panel, drag ResponsePageLink onto the email pallet.
A link is added in the email to the dialog that is contained in the Dialog Workflow component.
Click OK to exit the content editor.
Click OK to exit the email editor.
Click OK to exit the start process editor.