In my last article I demonstrated a visual and simple way to understand how the SSO form creation process works using a web application. This week, I will take the same approach and demonstrate how to create an SSO for a Windows application.
Let's start by doing a quick review of what I discussed last time. While it may not be true 100% of the time, regardless of what an application is designed to do, or how it's programmed to do it, in most cases applications will follow the same design. Every piece of the application has an identifiable name and some functions containing other functions within them. These are the kinds we mostly deal with when building an SSO. The specific functionality is a logon window which contains two or more fields. Each section of the SSO form corresponds directly to a particular portion of that functionality.
For the web application we saw, the HTML form which has the following format, has a specific section of the SSO where its identifiable names should be entered.
<form>
input elements
</form>
With a Windows application however, the biggest difference is that we can't simply "view source" to find those names. For this we use a tool called spy++ which is bundled with Visual Studio. If you don't have Visual Studio, there is a free program called AutoIt which has an application called "AutoIt Window Info" which accomplishes the same thing. By the way, these applications can be used to view the names in a web app as well. While we can't directly view the programming that makes up the logon window of an application, we can fairly quickly identify the appropriate information required to build our SSO. The reason we are able to do this is because the program has to "advertise" certain information to Windows which can be identified while the program is running. There are some programs, both Web and Windows that have been designed to mask the real information and what is presented does not allow us to perform the SSO functionality required. Unfortunately in those cases it can be very difficult or even impossible to create an SSO.
It's not a perfect science, and is at the mercy of how the developer chooses to create the application. But, for something that deals with unknowns, Symantec Workspace Corporate does a great job with its SSO functionality.
Now let's build the SSO for the SQL Server Management Studio logon. I'll jump straight to identifying what I need my SSO to automate.

As last time, I see that I need to identify the following elements:
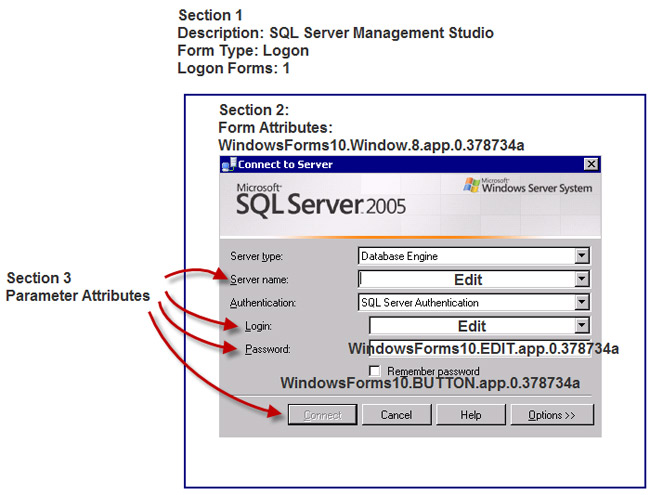
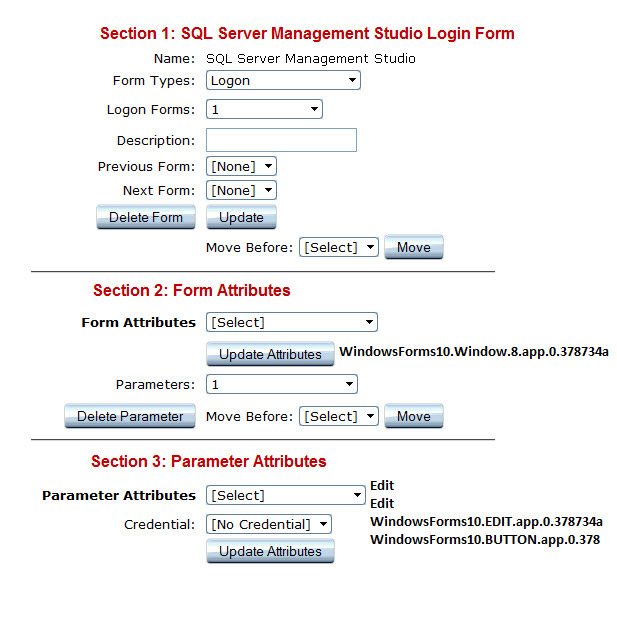
Section 2
Section 3
- Server name:
- Login:
- Password:
- Connect button
Now that I launched the application I will open spy++ or AutoIt and identify these elements. We don't have a credential field for "server name" so I used the "TextOut" parameter to collect (from user) and enter the host name of my SQL server.
Window name
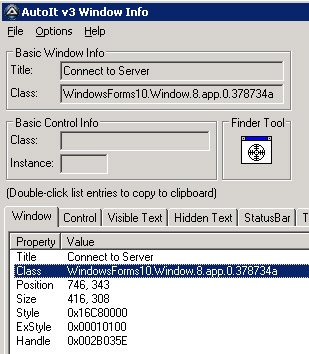
Window ClassName: WindowsForms10.Window.8.app.0.378734a
Server name
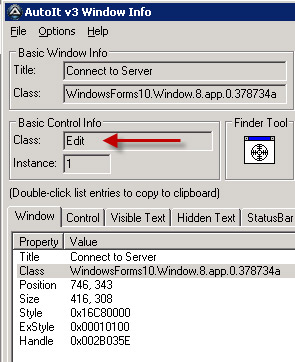
The window name I identified has a control with a ClassName
ClassName: Edit
Login
The login field has the same ClassName, but each one has a separate instance so as long as I create my parameters in the correct order, the needed info will be populated into the appropriate field.
ClassName: Edit
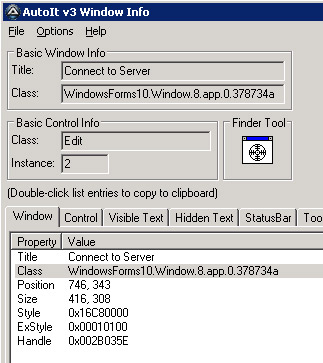
Password

And for the password...
ClassName: WindowsForms10.EDIT.app.0.378734a
By the way, in case you are not familiar with how the Window Info tool works. On the right side of the application window (as seen in the screenshot) is a window icon with a circle in it, called "Finder Tool".  What you do is left-click, hold and drag it over the field you want to identify. As you move the finder tool around you will notice it outlines the control below it. Just place it over the needed field until it's outlined and release the mouse button. Once you do that, let go of the mouse button and review the information it retrieved.
Connect button
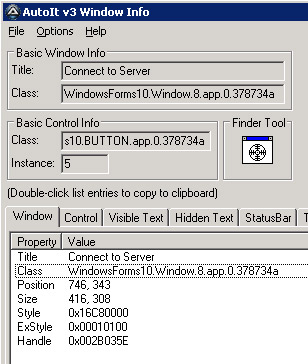
This application is a good example of how things are not always perfect. When I used the Finder Tool and dragged it over the "Connect" button I did not get a ClassName. However, when I dragged it over the "Remember password" checkbox, it gave me the name for the button. I'm sure there is a perfectly good reason for that.
ClassName: WindowsForms10.BUTTON.app.0.378734a
Let's see the GUI again but this time with the ClassName details.
Now that we have all the pieces to the puzzle, all we need to do is setup the SSO login form. As before let's look where these pieces fit on the SSO from.
If you compare the web and windows applications you will see that while they are very different in development complexity and functionality, the design format usually remains the same, so you should be able to apply this approach to most applications. While the SSO tools built into Symantec Workspace Corporate provide a plethora of attributes to use, you will find that you do not have to employ them all very often. Don't get discouraged if you're having trouble pinpointing the correct attribute or the correct order they are fired off in. Just keep trying until you find one that works. Sometimes the name of the attribute is all you need, sometimes you will need to identify text on a page, and sometimes the application is just not designed to be SSO friendly.
As it turns out, this particular application is only part SSO friendly. Instead of finding another one that works perfectly, and paint a pretty picture for you, I thought it would be a good idea to show you one of the possible scenarios when things just don't work. I spent hours trying to create the login failed page so that a bad login will close the application and produce an error that tells the user they entered the wrong credentials, but I was not able to identify any unique elements that would allow me to accomplish this. I could probably do this using the coordinates for the window, but since this particular application is usually only used by techies and we techies tend to be more forgiving when it comes to our requirements vs. end-users, so I figured no one would hate me for not adding that piece. Besides, the application still tells you that the wrong credentials were entered. The difference is that, you need to manually close the application and launch it again to get another shot at the logon. Of course this only applies to the initial login. Once you enter the correct credentials, they are saved and you're good to go.
Another important piece of information is that I built this specifically for a SQL credential logon. If you're using Windows authentication you don't really need an SSO since SQL takes care of that with AD integration, as long as you have the appropriate rights.
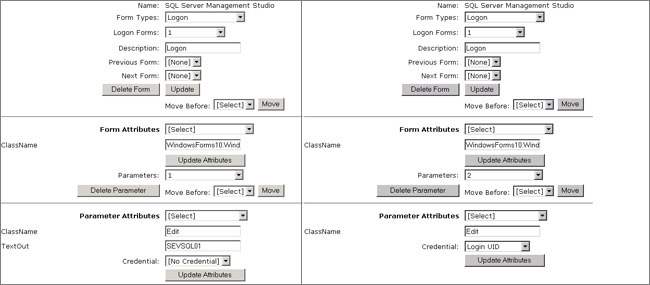

The above is the same logon form containing 4 parameter attributes. One for the server name field, one for user name, password and one to click the connect button. Take a look at the fourth image with the button parameter. You can see the logical approach to the automation. You are in essence creating an action that will perform what a user would do manually and this is clearly evident here where I identify the button and in the same parameter add an instruction to click the button using, "WM_LBUTTONDOWN". The first screenshot has a clearly evident action as well, instructing the SSO to input some text into a field identified by a ClassName.
I have included the .xml for this SSO. You will need to create a new application, save it, and click the import button to browse to and import the SSO form.
Return to Part 1: Single Sign-On: The Big Picture, Part 1