Now we've got a managed computer in the console, in this chapter we will focus on how we can image it using Altiris' built-in PXE Server. We'll begin by first covering how the PXE protocol works, and then move on to highlight how the Deployment Server, the agents, and the PXE services coordinate to form a seamless imaging framework. As a lot of attention in this chapter is paid to the nuts and bolts of the PXE protocol, it will be hard going. Getting these fundamentals under your belt though will help enormously should you ever have to troubleshoot PXE issues in your environment.
Feel free though to skip the detailed PXE sections for now and move on to the imaging sections if you think its too much. You can always come back to read this later, when PXE is perhaps more familiar.
If you've been following these chapters through from the beginning, your Deployment Server will have already been prepared from the initial install with Linux automation. In what follows, we'll be using this automation flavour to examine PXE image upload/download scenarios.
Production and Automation Recap
If you recall, a core concept when imaging computers with Deployment Server is that we should consider two operating systems in the process. The first is the business operating system if you like, the one we install to enable to read email, surf the web and write documents as required by our employers. Altiris calls this the production OS, and for most of us this will be Windows XP, Windows Vista or Windows 7. The partition the production OS resides on we call the production partition, and usually this will be the first and only partition on the disk.
We took this terminology a step further in Chapter 2, by considering a second operating system -the one we use for imaging. This we called automation, and its purpose was to provide a secondary, lighter-weight OS through which we can deliver computer images via Deployment Server.
The PXE Boot Process
When we want to image a computer, we've already seen how Deployment Server offers a variety of ways through which we can load the automation imaging environment. For example we can use CDs, DVDs, USB Flash Drives and even embedded/hidden partitions. At the top of the automation delivery tree however lies the network boot option called PXE which stands for Preboot eXecution Environment (and is lovingly pronounced as 'pixie').
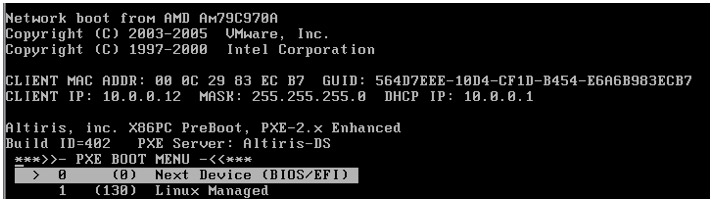
For those that aren't familiar at all with PXE booting, below is an illustration of what happens when you boot a computer off its network card in an Altiris environment;

What is happening here is that the computer is booting not from the harddisk, but from a hardcoded mini-operating system in the computer's firmware. First it tries to get an IP address so it can join the network, then it displays some network boot options in the form of the PXE Boot Menu. The first menu item is always to boot off the next device in the BIOS boot order, and following that will be the Altiris configured network boot options. In the above example, you can see only one network boot option listed -the one to boot into Altiris' Linux Managed automation environment.
The PXE environment you see above is part of Intel's 'Wired for Management Framework'. This was formulated over a decade ago to provide enterprise IT managers a standards based method by which they could network boot computers for OS installation and remediation. Although the PXE standard is also commonly referred to as a protocol, as we'll see it is really more of a collection of existing protocols (with some extensions) rather than being a completely new TCP/IP protocol itself. The PXE protocol can therefore be more accurately though of as the framework in which these more common protocols are extended and interact.
The protocols which underpin PXE are DHCP and TFTP. In addition to the internet standard's based DHCP implementation being critical, PXE also relies somewhat on an extension of DHCP. This means that in the end, PXE relies on three core networking components;
- DHCP Server
The Dynamic Host Configuration Protocol provides clients an automated mechanism by which they can receive an IP address allowing them to join an IP network
- A Proxy-DHCP Server
This server offers a subtle extension of the DHCP protocol which allows clients to be informed of their network boot options, and the location of the associated network boot files
- A TFTP/MTFTP Server
A Trivial File Transfer Protocol server (or its multicast equivalent) provides clients a simple mechanism by which they can download their network boot files
These three components are indeed critical -if you have problems with any one of these on your network your clients will fail any attempt to PXE boot. As you can probably gather, unravelling PXE in a single chapter isn't going to be easy, but we're going to give it a try anyway. And as DHCP is so fundamental to the PXE process, that is where we'll start.
The Dynamic Host Configuration Protocol (DHCP)
DHCP is a great protocol for IP networks -in fact, it's nothing short of brilliant. It primarily provides a mechanism for clients without an IP address to be provided one by a server on an IP network. To achieve this remarkable feat, the protocol states that clients without a current valid IP address should initially assume the IP address of 0.0.0.0 -which is a special IP address called the zero address. Next, the protocol states that in order for a DHCP server on the same LAN segment to hear the client's IP request, that all communications should be broadcast to the address 255.255.255.255. Such broadcast packets are delivered to every device on the LAN segment, a necessary evil considering neither the client nor server know where the other is. The ongoing client-server exchange which makes up the DHCP protocol is then executed as a series of such network broadcasts which culminate in the server confirming to the client the IP address it can use.
To illustrate how the protocol works in practice, below I detail the packet sequence from a typical client-server DHCP conversation,
- The DHCP_DISCOVER
The client assumes the zero address and broadcasts to the LAN segment a specially crafted UDP packet which details any IP configuration options it would like beyond a simple IP address (for example, such options include subnet mask, gateway, WINS server, DNS server, NTP server etc). A unique ID embedded in the packet ensures that both the client and server can keep track of their particular conversation in the midst of potentially hundreds of other client DHCP broadcasts.
- The DHCP_OFFER
On receiving the discover packet, the server hauls out an available IP address from its pool and forms with it a reply called the DHCP_OFFER. It adds to this offer any of the DHCP options it knows about as requested in the client's initial discover packet. It then broadcasts back to the network segment the reply called the DHCP_OFFER. To ensure the correct client interprets the offer, within the OFFER packet is embedded the unique ID the client used in the initial DISCOVER.
- The DHCP_REQUEST
On receiving the offer, the client has to make a decision as to whether it is acceptable. If it is, the client formally accepts the offer by broadcasting a DHCP_REQUEST packet. It all looks very legal at this point, and the client at this stage is essentially returning to the server it's offer packet. This is so that both parties a clear on exactly what offer has been considered acceptable. It is useful to note here that the client can potentially receive offers from multiple DHCP servers, and so broadcasting the acceptance of one offer also serves to inform the other servers that their particular offers have been rejected.
- The DHCP_ACK
The DHCP server receives the request packet and, should that offer still be valid, it confirms this to the client by broadcasting out an acknowledgement packet called the DHCP ACK. This marks the end of the conversation, and the client now assumes the offered IP address and IP configuration options as detailed in the offer.
To summarise then, clients may, using the DHCP protocol, directly ask of any DHCP server on the same LAN segment for an IP address and a set of IP configuration options using a UDP broadcast. The client may receive a number of offers from different servers to the initial broadcast. From these it will pick one which best suits it's wish-list of options as broadcasted in its discover packet. In order to let the 'winning' server know of its decision to accept a particular offer, it broadcasts back to the network a formal request for that server's offered IP address and options.
There are some points in the above which are noteworthy in relation to the PXE process we'll be covering shortly,
- The DHCP protocol provides a mechanism for a client without any prior knowledge of a network's configuration to obtain IP and configuration information for that network. The protocol also allows the client to locate network services through the protocol by allowing the DHCP server to store information on services such as WINS, DNS and NTP. This data is stored as DHCP options, a small sample of which are detailed in the following table;

- DHCP servers will try to respond as best they can to the clients option wish-list (called client's parameter request list) The DHCP server might not necessarily have all the answers to the requested network parameters, but will respond with any is has configured. For example, the server might have option entries configured for DNS servers, but perhaps not WINS.
- DHCP clients are free to consider replies from multiple DHCP servers, but may only accept one of those replies.
With that little tutorial in DHCP behind us, we're better prepared to take that next step and look at network booting and PXE.
The PXE Protocol
One of the problems which Intel had to solve when developing the PXE protocol was how to provide clients with critical network boot information such as,
- PXE Discovery Data
The client needs to be informed of how it should contact the PXE Server. For example should it be discovered by multicast or broadcast, or should it be contacted directly (unicast)
- PXE Boot Server location data
The client needs to be informed of course of where the PXE boot servers are located on the network.
- A Boot Menu
This menu informs the client of its network boot options
- Boot Menu Timeout
So that the client doesn't get stuck indefinently at the boot menu, a timeout can be configured.
- Boot Prompt
Some text to display during the boot menu timeout
So, what Intel needed was to find a mechanism by which they could transfer all this data to a client before it got its IP address on the network. Hmm... this must have seemed rather familiar, and the answer obvious -use DHCP. However, there was a small hurdle -DHCP options simply did not exist for these network configuration options. To directly house this data, they'd have to be sneaky, and amazingly the DHCP standard allows for that very scenario. Within DHCP there is a particular option for 'Vendor Specific Information'. This is a variable length option field, and allows clients requiring specific third-party configuration data to be completely provisioned by DHCP.
So, the decision was made -Intel would piggyback on the DHCP protocol and embed in this vendor field (the ubiquitous option 43) all the PXE configuration data the clients would need. To make all this work the PXE standard needed to stipulate the following,
In order for clients to get IP addresses from DHCP Servers, and PXE information from a PXE server, a PXE client would have to be able to accept two DHCP_OFFER packets. This would allow an IP DHCP_OFFER from a DHCP server to be accepted, in addition to the PXE information embedded in the PXE Servers DHCP_OFFER
- The PXE Server should only respond to DHCP_DISCOVERS from PXE clients. This was implemented having the client set the 'vendor class identifier' field (option 60) in its DHCP_DISCOVER to PXEClient. Should a PXE Server see such a discover packet, it understands it can only originate from a PXE Client and therefore can safely form a response. DHCP servers in standard configurations will not have this option configured, and so will simply ignore it.
As a result of PXE servers essentially being DHCP servers at a protocol level, it is important for these initial DHCP_DISCOVER packets to reach not only your site's DHCP servers but the Deployment Servers too (or Altiris PXE servers if you've separated out the PXE services onto a separate box). From a networking point of view then, you need to treat your Altiris PXE servers as if they were DHCP servers and configure your DHCP Relays/IP Helpers accordingly. If you do not, your PXE Clients will error out as they can only get half the information they need to perform a successful PXE boot,

Figure 17: Example of a client failing to PXE boot because although it can get an IP address from a DHCP server, it is not getting any responses to its PXE information request.
The Client-Server breakdown of PXE Conversation
In order to illustrate the how PXE implements both DHCP and TFTP to facilitate client booting from the network, let's now take a look at the anatomy of a typical PXE boot process focusing on the protocols used. Specifically, what follows is for the case of a client PXE booting off an Deployment Server which is separate from the organisation's DHCP server. To make things simpler, PXE is configured to use TFTP (rather than multicast TFTP -MTFTP).
So, starting at the beginning, for the PXE client to boot onto the network, it needs to get an IP address and this marks the start of the DHCP exchange,

With IP and PXE boot information now in hand, the PXE client can now download the Network Bootstrap Program (the Altiris BStrap.0 file) from the server. "What??" I hear you cry? "BStrap.0 -what on earth is this??". Well, one thing I haven't pointed out is that PXE has been through a few versions, and as such older PXE firmware needs a bit of help to PXE boot in the modern PXE 2.1 world. This little bootstrap file is downloaded just to add some extra support to the PXE firmware. This gives legacy (pre v2) PXE clients the necessary code they need to complete their bootserver discovery. Modern clients don't actually need this, but they seem to get it anyway.

Now, the client confirms a successful TFTP download to the AltirisProxy DHCP service
,
This is now the point where user can see he boot menu,

And finally, we use TFTP again to download the automation files, which it bootstraps into when downloaded.

With that anatomy breakdown, you should hopefully have a bit more grounding in what it takes for a client to PXE boot. If you've been following these notes as a course, your setup will be a client and server on the same subnet, and you'll be PXE booting a computer already known to Deployment Server database. This will therefore give the following screen,

In terms of our protocol steps above, here we can see that the client has been able to,
- Get an IP address from the DHCP server
- Get a response from the PXE server with boot menu information
- Download by TFTP the BStrap.0 boot file from Altiris-DS.
The default menu timeout is 3 seconds, and should you press F8 at this stage, you will be presented the full list of PXE menu options as detailed in the proxy-dhcp offer. In our particular case, pressing F8 reveals the screen below as we have only currently configured Linux as a menu item,
What makes Altiris special is that when we create imaging tasks we have the ability to specify within that task the PXE menu option which should be automatically loaded. By doing this, when such imaging jobs are scheduled and the client PXE boots, the client will immediately execute the menu option specified without waiting for user interaction. It is this interaction between Deployment Server and it's PXE Services which makes Altiris such a powerful imaging engine.
Uploading an Image
In this section we're going to look at how we take an image of a computer using Linux automation loaded through the PXE boot mechanism. The only automation OS we've installed up to this point is Linux, and this not accidental - Linux automation and PXE are in fact a great combination.
Linux's prime advantage for PXE delivery is that it is lightweight and therefore great for deploying over the network. Further to this it has both 32bit and 64bit support, and a decent enough driver base to allow common platforms to be imaged without tweaking the Linux environment. Let's start now by creating an image of an XP computer.
- Ensure the computer you wish to image has its BIOS configured to boot off its NIC first
- Right-click the computer in the console (XP-Client if following these notes from the course) and select "Quick Disk Image"
- Confirm the job schedule
Your XP machine should in a matter of seconds begin to shutdown in preparation for a reboot. Just before the reboot though the AClient does couple of things,
- It disabled Windows networking
- It striped the AClient of its identity
These rather brutal actions by the AClient are so that when the machine boots into automation for imaging, the resulting image is suitable for redeploying to other computers without generating conflicts on the network.
Let's now look at the broad strokes of the image upload process using Figure 18 below.

Figure 18: Depiction of a PXE driven image upload
The first part shows the actual PXE boot -the computer booting using the boot code embedded in the PXE firmware extension in the BIOS. On loading the PXE code, the PXE client gets an IP address from a DHCP server and awaits a response from a PXE server. The Altiris PXE Server responds, and in this case directs the client to boot directly into the Linux automation image residing on the PXE server. The PXE client duly downloads the image by TFTP and then bootstraps into it.
The second part shows the client once booted into Linux automation -the Linux agent has loaded and imaging has begun. The blue strip with the progress bar belongs to the Altiris RapidDeploy imaging program. It's imaging in create mode, and the progress bar indicates its about 9% uploaded. Those from a Symantec/Norton background can consider RapidDeploy as the Altiris equivalent to Ghost.
The third part shows the ubiquitous Altiris 'Reconfiguring' window which appears after the image upload has completed and the computer is booted back into windows. This reconfiguration is essential to restore the network stack and the computer's identity. And because the network stack is disabled, all the information to restore the AClient's settings must already be present on the system. These settings are stored in a file called AClient.cfg at the root of the system drive.
Once the AClient and Windows settings are restored, your machine is usable once again (after a reboot, naturally).
The Image File
If you browse the images folder on the express share, note that the quick disk image task has created an image file using the computer's name in the root of the windows folder (if it were a Linux machine, it would have filed it in the Linux folder). If you ever do find yourself frequently using the quick disk image console function, get into the habit of filing these files away to prevent image clutter.
As the images are divided into 2GB chunks you might find the image file has several parts. The first 2GB segment can be found in the .img file, the second in the .002 file, the third in.003 etc...
Process Flow for Image Upload thru PXE
Having covered the broad strokes of uploading an image using PXE, let's now look at the details, step-by-step, using the graphic in Figure 19 below to help illustrate the process flow. The graphic depicts 8 imaging steps, with a timeline (the Linux penguin beside the timeline is just a reminder that in our scenario the automation environment is Linux).
Let's now take a look at each step in the imaging process, beginning from the moment you dropped the image upload task onto the client the Deployment Solution console.

Figure 19: The Eight steps when performing an image upload
- Shutdown in preparation for imaging
The AClient in the Windows production environment receives the task to reboot the computer for imaging. The AClient saves the computer's identity to the file C:\AClient.cfg before stripping out the computers identity and networking information. The AClient then sanitises itself and then issues a command to the OS to reboot the system.
- Restart with PXE boot
The computer then reboots. Assuming the BIOS is configured to boot off the NIC before the hard disk, the computer should bootstrap into the NICs PXE firmware. On start-up, the PXE Client will obtain an IP address and attempt to locate a PXE Server.
When the PXE client contacts the Altiris PXE Server, it responds by offering the PXE Client just one boot option only -this being to download Linux automation. The PXE client downloads and bootstraps into the offered Linux automation image.
- Image Upload
When Linux loads, the Linux deployment solution agent (ADLAgent) starts and establishes contact with the Deployment Server. This is quite quick -about half a minute. The server then sends to the agent the imaging task command-line which contains the image upload path on the server.
The RapidDeploy imaging program then loads, and begins uploading the client's disk image to the server using a mapped drive. In the graphic, the imaging time is shown as being just over 6 minutes.
- Server issues Automation re-boot
Once the image upload is complete, the agent is issued by DS reboot task forcing the client to reboot.
- Restart with PXE Boot
On reboot into the PXE firmware, the Altiris PXE server offers the client as its only option the 'Local Boot' menu item. This is because there is no more work scheduled for execution in automation. The bootstrap code from the master boot record is loaded, and XP loads from the hard disk.
- Windows Reconfigures
As Windows starts up, the services start in their usual order until finally the AClient service is loaded. On loading, it realises it is in a sanitised state, and therefore enters the 'Reconfiguration' phase where it loads its client networking and identity restore information from C:\AClient.cfg.
Once the computer's identity has been restored, the agent initiates the final reboot of the XP Client.
Note: it may take several minutes for the reconfiguration window to appear as the state of the network stack delays the startup of the Windows services which are required to fire-up before the third-party AClient service can start. In the timeline shown in the above graphic, it took about 4 minutes from the boot Windows started to boot until the configuration was complete.
- The Final PXE boot
When the PXE firmware is again bootstrapped, the Altiris PXE server again provides the client the 'Local Boot' option as the only menu item. Again, this is because there is no work to do in automation. The server is now awaiting the AClient to report back that all is well in the production OS.
The Master Boot Sector on the hard disk is once again bootstrapped into, and XP begins to load.
- Production OS now Ready
Ten minutes after the whole process began, Windows has finally booted back up with a fully functioning network stack. At this point you can safely login to a fully usable system. The AClient re-opens communication once again to the server.
Deploying an Image
Now that we've saved an image, let's see if we can deploy it. For this we need to create a task to distribute our image.
- In the console jobs pane, right-click and create a new Job called "Deploy XPSP3 Image"
- Add a Distribute Disk Image task
- Enter ".\Images\Windows\XP-Client.img" in the image file path, where XP-Client is the name of the image we previously uploaded. Click 'Next'
- On the Return Codes screen, click 'Finish'
- Drag this job onto your computer, and confirm the schedule to execute it immediately
Behind the scenes, the image download process is very similar to the image upload. There are three differences worth noting,
- As the current OS is about to be wiped by the image download, there is no need to sanitize the AClient, or strip out the computers networking before the reboot.
- Once the new image has been downloaded to the client, the AClient configuration file, C:\AClient.cfg, needs to be refreshed with the target computers AClient and networking data from the SQL database. This ensures that once the OS boots up, it can claim the correct identity on the network.
To explain, consider this: the image being deployed could actually be intended for delivery on a lab of twenty computers. Each computer before imaging had a unique computer name and IP address. This unique information (which is stored in the eXpress database) must be restored to each machine after they've been imaged to ensure conflicts don't occur once the networking stack has been restored.
- Image downloads are faster than uploads. A major factor is the compression/decompression algorithms used. The decompression algorithm required to inflate the images as files on to the hard disk is faster than the algorithm used to compress those same files into an image*.
For completeness, the image download process is depicted below in Figure 20, and then each stage described in detail.
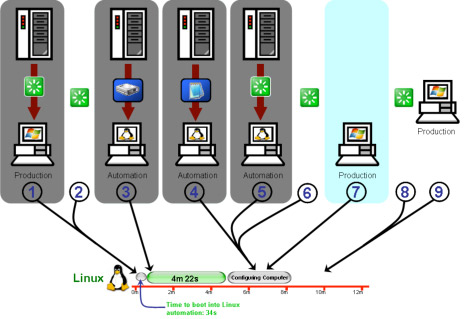
Figure 20: Nine steps when performing an image download
- Reboot
The AClient in the Windows production environment receives the task to reboot the computer, which it does without delay.
- Restart with PXE boot
The computer then reboots. Assuming the BIOS is configured to boot off the NIC before the hard disk, the computer should bootstrap into the NICs PXE firmware. On start-up, the PXE Client will obtain an IP address and attempt to locate a PXE Server.
When the PXE client contacts the Altiris PXE Server, it responds by offering the PXE Client just one boot option only -this being to download Linux automation. The PXE client downloads and bootstraps into the offered Linux automation image.
- Image Download
When Linux loads, the Linux deployment agent (ADLAgent) starts and establishes contact with the Deployment Server. This is quite quick -about half a minute. The server then sends to the agent the imaging task command-line which contains the image location.
- AClient.cfg Download
Once RapidDeploy has finished the image download (4 mins 22 seconds in the graphic), the AClient configuration file is downloaded to the C:\ drive to drive the AClient reconfiguration phase.
- Server issues Automation re-boot
Once the image upload is complete, the agent is issued by DS reboot task forcing the client to reboot.
- Restart with PXE Boot
On reboot into the PXE firmware, the Altiris PXE server offers the client as its only option the 'Local Boot' menu item. This is because there is no more work scheduled for execution in automation. The bootstrap code from the master boot record is loaded, and XP loads from the hard disk.
- Windows Reconfigures
As Windows starts up, the services start in their usual order until finally the AClient service is loaded. On loading, it realises it is in a sanitised state, and therefore enters the 'Reconfiguration' phase where it loads its client networking and identity restore information from C:\AClient.cfg.
Once the computer's identity has been restored, the agent initiates the final reboot of the XP Client. Again, there will be several minutes delay as the computer goes through the reconfiguration process.
- The Final PXE boot
When the PXE firmware is again bootstrapped, the Altiris PXE server again provides the client the 'Local Boot' option as the only menu item. Again, this is because there is no work to do in automation. The server is now awaiting the AClient to report back that all is well in the production OS.
The Master Boot Sector on the hard disk is once again bootstrapped into, and XP begins to load.
- Production OS now Ready
Ten minutes after the whole process began, Windows has finally booted back up with a fully functioning network stack. At this point you can safely login to a fully usable system. The AClient re-opens communication once again to the server.
And that is pretty much it. You've just had a very in-depth introduction to the nuts and bolts of PXE booting, and how Altiris images computers. At this point, I can only recommend a coffee and icecream. Followed by a good night's sleep.
Firewalls
On networks with firewalls, in order to get PXE booting up and running you'll need to present your networks team with a list of port openings to get the traffic moving. This list below will help you get started. These ports need to be able to accept packets from all your organisation subnets where PXE boot functionality is expected.
| Port |
Description |
| UDP 67 |
ProxyDHCP response giving PXE Boot menu, and location of BStrap.0 file |
| UDP 69 |
TFTP (For initial boot file (BStrap.0) and used again later for downloading the PXE Automation image) |
| UDP 4011 |
PXE Boot Server response giving download details for selected menu option |
| UDP 1759 |
MTFTP (For initial boot file (BStrap.0) and used again later for downloading the PXE Automation image if applicable) |
Troubleshooting
On a small network with clients and servers all existing on the same subnet, PXE booting is rarely a problem in my experience. However problems can occur, and generally PXE will report an error in such instances. Below is a table of common errors and descriptions,
| Error |
Description |
| PXE-E11: ARP timeout |
The PXE Client is not receiving replies to its ARP requests. This is normally a router configuration issue and you should take packet traces and talk to your network team. |
| PXE-E32: TFTP open timeout |
This error means you are nearly there. The PXE client has recieved valid responses from both the DHCP server, and PXE Server. It however timed out when trying to download the boot file from the TFTP server. Check the TFTP services are running and that you don't have firewalls blocking this UDP 69 incoming to the PXE server. If this error appears to be hardware specific, a BIOS bug might be the cause. In this case, consider upgrading/downgrading the computer's BIOS.
If this error occurs after trying a long delay with a "MTFTP..... " prompt its possible that the server is configured to try MTFTP first and this is blocked. Check firewalls aren't blocking UDP 1759 incoming to the PXE server. |
| PXE-E51: No DHCP or proxyDHCP offers were received |
The PXE client could not get a response from either a DHCP server, or a PXE server. Check that DHCP is working on the subnet you are working on, and that IP helpers have been configured if your client is on a network distinct from the DHCP server and/or PXE server. Might be worth also checking firewalls. |
| PXE-E52: proxyDHCP offers were receive |
The PXE server responded, but a DHCP server did not. This is not a common error as in most environments DHCP is provided by the network group, or delivered from a separate server. Generally happens on new computers on networks where MAC addresses have to be registered with the DHCP team. |
| PXE-E53: No boot filename received |
The DHCP Server responded, but the PXE server did not. Check services on PXE server, and worth also checking firewalls. Can also occur if PXE & DHCP are cohosted, but then the PXE services are moved off-box. Check that the DHCP server still does not have option 60 set as 'PXEClient' (which signifies DHCP and PXE stil co-hosted) |
| PXE-E55: proxyDHCP service did not reply to request on port 4011 |
The PXE Client could not connect to the PXE server on UDP 4011. Check firewalls. |
| PXE-E74: Bad or missing PXE menu and/or prompt informatio |
This is rare, and can be bad. It could be that you have too many menu items configured on the PXE server, so try deleting the most recent one, and/or shortening configuration names. There is about a 200 character limit for all the menu names, but not all BIOS react the same to overflows here, and nor to they implement the same byte limit for menus. If it looks like all clients are affected, the chances are the PXE service is corrupted somehow, so uninstalling and reinstalling the PXE server component might help. |
Further Reading
- Intel's Preboot Execution Environment Specification (v2.1)
- The DHCP Protocol : RFC2131
- A more complete list of PXE errors from HP's Knoweldge Base -PXE Error Codes.
* Whilst this behaviour is seen for WinPE and Linux automation, with DOS the reverse is often the case. Downloads tend to be slower because the default TCP buffer size in DOS much smaller. This can be altered though protocol.ini -change the default tcpwindowsize variable from 2900 to say 8700 and drop NBSessions to 2.
Return to Index
Read Part 12: Deployment Server 6.9 - A Quick-Start Course, Part 12: Configuring PXE for DOS