Many Corporate environments have a security setup on the local network. One of the frequently used deployment scenarios includes Proxy Server on the way to the internet to control, or monitor, outbound traffic.
Traffic secured by Secure Access Cloud has no essential reason to pass through SWGs or Proxy Servers, since the auditing done by Secure Access Cloud itself. Consequently, passing this data through the organizational proxy will not gain additional security value but will increase the resource requirements on the proxy server itself.
An additional reason to avoid passing Secure Access Cloud traffic through a Proxy is certificate-based trust. In order to keep the commination secured the SWGs or Proxy Servers will have to be authenticated with their own certificate. This will prevent Secure Access Cloud to authenticate connectors placed behind the Proxy with its unique certificate to guarantee the connector identification.
Getting a more detailed look on a topology, it would be recommended to allow connectors a direct outbound connection to Secure Access Cloud Front End URLs specified below by defining relevant Firewall rules:
Note: In some cases, the IP addresses of the Secure Access Cloud may change, hence its recommended to use URLs for the firewall rules.

However, due to the different constraints & considerations (such as the inability to configure Firewall exclusions), some organizations prefer to keep the Proxy Server for the whole organization’s traffic.
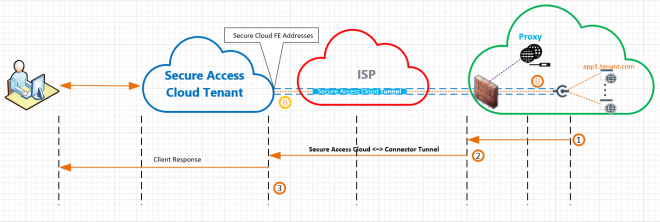
The example in the picture below describes the scenario where one application (app1.tenant.com) secured by Secure Access Cloud & Firewall is assumed to provide connectivity from the Proxy Server only:

Symantec Secure Access Cloud fully supports this topology, by setting Proxy parameters as part of the Site Provisioning process.
Configuration steps for Proxy Use Case
Proxy Server configurations placed on a Site level and applied to all Site connectors once saved.
- As a first step switch the “Use a Proxy Server for outbound connection” toggle button to “On” state
- Proxy Server URI should be set
- Set Proxy username and password (if needed)

Note 1:
The Proxy configuration support requires 2.6.3 connector version and up. Please upgrade your connector appropriately to allow the functionality.
Note 2:
Proxy configuration takes effect as part of connectors provisioning process only. Such in case any Proxy configuration (including on/off) need to be changed, you will be asked to re-deploy connectors, while you can keep the other Site configurations
When you have connectors, which weren’t deployed with the new configuration, you will have the following indicative warning:
