In Servicedesk, as the need arises to add and display custom data fields in the Process View (which may be necessary for either an incident or a problem), there have been questions around how much potential flexibility exists to do just that. Fortunately, the Workflow basis upon which Servicedesk is founded can be used to add new custom data types and then modify and report on them. These data types might be items like Cost Center, Cost Code, and other business and process-relevant information. This document will show how you can add custom data types to the existing SD.Data set, and then how display them, and change them using an existing Smart Task.
For purposes of our example we will add two incident-based data types, Cost Center and Cost Code. To do so, we must first create the data types. This is well documented in the Servicedesk Customization Guide, found here, starting on page 46. A review of the process will be highlighted in the steps below:
Creating the Data Types
- Open Workflow Designer, and open the SD.Data integration library, by double-clicking on it. If it does not appear, then select File>Open Project. This should open up the folder structure to the Workflow Projects folder, where you can highlight the SD.Data.Integration.Package file, and click Open.

- Select OK to unpackage the project.
- You will then see the Integration Library Screen
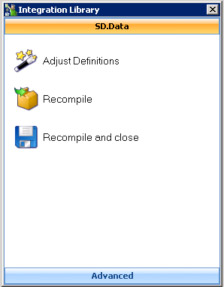
- Select the blue Advanced Option at the bottom
- Now select Edit Advanced Settings, then choose Edit Included Assemblies
- You will see an Included Assembly Path. Click the ellipsis to the right as shown below
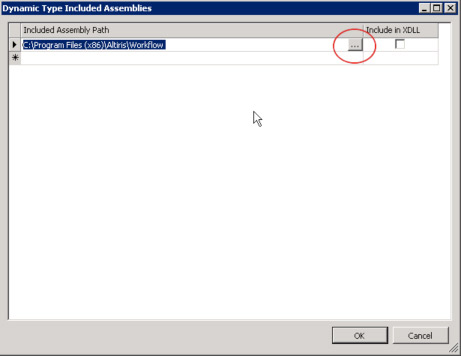
- Browse to the c:\Program Files (x86)\Altiris\Workflow Designer\Workflow Projects\SD.Data.Integration\libs folder and select the SD.DatatypesCore.dll file. Click Open.
- Click OK, then OK to exit the Dynamic Type Editor Form
- Click on SD.Data, then Adjust Definitions
- You will now see the Generators Management Screen as shown below
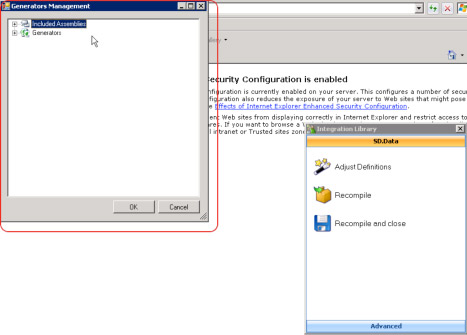
- Expand the Generators option and double-click on SD.Data. The Generate Components wizard appears.

- Highlight ServicedeskIncident and Click Add Property
- The Edit Property screen appears. as shown below:
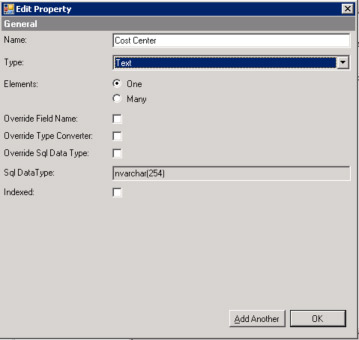
- Create the Cost_Center Property with a type of Text. Make sure you use the underscore _ in the title. Leave the rest of the values at default.
- Click Add Another
- Create the Cost_ Code Property and change its type to number (Integer). Make sure that you have no spaces in the name of the data type. Click OK
- Click Next
- We do not need to add any indices, so click Next.
- This will reside in the same namespace, so click Next.
- Click Finish
- Then click OK on the Generators Management Screen,
- Then click Recompile and close. This will generator the data types as required. Our next Step is to make them available for use in Process Manager and on the forms.
Making the Data types Available to Process Manager
We next need to make the data types available in Process Manager. That means we need to add them to the Servicedesk Incident Management Profile. To do so:
- Open Process Manager and Login as Admin@logicbase.com
- Click the Admin>Data>Lists/Profiles
- You will now see the Profile Definitions Screen, as shown below. Click the lightning bolt to the far right of Incident Management, and then click Edit Profile Definition.
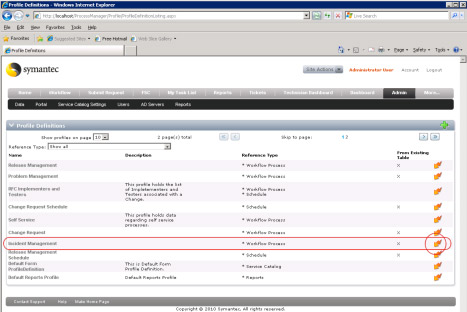
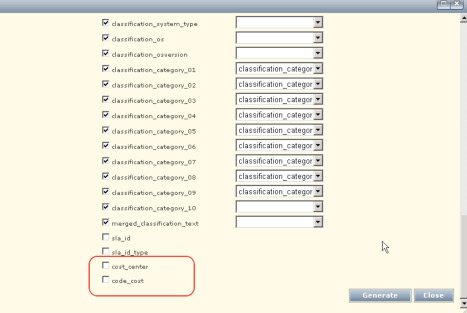
- Scroll down thru the list of fields until you see cost_center and code_cost and place check marks next to them and click Generate.
- They will now be available to be used in Process View pages.
Adding Custom Values to the Advanced Incident Form
This is well documented in the Servicedesk Customization Guide, found here, starting on page 47. Since this is a reasonably simple procedure, the focus will now move to adding the new data fields to the Incident Process View in Process Manager.
Adding Custom Data Fields to the Incident Process View
Once the Incident Profile has been updated to include the new data types, we can now modify the Incident Process View to display entered values. Please note that to enter the values upon initial incident creation; it is best practice to add the fields to the Incident creation forms, as documented in the section above. But once a part of the Process view, it can be both added and modified from the Reclassify Smart Task, or a Smart Task of your own creation.
Here are the steps to add the custom data types to the Incident Process view page:
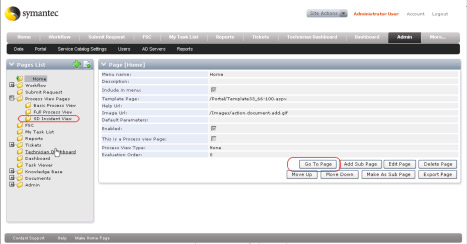
- Open Process Manager and click on Admin>Portal>ManagePages
- Under Pages List on the left, expand the Process View Pages, and Highlight the SD Incident View page, and then, on the right, click the Go To Page button, shown below.
- You then see the basic Process View screen, inset into the Process Manager. Click the Site Actions drop down menu as shown below

- Now click Modify Page. The same page will flash and it will look as though you have done nothing. Click the Site Actions drop down. You should notice that the menu options have changed slightly. Choose the Edit Page option, as shown below.
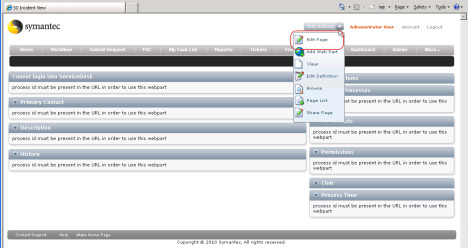
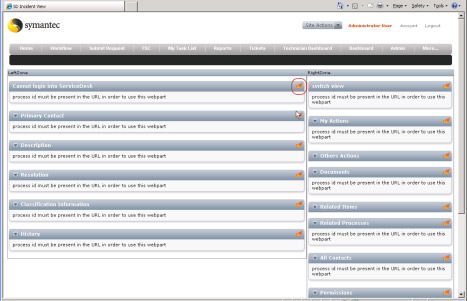
- Now you will be redirected to a screen that looks similar to the one below. The key object to look for is the lightning bolt icons on the right sides of each menu area. Since for our example we want to add the Cost Code and Cost Center customer data type fields to the top Process View area of the form, click the Lightning bolt next to the "Cannot login into ServiceDesk" menu, as shown below., then click Edit.
- The Process Info Editor Zone displays. Make sure that, under Available Profiles, that Incident Management is checked. Scroll down further and review the Edit Process Setting Section. Placing a check in the "Allow Edit Process" box will expand this area to allow some of the process view options to be edited when in the Incident View mode. Simply place a check in the box next to the items that you would like to be able to edit. However, our real goal is to be able to add the custom data type fields we created. Scroll down until you see the Columns area.
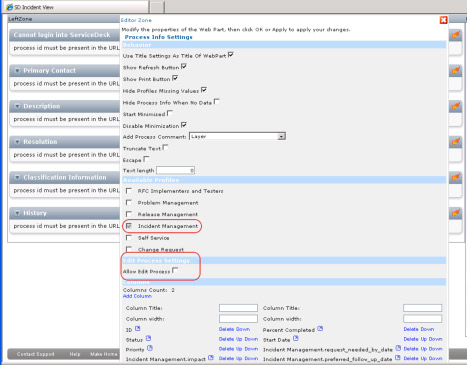
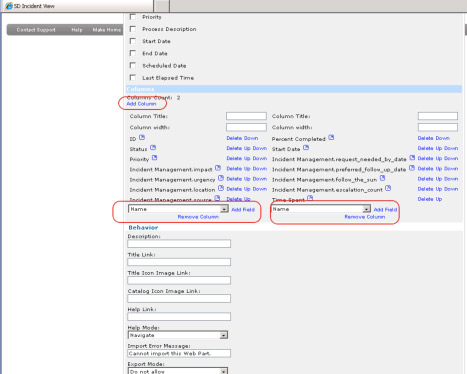
- Here we can modify the appearance of the top Process View section when reviewing an existing incident. You can add columns, and then add the fields (data types) to columns that you would like to show by selecting the field in the drop down. , and then clicking Add Field. On the left column, click the drop down and search for Incident Management.Cost_center. Select that and click Add Field. When that is complete and shows, do the same for the right column, adding the Incident Management.Cost_code field. Then Scroll down and click OK
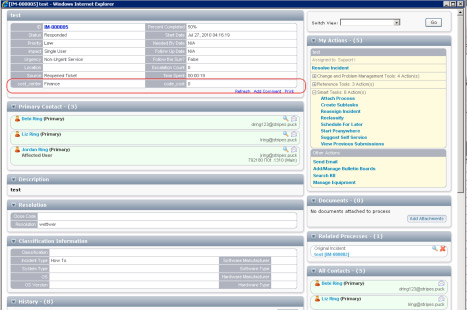
- Now click on My Task List, and under the Tasks Viewer option, Expand the SD.IncidentManagement processes and click on any of the tasks listed. You should be able to see the two new fields shown in the screen shot below.
Changing the Customized Values for Each Incident
Now that we have the value locations visible on the form, and we know how to initially populate the data, what happens if we want to change the values? First of all, whenever we open an existing incident in the portal, we should realize that we are looking at a Process View, not an incident editor. There are tools for making some modifications, but this window that opens is primarily looking at a view. All of the activity to make changes should generally be done using the My Actions menu area.
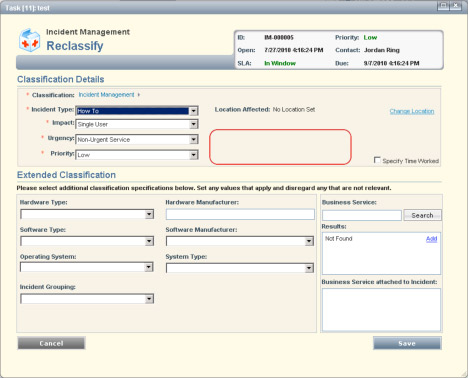
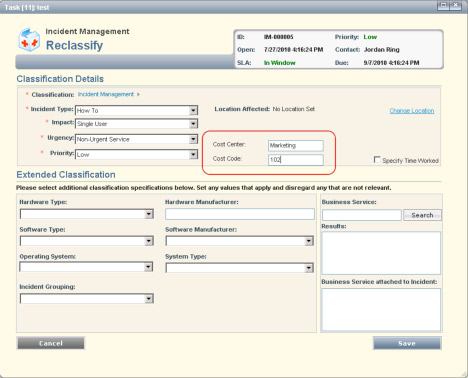
In the My Actions area, there is a Smart Task named Reclassify. This brings up a screen as shown below, allowing you to change the classification details, and extended classification of the incident. It is important to use this option for these kinds of changes, as it assures that all of the changes made are added correctly to the necessary database tables and to maintain association with the correct processes.
We are going to add the ability to modify the area encircled in red to add our two new custom fields so that they can be modified using this Smart Task.
Modifying the Reclassify Smart Task
To modify the Reclassify Smart Task, you will need to open the SD.IncidentManagement workflow project inside of Workflow Designer. In similar fashion to the way we edited the SD.Data integration library, we will open the SD.IncidentManagement workflow
- Open Workflow Designer or return to your open Workflow Designer session. You can then either expand the Type: Workflow options and find the SD.IncidentManagement workflow there or you can use File>Open Project , and browse to the folder structure in the ...\Workflow Projects folder, where the SD.IncidentManagement workflow resides, highlight it and click Open.
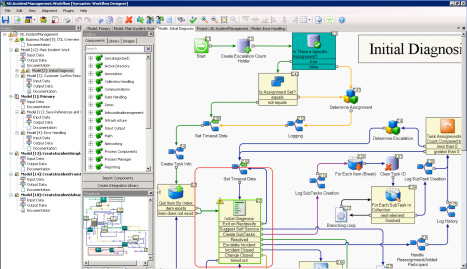
- Once open, on the left side, in the Project tree structure, find the "Initial Diagnosis" model, and double-click on it. You will then see a screen similar to the one below. Double click on the Initial Diagnosis Dialog Workflow.
- You will then see the component editor. Highlight the Interaction Setup tab and, under the Dialog Models listing, scroll down until you see the Reclassify option. Highlight it and click Edit.
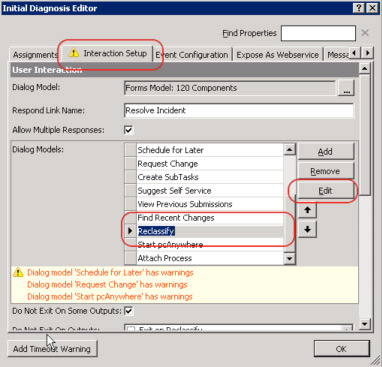
- Next, click the ellipsis next to the Dialog Model option.
- This opens the embedded decision forms model for the Reclassify option. All of the sub-models and other components make up the necessary items to reclassify an incident, and assure that all relevant associations are updated during this process. We need to find the form that we saw at the top of this section and add the fields. Click the Zoom Out 10% icon a few times and scroll to the right until you see the Edit Impact/Urgency/Priority form as shown below. Double-click on it to edit it.
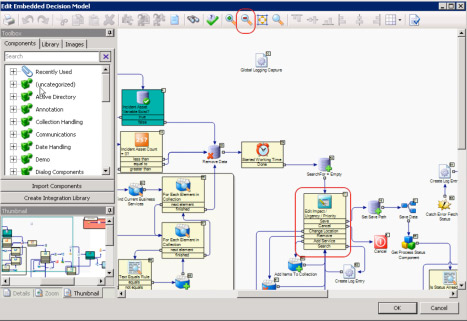
- You will now see the Reclassify form, in the Web Form Editor. We now want to add the variables for our custom data types so we can edit them. In the Variables section, expand the Incident category and find the two custom options created, cost_center and cost_code. Check both box and then drag them to the correct spot on the form. The Build Wizard opens and you will work thru building the form entries for these variables.
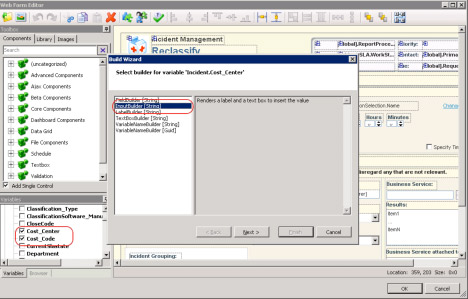
- Highlight the InputBuilder [String]. Before selecting Next, note in the header that you are building the entry point for Incident.Cost_Center. You will do both Cost Center and Cost Code in this process. Click Next, then highlight InputBuilder [Decimal] for the Incident.cost_code variable, then click Next. Click Optional under Save, and click Finish. You should see your form look similar to this one below.
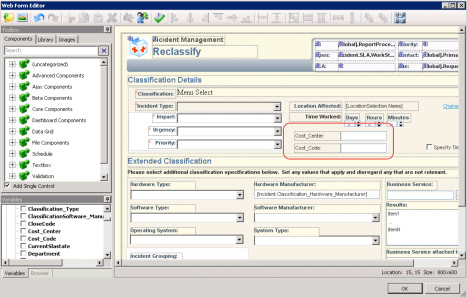
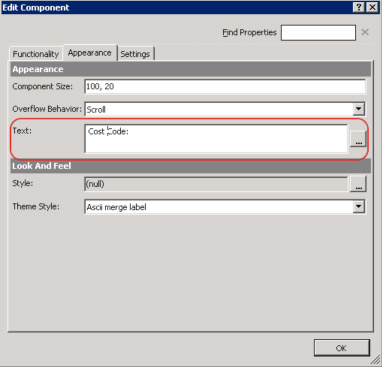
- You will note that the titles have the name of the data types. We would like this to be a bit more visibly user friendly by removing the underscores. Simply double-click on each one and modify the Text to reflect the correct title and click OK.
- If the form looks correct, click OK, then OK to close the embedded decision model, then OK, and then OK to close the Initial diagnosis editor.
- Now we need to republish the project back out to the web server to use the form changes. In the left hand view - highlight the SD.IncidentManagement header, right-click on it, and the select Publish Project>Publish Application to Server
- The Publish Project Dialog appears and provides the opportunity to decide which Web servers to publish the application to. Since the test environment here only has one server group and serve, assure that both boxes are checked as shown below, and click OK.

- The next screen to appear is the Open Deployed Project Screen. Since this is a Workflow project it will simply open the revised SD.IncidentManagement webservice. You can click either Yes or No here. Clicking yes will force the load of the new webservice and that is what we will do. Click Yes. Once the Webservice webpage opens, it is good to see what operations are part of publishing the webservice. Close this page when your review is complete.
- The last dialog to open is the Deployment dialog, and this just wants to know whether or not you want this service deployed to your Notification Server or Symantec Management Platform server as a Service Workflow Item. You do not, so select No. This completes the changes necessary to edit the values. Let's open up an Incident Process View screen in the next section and test it.
Making Sure We Can Edit the Custom Values
Now that we have made the changes, let's test what we have done. We will open Process Manager and open an existing incident, check to see if the fields are present, run the Reclassify Smart Task, and change the values. We will then open up the database and query the table to verify that our data is present.
- Open a command Prompt and type IISRESET, and press Enter
- Restart the Service Extensions for Workflow.
- Open Process Manager and open any existing incident
- Verify that the custom fields show, as shown below.
- Now, in the right menu, under My Actions>Smart Tasks there is an option, Reclassify. Select this choice.
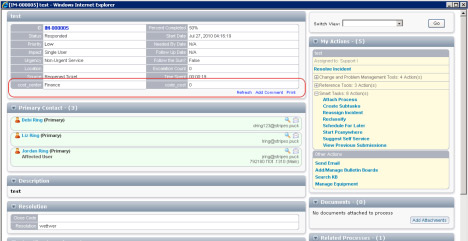
- You are next presented with the Reclassify window, in which are the two new menu options you have just entered, as shown below. Enter "Marketing" in the Cost Center field, and "102" in the Cost Code field and then click Save.
- It might take a minute or two for the Incident form to read the database and capture the updates, but once completed you will be able to reload and review your form and have the changes appear as shown below.
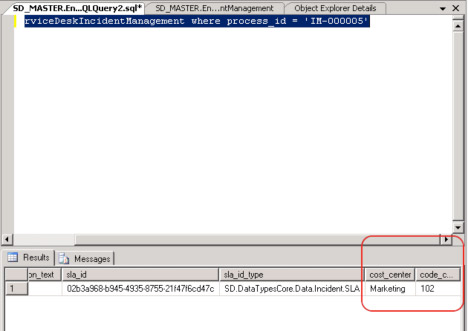
- And lastly, to verify that the database has correctly received the update, open the Ensemble database on your SQL server. Open a query window and enter the following SQL query:
Select * from ServicedeskIncidentManagement where process_id = ‘enter the process ID of the incident'
and press Enter. You will see the record appear. Scroll to the end and you can see the updates added, as shown below.
Conclusion
As you have now seen, adding and modifying custom data types is not very difficult. This will make it easier to provide you with the ability to add data to your forms and modify them, and then to report on incidents with that related data.