If you recall from Part 2, for DS to manage a computer we need to install a little program on it called an agent. This program establishes contact with the server, uploads an inventory and thereafter keeps an open channel to await requests from the server.
Altiris allows some flexibility as to how you can install the Deployment Server agent on a client computer. We can perform a manual installation, a scripted installation or even a remote agent push. In this chapter we'll be looking specifically as installing the AClient on a Windows XP machine.
The Deployment Server Agent Branches
When we talk about installing the Deployment Server agent on a Windows client, it may come as a surprise that there is a choice. There are in fact two agent branches which have been developed by Altiris for the Microsoft Windows family,
-
AClient - The Agent for Windows 98/NT/2000/XP
-
DAgent - The Agent for Windows Vista/7
Essentially the thinking here is that if you are installing agents on computers with Windows Vista or Windows 7, you should use the newer DAgent. Otherwise, the AClient is your man.
When the agent installs (either the AClient or DAgent) it runs as a windows service under the local system account. These privileges enable the Deployment Server (through the agent) to perform the following functions on the managed computer:
-
Take Inventory
-
Deploy software
-
Shutdown/Reboot
-
Remote Control
-
Manipulate system settings
-
Prepare the system for image upload
In order to accommodate different processors, there is an agent compilation available for the following three mainstream architectures,
-
32-bit processors (x86)
-
32-bit processors with 64-bit extensions (x64)
-
Intel Itanium 64-bit processors (IA64)
This means that for every agent version, Altiris releases six agent branches. These are located in the Agents\AClient folder on the express share as illustrated in Figure 11.
To maintain some semblance of order, the following convention is used by Altiris in the naming of the agent files,
altiris-<agentname>-<version>.<architecture>.exe
So, if we want to manage an XP computer with Deployment Server, we need to choose from the following installers in DS6.9SP3,
-
altiris-aclient-6.9.430.IA64.exe (for Intel Itanium machines)
-
altiris-aclient-6.9.430.X64exe, (for x64 machines)
-
altiris-aclient-6.9.430.X86.exe, (for x86 machines)
where 6.9.430 is the agent version number for DS 6.9SP3.
In the vast majority of cases, we'll be running a 32-bit OS, so this means our primary agent installer for XP will be altiris-aclient-6.9.430.X86.exe

Figure 11: Illustration of Agent locations on the Express share. The folder contains the AClient and DAgent installers for each processor architecture. In addition, the folder contains the DAgent runtime files so that the agent can be executed under WinPE (which does not include the Windows Installer Service). Also of note is the sample AClient input file, aclient.inp
Let's proceed now by installing the Deployment Server agent on a Windows XP computer.
Installing the AClient manually
This is the most instructive way to install the AClient. In a manual agent install, the install wizard screens give visibility to most of the options which can be configured. After seeing all the options first hand in a manual install, you'll then be able to make a bit more sense of the Altiris supplied agent answer file aclient.inp (see Figure 11) used in silent agent installations.
In this section, we'll go through the manual stages of an agent install, selecting options which deviate minimally from the default settings. This will get the agent up and running and allow us to see how the process works. Also, as we go through the install process, I'll point out interesting configuration options as they appear.
-
Execute the Agent Installer
Double-click the executable,
\\Altiris-Ds\express\Agents\AClient\altiris-aclient-6.9.430.X86.exe
This will open up the Altiris AClient Service in GUI install mode.
-
Install Altiris Client Service
Here we can configure where the installed service location will be, and also set an option to secure the service administrative properties with a password.
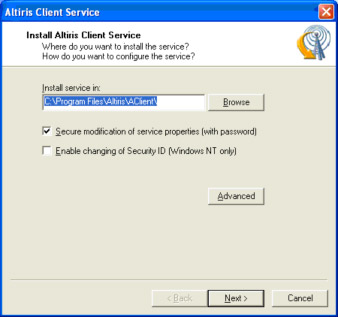
There is also the option here to 'Enable the changing of the system's Security ID' to allow SIDgen/Sysprep SID changing. To see anything more, we need to go to the advanced section.
Set a simple password. Click 'Advanced' to proceed.
-
Server Connection
This tab is primarily used to configure the IP address or hostname of the Deployment Server, and its TCP port. If you are really security conscious you could enable key-based authentication which would mean generating and proving the security key to all your clients.
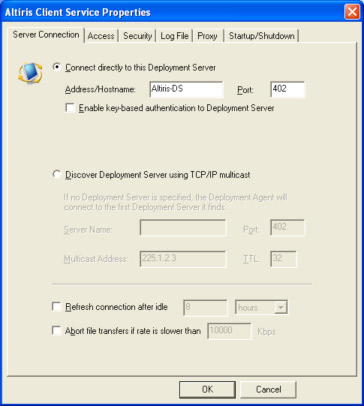
I always recommend not using multicast to discover your deployment server as this could theoretically allow a rogue server to take clients (if key-based authentication hasn't been enabled).
The 'Refresh connection after idle' setting can be used to keep agents connected in environments where idle TCP connections can be dropped, and the 'Abort file transfers if rate is slower than' option gives you some control over bandwidth used in file transfers.
Set the server name as Altiris-DS and move to the next tab
-
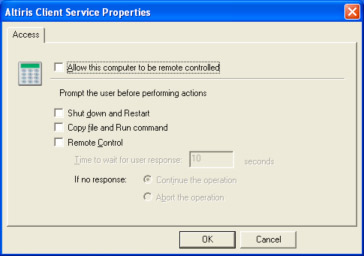
Access
The Access screen is where you can preconfigure the user options. What ever you set here, the user can change if the AClient is visible as this area is not password protected.
The options here are self-explanatory, but the blockouts are worth a mention as the user can invoke complete blockouts to tasks being pushed down from the server on a day of the week basis, or just temporarily.
Many administrators choose to hide the AClient icon because even with password locking, users can deny execution remote tasks.

Check the box to allow remote control, and move to the next tab
-
Security
If you want to put yourself onto the bleeding edge of security, here you can choose to encrypt AClient communications. It is unlikely that anything of a sensitive nature will be travelling through the AClient communications, but this can help when company policy is simply 'encrypt everything'.
Here you can choose to again password protect the AClient, and even hide the AClient icon from the systray if you wish.

Select the next tab to proceed
-
Log File
I recommend logging errors and informational messages purely because should you have to investigate an suspect agent, it can be very frustrating to find that logging has not been enabled.
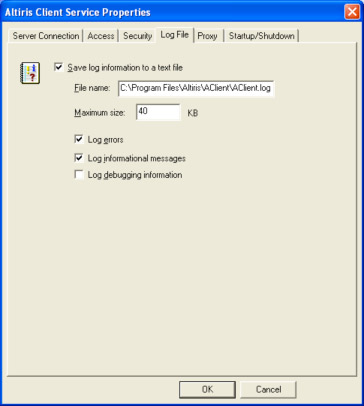
Log Errors and Informational Messages, and increase the maximum log size from 4K to 40K. Move to the next tab.
-
Proxy
The primary aim of this screen is to allow you to configure this agent as a Wake-On-Lan (WOL) proxy. This setting configures the agent so that it becomes the WOL source for its subnet, to be triggered whenever the Deployment Server needs to wake any computer sharing that same subnet. Choose just one computer on each subet to act as a WOL proxy -and NEVER make this a generic setting.
The forwarding of Deployment Server discovery multicasts is so that you can allow clients on subnets remote to DS to get a discovery response and configure themselves to the remotely sited Deployment Server.

Move on to the next tab.
-
Startup/Shutdown
The primary aim of this tab is to allow you to configure the computer to forcibly shutdown if required. I generally recommend that shutdowns are enforced to prevent machines you want to image being held up by pending dialogues demanding attention. Users can lose work with this option, so remember this when forcing reboots.
If you need a cheap man's time server, the you could do worse than enabling the option to 'Syncronise date/time with DS'. Using a proper timeserver, or syncronising with your domain hierarchy is going to be more robust though.
The 'Disable Direct Disk Access' option is for Bootworks, where automation is emedded in the harddisk. The mechanism for booting into embedded automation is via the agent setting/resetting a flag in the MBR. If you disable direct disk access, this functionality is lost and the computer is forced to perform an automation boot on every start-up.

Check the box to Force programs to close, and then click OK
-
Automatically Add to a Group
Here you have the option of putting the computer directly into a group in the console. If the group path does not exist, the console will create it automatically for you.
Click Next, and then Finish.
As the Agent installs, you'll notice in the systray the appearance of the AClient icon. At first, it will have a white circle indicating it has not yet contacted the Deployment Server. It will turn blue after a few seconds (as depicted in Figure 12) to indicate is now has successfully established a connection to the server.

Figure 12: AClient icon evolution during agent installation
The User Level AClient Settings
If you right-click the AClient icon in the systray, you'll see several options as below,
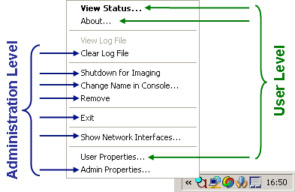
Figure 13: AClient Systray options. The Administration level options will be password protected if you configure an agent password
Although all of these options are visible should you decide not to hide the AClient, should you configure a password (highly recommended) then all the Administration level settings will be password protected.
At the user level then, we have the following options which can be accessed without password protection,
-
View Status...
Selecting this option will present an Altiris Client service window similar to that in Figure 14 below. It holds the agent status (i.e. whether its connected to the server or not), version details and some networking information. Note the 'Properties' button is an administration level item (it is just a shortcut to the 'Admin Properties' selection in Figure 13), so if a password has been configured users will not gain further access.

Figure 14: Altiris Client Service status window
-
About...
This 'About' option presents a general Altiris licensing statement. It's rather dull.
-
User Properties
This interface allows you users to control whether their machine can be remote controlled, and whether tasks should execute at all from the Deployment Server. This looks fairly innocuous, but suspicious users will certainly deny all remote access possible.
Uninstall the AClient
Having just install the Agent, guess what? We're going to remove it again! In the next section we are going to use other method to install the agent, so we need to get rid of it again. Right-Click the AClient systray icon, and select 'remove'. Enter the password, and choose to remove all files,

The Agent will then inform you that it's been stopped, and then shortly afterwards that it's been removed. Reboot when prompted to complete the removal.
In order to start afresh in the Deployment Console (so that we can pretend that our XP client is new), we need to delete it from the eXpress database. This is a simple task, just select the computer in the console and hit DELETE.
Installing the AClient using Remote Agent Installer
When installing AClient from the console using the 'Remote Agent Installer' the requirements are:
-
Known admin credentials on the remote computer*
-
Simple file sharing disabled on the remote PC (XP systems only)
-
"File and Print Sharing" ports open to the remote computer for XP and above (at least allowing access from the Deployment Server).
-
Client for Microsoft Networks installed on remote computer
These requirements allow the Deployment Console to copy and execute the AClient code via SMB on the remote computer.
Let's see now how this works,
-
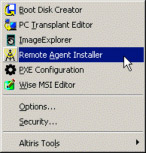
To start the remote install, from the Menu bar in the Deployment Console, select Tools -> Remote Agent Installer.
-
Welcome Page
The first screen welcomes you, and offers you the choice of using a single set of credentials when pushing out the agent to clients, or to choose the credentials as you go. For now, leave it so you can specify a username as you go.
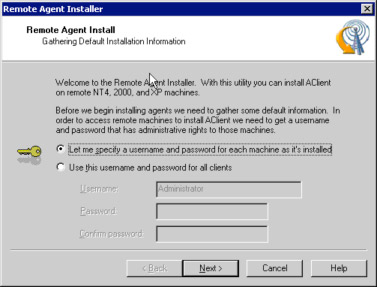
Click 'Next'
-
Select Agent Branch
By default, the Remote Agent installer is configured to install the DAgent.
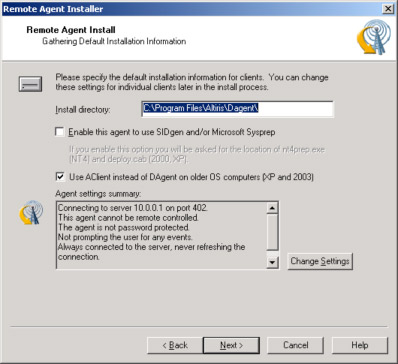
Select the option to use the AClient instead of DAgent on XP/2003 computers, and click 'Change Settings'
-
The Default Agent Settings Tabs
This should all now look very familiar from the manual install we did earlier, so try now to configure the agent as before. Encryption is enabled by default in the Security tab, but the Agent won't actually use this unless you configure encryption server side (which we haven't). When finished, Click 'OK'
-
Automatically Add to a Group
This screen should also be familiar from the manual agent install. Leave it as adding the default group and click 'Next'
-
Select Clients
Here we get to add the clients we want the Remote Agent Installer to push to. Add XP-CLIENT (using the Add Button) and click OK.
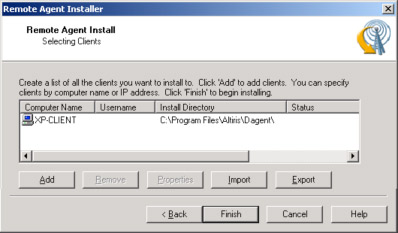
Click Finish.
-
Installing Clients
If all goes well, the agent installer will be able to resolve your client, authenticate and push out the agent.

If there is a problem, ensure all the requirements laid out at the beginning of this section have been met on the client. Tweak the client, and try again.
Once you are happy that you understand this agent install process, we can move on to our last agent install method, the scripted install. Remove the agent, and then delete the computer object from the Deployment Console before proceeding.
Scripted Agent Deployment
A robust way of installing the agent is to install it on the client by executing the agent installer with an already prepared answer file. To see how this works, in what follows we'll be logging into the PC we want to manage, connecting to the eXpress share on the DS Server, and running the agent installer with an answer file. Don't worry about the scalability of this process in the enterprise environment -this isn't how you'll deploy the agent in practice!
Installing the AClient using a Script
There are in essence two ways to install a Deployment Server agent onto a client computer, manual and scripted. The manual method forces you to configure the agent through a wizard. The scripted method in contrast allows you to configure the agent silently with an answer file. In what follows, you will prepare a batch file to perform a scripted agent install.
-
Login to the XP client
-
Map a drive to the Deployment Server's express fileshare
In a command shell, use the net command to map a drive to the express share,

Authenticate to the server if required using your known administrator credentials.
-
Locate the Agent installation file
Navigate to the \\Altiris-DS\eXpress\agents\Windows folder to locate the agent installation files. As we have an 32-bit XP client, locate the agent named altiris-aclient-version-x86.exe and press CTRL-C to copy the file to the computers clipboard.
-
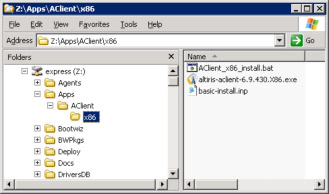
Create an Installation Folder for Silent Package
Create the folder tree "Apps\Aclient\x86" in the root of the eXpress share. Paste into it (CTRL-V) the AClient installer
altiris-aclient-6.9.430.X86.exe
-
Create an agent answer (.INP) file
In the x86 folder create a new text-document called basic-install.inp, and using notepad type in the following five lines, ensuring the last line has a carriage return.
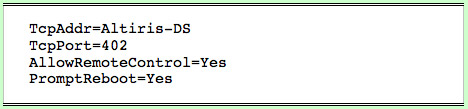
The above input file answers a fairly minimal set of questions -the name of our Altiris Deployment Server, the TCP port to connect on, and that the agent should allow remote control, and reboots should show prompts. Save the file now, and close notepad.
-
Create the installer batch (.BAT) file
In the x86 folder create another new file, this time called AClient_x86_install.bat. Using notepad, give it the following single line as content,

Save the file, and close notepad. Your Explorer window should now look similar to that below,
-
Run the install batch file

In your command shell, navigate to the installer folder and run the installer,
After a few moments, you should see the AClient icon appear in your client computer's systray -this indicates the service has started. Initially however, it will have a white circle to let us know that it is not yet in contact with the Deployment Server. After a few moments though, the white circle should turn blue (see Figure 12), indicating that communication with the configured DS server has now been established.
If you now return to look at the Deployment Server Console, you'll now see the live computer icon with the user logged in for the managed XP machine.
* Note that default XP security will not allow a remote computer access if the authentication credentials have a blank password
Return to Index
Read Part 9:
Deployment Server 6.9 - A Quick-Start Course, Part 9: DAgent Installation Methods