Quick Delivery
Advanced Configuration
Download Options
Run Options
Task Options
Walkthrough
Targeting And Scheduling
Manual Selection
Targets
Task Server
Troubleshooting
As the name implies, Quick Delivery is primarily used for single Software Deployment events. Other uses, such as running commands or other scripts, can also be used. This is not considered a "Managed" method of deploying Software. Running primarily on Task Server, Quick Delivery Tasks use the Site Server method of quickly deploying a package and command to target clients. The Configuration options are limited on a Quick Delivery, noted in the processes below.
The basic creation of a Quick Delivery Task is covered below. While there are Wizards and contextual links that provide other methods, the base creation is covered here:
- In the Symantec Management Console, browse under Manage and select Jobs and Tasks, or if you are already in the Activity Center (ECV) click on the Jobs / Tasks section found in the left-hand column.
- Browse under Jobs and Tasks > System Jobs and Tasks > Software > and select Quick Delivery.
- Right-click on Quick Delivery and choose New > Task.
- From the left-hand pane in the resulting window, browse down to the Software section (folder) and select Quick Delivery.
- In the right-hand pane Name the Quick Delivery Task so it is recognizable when you need to go back to it.
- In the Software Resource multi-function field type in the name or use the drop down to select the Resource to use.
- Use the field adjacent to Command line to select the appropriate command line for the Task to run. Be sure to pick the right one if you have different types created in the Resource.
|

|
It is advised to review the command-line under the field. It will show you what command will execute, and can help avoid picking the wrong command-line. Running an uninstall when you're trying to install is quite ineffective. ☺
|
- Use the Package field to select the Package to use. Since a Software Resource can have more than one package this step is required before saving a newly created Quick Delivery Task. See this screenshot for an example:
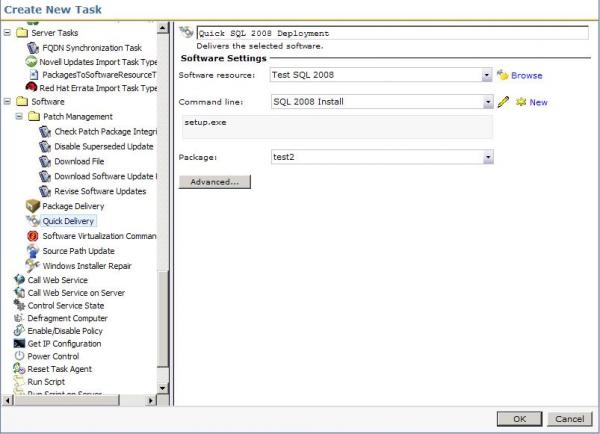
- Click Advanced. Use the next section to configure the Advanced section.
- When completed, click OK to save the Task.
After the Task is set, the Advanced options provide fine tuning of the Task, and can change drastically how the Task runs. This section covers the different options and how they affect the Task. First I'll details the options, and then provide a walk-through for some of the more popular options.
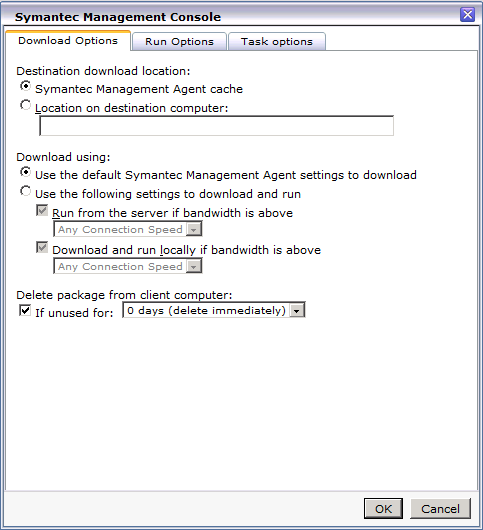
Download Options
By default the Altiris Agent will download files to the following location: install_path\Program Files\Altiris\Altiris Agent\Agents\SoftwareManagement\Software Delivery\. Each package is placed inside a folder matching the GUID of the Package and a subsequent Cache folder. At times an administrator may want to put the package in a non-default location. Change the Destination download location radial to Location on destination computer. The path will be local relative to the target systems.
|

|
NOTE: The download will occur directly to the path given. It does not use the GUID folder method used by a Managed Software Delivery Global Option for the download path. Each Quick Delivery needs a unique path or else all files will end up in the same folder, causing overwrite, validation problems.
|
The Download using: options present a unique situation. In versions 6.x the defaults found here were also found under the Altiris Agent Configuration Policies. This is no longer the case. The settings for Downloading in the Altiris Agent Configurations and the options here are exclusive. While it does add to confusion, it allows you to configure more options than previously. There are two primary use cases for manipulating the options here:
- Control limited bandwidth between the Package source and target clients, particularly in WAN environments or poor VPN connections.
- Have the execution occur locally directly from the Package Server instead of downloading it first.
|
|
The two checkboxes can be checked, giving the appearance that the two settings are mutually exclusive. Since they are talking about the opposite end of the download or run remote equation, you should only use one at a time.
|
The option: Delete package from client computer can be used to control how long the source files are available. For most Quick Delivery Tasks an immediate delete fits the use-case model. This may not be the case, so consider how long the source files should stay for the circumstance and set it appropriately.
|
|
The nature of Quick Delivery Tasks suggests you'll only need the files for the Installation. Check the option to delete the package as it is not checked by default. One type of exception is for those applications that install via an MSI and where the Source files may be needed in the future.
|
Run Options
The Run As options provides functions for what user context will be used for the installation.
|
|
The default option on a Quick Delivery is logged on user. This default will not work for users who do not have install rights on their local systems. It is advised to change this when configuring a Quick Delivery Task for the first time.
|
Generally the Altiris Agent credentials are sufficient for an install. Since the package is downloaded, all necessary rights exist on the local system. Some exceptions to this are details here:
- The install accesses network resources or location during the install. This does not include the ability of the application to contact network resources after the installation.
- The source files for the install will be executed from a remote location, such as a UNC or the option to execute from the Package Server is selected.
- The application must be run under the User's context that will launch the application for use.
For the first two use-cases, Specific user should be used, one that has rights to the resources or network locations to be used during the execution. For the last one the execution must be set to Current logged-on user.
|
|
If the users do not have installation rights to their systems, and you have an application that only works when installed under the user's own context, use a Managed Software Delivery Policy (MSD). The MSD can be configured with current user credentials and it will elevate the install session for that user to allow the install to proceed.
|
Task Options
The two options under this Task Options tab include the ability to have Task Server execute other Tasks while this one is executing, and to define the length of the execution.
The option, End task after __ minutes, is important to note. The default may not work for a larger install. In 7.1 GA 30 minutes was the default. In 7.1 SP1 5 hours is the default. While these defaults work for short installs, larger packages with longer installs may exceed this amount. This is also compounded in hierarchy environments where the package needs to trickle down to the lower level packages servers. This entire process is included in the timeout, so plan accordingly.
|
|
When the Quick Delivery Task executes, it first has to download the Package. The download time is calculated into the Task kill setting. Set the length for enough time for the targets to download the package and execute the command-line successfully.
|
The following process uses common settings to configure the Advanced options.
- Select the Quick Delivery Task to configure, or if you are still in the creation process, click the Advanced button.
- Under the Download Options tab, under the Delete package from client computer settings, check the box labeled: If unused for:.
- From the drop down select an appropriate length of time. For this example I left 0 days selected. NOTE: This option doesn't immediately delete the package, but a maintenance process will remove them soon after the execution. See this screenshot for an example:
- Click the Run Options tab.
- Change the option to Altiris Agent credentials.
- Uncheck the option Allow user interaction. In most cases I've worked with administrators have not wanted users to see an install as this often generates a Helpdesk call.
- Click the Run Options tab.
- Change the designated minutes to 300 if it is set to 30. This gives clients more time to download and execute the task. This setting will solely depend on environmental and situational elements, including:
- How soon Package Servers will have this package available
- The size of the Package and how many files are contained within
- The length of the Execution on target systems
- Click OK to save the changes.
- If newly creating a Task, Click OK to create it. If editing an existing Task, click Save changes to apply the new settings.
The targeting for a Quick Delivery uses the common Task Server scheduling controls. If you are familiar with this, the following walk-through should be familiar. The scheduling also uses the standard Task Server controls.
Manual Selection
To add targets to the Task and schedule the execution, follow these steps:
- Browse to the Quick Delivery Task to schedule/execute.
- Under the setting page, under the Task Status section, click on New Schedule.
- Choose Now or a specific schedule using the radial button and applicable controls. Due to the nature of a Quick Delivery, for this example I'll use Now.
- Under the Input section, click Add v > Computers or Devices. If you have a Target saved of systems to use, you can alternately use Target from the dropdown and link to it. Use this screenshot for reference:
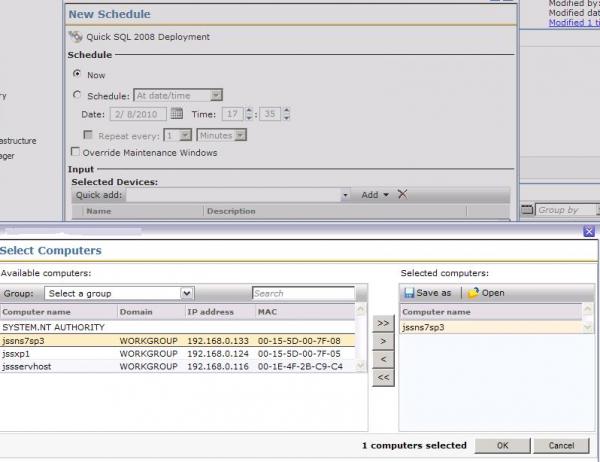
- In the resulting window select the systems you wish to run the job on. The following methods can assist in finding designated computers:
a. Use the Group: dropdown to filter results by Organizational objects/views.
b. Use the Search field to filter the results based on computer name.
c. Multi-select computers using the Ctrl and Shift keys and use the >> button to transfer them over.
- Click OK once the computers you need are included.
- Click Schedule to commit the execution/schedule.
- The status can be reviewed in the Input section as each execution will be listed. Double-click on the entry to track the status of the Quick Delivery task.
In a large environment, obviously using the above method would be cumbersome and take significant time. Targets are the answer for this. Targets are dynamic collections of computers. The following example shows a basic Target being created.
Targets
- Browse to the Quick Delivery Task to schedule/execute.
- Under the setting page, under the Task Status section, click on New Schedule.
- Choose Now or a specific schedule using the radial button and applicable controls. Due to the nature of a Quick Delivery, for this example I'll use Now.
- Under the Input section, click Add v > Target.
- Click the Add Rule button.
- Leave the selection exclude resources in, and the type to Filter.
- Type Windows Servers and click the dropdown arrow in the third field.
- Select Windows Servers from the dropdown (we will be excluding all Windows servers based on our criteria).
- Click Update results to see what is returned. See this screenshot for an example:
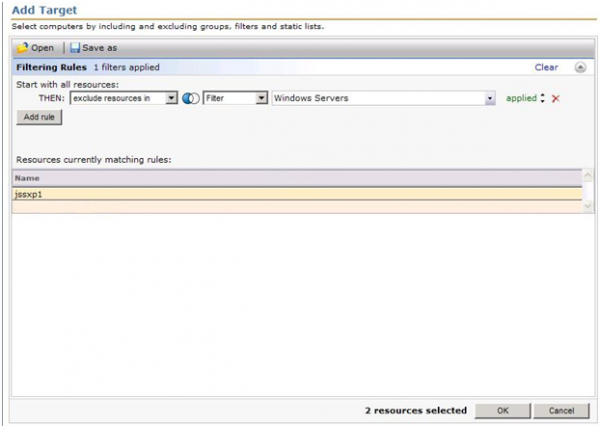
- Click OK to apply the Target.
- Done! You can now execute the task or set the schedule for execution.
Alternatively you can create your own Filter, to exclude or not exclude, a list of computers. The Filters can be static or dynamic. In this way it gives you full flexibility when setting up your targets for a Quick Delivery Task.
Task Server is the engine behind Quick Delivery Tasks. These Tasks are no initiated on the Altiris Agent side, but are pushed down from the Target system's Task Server at the scheduled time. The process is as follows, in high level view. Use the previously covered items to fill in the specifics on this process:
- An administrator configures a Quick Delivery Task by choosing a Software Resource and a Command Line.
- A Filter, or basically a collection of computers, is selected to receive the Task.
- A schedule is set. A popular choice is the "Now" option.
- The Notification Server passes the Task to the applicable Task Servers.
- The Task Servers take the Task and pushes it down to the Client Task Agent running within the Altiris Agent at the Target Systems.
- The Client Task Agent accepts the Task and executes the Task.
- This Agent first employs the Package download mechanisms within the Altiris Agent to download the package. Normal statuses for the download are passed up as with any internal NS policy or Managed Software Delivery policy.
NOTE: I've stated it before but it's worth mentioning again. The download is considered part of the Task's execution time.
- Once the package is downloaded, the Command-line is executed per the configuration within the Software Resource.
- The execution completes and provides the applicable exit code back to the Client Task Agent.
- The Client Task Agent passes the status up to the Task Server.
If your Task Server environment is healthy and properly distributed (Site Servers configured to spread the load out) the Executions should begin in real time. Latency is minimized and the completion of the Task should occur quickly when you allow for the length of the execution. If there are few task servers for a large target, the tasks will not all execute at once as the Task Server moves through the list.
This section covers troubleshooting for Quick Delivery Tasks and functions surrounding it. Each section contains details around the symptom named. Find the symptom you are experiencing and review the steps provided to identify and resolve the issue.
- Client never receives the Task
- Is the Task Services working? The status of the Task should show as Running in the Console. If it does not, go to the Task Server (Site Server) and check the Altiris Object Host service. Is it running? Try restarting it.
- Is the client able to register with a Task Server? Open the Agent UI and check this section:

If no Task Server is listed, or the Last registered is empty, try clicking the Reset Agent button. If that doesn't work, try restarting the Symantec Management Agent service.
- Does the client have a Site Server assigned to the Site? Check these steps:
- Find the Site that the Client should belong to. Expand that section, and browse under Subnets. Ensure that the Subnet the client belongs to is included here.
- If the Subnet does not exist, add it to the Site by Clicking the New button and adding the subnet.
- You can also search for the subnet by clicking on Subnets in the main list and using the search field. This will let you know if the subnet belongs to a site, and if a Site Server is assigned to it.
- Task never finishes running
- This is often caused by a prompt within the execution. If you run the command-line outside of SMP, do you get any prompts that require user interaction? If so, make sure a silent switch or argument is added to the command-line. Any pop up, even one that only requires you to click OK, will "hang" a task.
- On rare occasions this is caused by a hang of the SMFAgent. Try restarting the Symantec Management Agent and running the Task again.
- The Download is part of the Task Execution. Check to ensure that a Package Server is available and ready for the download. Check #4 in the main list for details.
- Task Errors out
- Check the Exit Code. These are passed back from the installer. Run a search on Google to see what the code means, and apply the resolution as applicable.
- Run the Command-line outside of SMP. If the same error occurs, this is an installer problem and not an issue with Software Management. If it won't run outside of Altiris, there's not much we can do.
- Does the Task require network access? Run as a specified user with network access. The default account, System, does not have any rights outside of the local system.
- If the Exit Code is not typical, or does not get thrown from the installer, check our knowledgebase system to see if we have it documented.
- Quick Delivery Tasks are point and execution, there is no logic built into checking whether the execution is valid for the target machine or not. Ask the following questions:
- Is the software already installed?
- Is a different version that does not support an over-the-top upgrade already installed?
- Does the system have all dependent software installed that it needs?
Consider using a Policy as it can handle all these situations.
- Package Download Issues
- What Package Server options have you set in the Package Properties? Package Servers must be selected in one way or another in order for their clients to download the package.
- All Package Servers is the easiest option since they will all host the package as soon as they know about it. This removes any potential for delay.
- All Package Servers with manual prestaging will allow any package server to get the package, but only after a client who is serviced by it requests it. This adds a potential delay to the download process and may explain why a client is not getting a valid codebase when it first gets a policy or task with the package.
- If you select only specific Package Servers, ensure that all clients have good bandwidth to those locations, or that limited bandwidth is taken into account.
- Does the Package Server the client is communicating with have the package in a ready state?
- Check what Site Server the client is communicating with by opening the Agent user interface and clicking on the Task Status tab.

- Go to that Site Server and open the Agent user interface.
- Click on the Package Server tab to review the Status.
- The three step process to make sure everything is where it should is to:
- Under Settings click Update Configuration.
- Under the Package Server tab, click Refresh all packages.
- Under the Package Server tab, click Resend all statuses.
- Is the client getting the Code bases (links to download) from the Notification Server?
- On the affected client, bring up the agent user interface.
- Click on the Software Delivery tab.
- Find the Policy that contains the package you need downloaded. Double-click on the package line down in the lower-right pane.
- Click on the Download History tab.
- If no Source location is shown, see concerning Package Servers having the package ready previous in this list. A second problem could stem from the client belonging to a site that does not have a Package Server assigned.
Symantec Software Management 7.5 Troubleshooting and Best Practices: Part 1
Symantec Software Management 7.5 Troubleshooting and Best Practices: Part 2
Symantec Software Management 7.5 Troubleshooting and Best Practices: Part 3
Symantec Software Management 7.5 Troubleshooting and Best Practices: Part 4
Symantec Software Management 7.5 Troubleshooting and Best Practices: Part 6
Symantec Software Management 7.5 Troubleshooting and Best Practices: Part 7