Task Settings
Sequencing
Scheduling
Rules
Manual Execution
Software Publishing
Task Settings
You can also add any Task Server Task to a Managed Delivery. The following example illustrates how to accomplish this:
- In the Managed Software Delivery Policy, under the Policy Rules/Actions, Software tab, Click the + ADD button and select Task
 When adding a Task, do not have a Software Resource selected or the Task will replace it. If the Resource is selected you can deselect it by moving to another section such as Applied to.
- Select the desired task from the list. Use the Search field to narrow the results if necessary.
- The Task will be added to the list. For sequencing information, see the subsequent section. See this screenshot for an example:
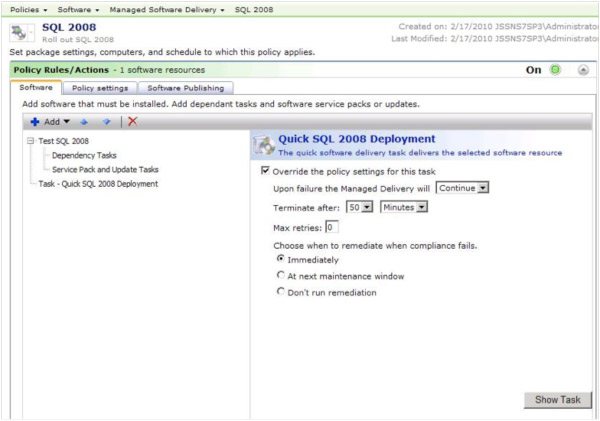
- You have the ability to override the policy settings for the task. The following walkthrough provides an example with use-case information explained.
- Check the box Override the policy settings for this task.
- Choose Continue from the dropdown next to the label Upon failure the Managed Delivery will.
- Change the Terminate after setting to 50 Minutes.
- Leave the other settings as is.
- If you need to adjust the Task itself, you can click the Show Task button in the lower right.
- Be sure to Save changes when you've completed the Task configuration.
Sequencing
Managed Software Delivery Policies allow a sequence of Software Resources and/or Tasks. This allows grouping of like executions or a string of executions to create a more comprehensive job. The following 2 primary use cases explain benefits of using a Managed Software Delivery in this manner:
- Complex Software Management - For software that contain a base install and multiple updates, service packs, plug-ins, and/or add-ons creating one MSD to manage the rollout of all the components will simplify the rollout.
- Core Software Management - Most companies have a core set of software that all Users should have available. This usually includes Microsoft Office, Cisco or other VPN client, Anti-virus Software (Symantec Endpoint Protection being one good example), branded version of Internet Explorer, etc.
 Be selective when you add multiple Resources and Task to a Policy. The more action points in a job, the greater chance to run into issues. The greater the complexity will also factor in, creating more potential points of failure.
To illustrate how this can be used, I'll provide a walk through for each of the use cases listed above. This first example uses Microsoft Office for an example. Note that the steps are in the order the options appear (to avoid excessive scrolling back and forth).
Complex Software Management
- Create Software Resources for the following components:
- Microsoft Office 2007 Enterprise Edition
- Microsoft Office Visio Professional 2008
- Microsoft Office 2007 service pack 1
- Microsoft Visual Studio 2008 Service Pack 1
- Ribbon Customizer for Office 2007 - v4.0
- Classic Menu for Office 2007 - v4.52
- Create detection rules for each Resource. If the install has a MSI Product Code association, use this for the software detection. Other examples are registry keys. For example, for Office 2007 you can use the key:
HKEY_LOCAL_MACHINE\SOFTWARE\Microsoft\Office\12.0\Common\ProductVersion, with a value name of Lastproduct. You can specify a specific value, or simply use the existence of that key.
- Create the following Service Pack Associations within the associated Software Resources:
- Browse to the Software Resource for Microsoft Office 2007 Enterprise Edition.
- Click on the Associations tab.
- From the Association Type dropdown, select Updates (Service Packs).
- Under the caption, Software resources that update this software resource, click the + Add button.
- From the list, locate the Software Resource for Microsoft Office 2007 service pack 1.
- Select and click the > button to move the Resource over to the right-hand pane.
- Click OK to save the association.
- You should see the association now represented in the list, as shown in this screenshot:
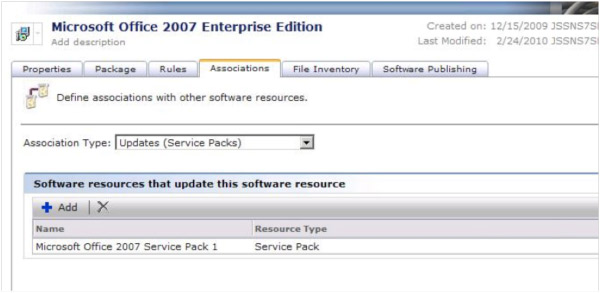
- Click Save changes on the main Software Resource page to complete the process.
- Now go back through steps a through I except use Visio as the Parent Resource, and Visio SP1 in the association of the Visio Resource.
- Create the following dependent associations:
- Browse to the Software Resource for Ribbon Customizer for Office 2007 4.0.
- Click on the Associations tab.
- From the Association Type dropdown, select Depends On.
- Under the field labeled Software Resources that this Software Resource depends on, click the Add + button.
- All Software Resources are shown on the resulting page, so use the search filter to find Microsoft Office 2007 Enterprise Edition.
- Select Office and use the > button to move it over to the selected right pane, as shown in this screenshot:
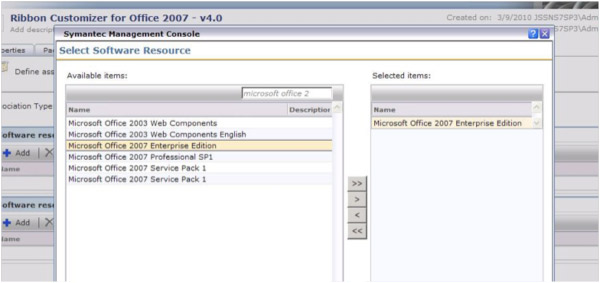
- Click OK to apply the new association.
- Click Save changes on the main Software Resource page to complete the process.
- Now go back through the steps, but choose the Software Resource Classic Menu for Office 2007 - v4.52 to add the 'depends on' association to.
- Create a new Managed Software Delivery Policy (MSD).
- In the Symantec Management Console, browse under Manage > Policies.
- In the left-hand tree browse under Policies > Software > and select Managed Software Delivery.
- In the resulting right-hand pane click the Add + button.
- In the Name field, provide a name, such as: Office 2007 Bundle.
- Turn the Policy On by clicking the red/green switch and clicking On.
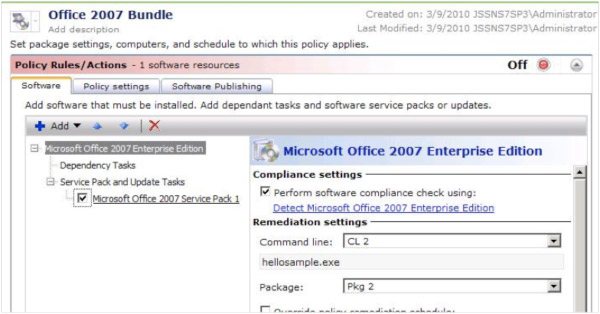
- Click the Add + button and choose Software resource.
- Use the Search filter, if necessary, to locate and select Microsoft Office 2007 Enterprise Edition.
- Click OK to add the resource to the MSD.
- Note that by default a command line and package will be selected. A Detection rule will also be selected, so ensure all settings are as you intend them. Normally this is not an issue unless you have multiples of any item.
- Check to ensure the Service Pack shows up under the Software Resource, as shown in this screenshot:
- Click the Add + button and choose Software resource.
- Use the Search filter, if necessary, to locate and select Microsoft Office Visio Professional 2008.
- Click OK to add the resource to the MSD.
- Click the Add + button and choose Software resource.
- Use the Search filter, if necessary, to locate and select Ribbon Customizer for Office 2007 - v4.0.
- Click OK to add the resource to the MSD.
- Click the Add + button and choose Software resource.
- Use the Search filter, if necessary, to locate and select Classic Menu for Office 2007 - v4.52.
- Click OK to add the resource to the MSD.
- Ensure the Software Resources are in the right order. Select and move entries using the up and down arrows. This screenshot shows the finished list:
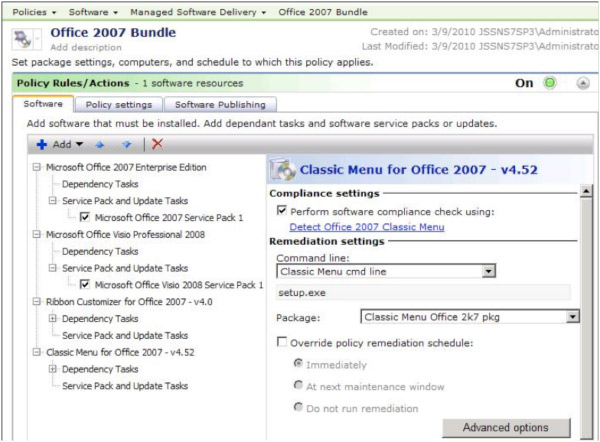
- For the Advanced options for each Software Resource, see the previous section labeled Advanced options.
Ensure you go through the Advanced options for all resources added to a MSD. For example if an Office Add/on is only applicable per user, you may need to change the Execution environment to run as the Logged-on User in order to have a successful deployment.
- Expand the Applied to section.
- Add a filter to the Policy. For this example we'll apply it to all Windows Computers.
- Click the Applied to button, and choose Computers.
- Click the Add Rule button.
- Change the 1st option to Exclude all computers not in.
NOTE: The double-negative usage may be confusing. To put it into perspective, note that the Filter starts including all computers, thus the wording, while not intuitive, is accurately labeled in the context.
- Leave the 2nd option on Filter.
- In the right field type Windows 2000, and click the dropdown arrow.
- Choose the filter Windows 2000/XP/2003/Vista/2008/7 Computers.
- Click the Update results button. You should see a list of applicable computers, as shown in example on this screenshot:
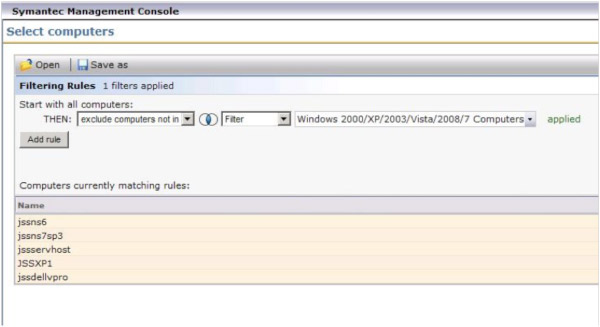
- Click OK to apply the filter.
- Expand the Schedule section.
- Add a schedule to the Compliance check for the MSD. The schedule in this example will be a reoccurring one that runs daily. This allows computer to check for compliance once a day.
- Click Add Schedule and select Scheduled Time.
- Input a time of day best suited to run the install. I this example I chose 18:00 (6:00pm).
- Click the hyperlink default label: No repeat.
- From the dropdown in the resulting prompt, choose daily, as shown in this screenshot:
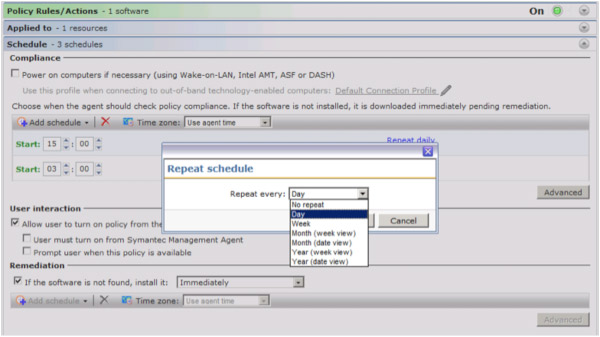
- Click OK to add the repeat setting.
- Check the Remediation schedule to ensure it is set as desired. For example immediately is default, but if you wish to wait until off production hours you can set a time after day hours.
- Click Save changes at the bottom to complete the process!
Scheduling
There is a known situation that has been seen on occasion. Unfortunately we have not been able to reproduce the issue so that development can diagnose the issue, and it is rare enough that at this point it is only being documented as a possible issue.
- Set the Start window to something else besides 00:00, and 24:00. These two numbers are essentially the same number, and under rare circumstances the scheduled at the Agent can error when trying to evaluate the schedule, causing CPU issues on the target PC.
Core Software Management
This series will be a smaller subset of what was introduced under the Complex Software Management section previously covered. In this example I'm introducing a list of common software to deploy.
- Create Software Resources for the following components:
- Symantec Endpoint Protection
- Microsoft Office 2007 Professional
- Company branded Internet Explorer
- Cisco VPN Client
- Adobe Acrobat Reader
- Adobe Flash Player
- Create detection rules for each Resource.
- Create a new Managed Software Delivery Policy (MSD).
- In the Symantec Management Console, browse under Manage > Policies.
- In the left-hand tree browse under Policies > Software > and select Managed Software Delivery.
- In the resulting right-hand pane click the Add + button.
- In the Name field, provide a name, such as: Common Software Suite.
- Turn the Policy On by clicking the red/green switch and clicking On.
- Go through the following process for each of the Software Resources to add to the Policy.
- Click the Add + button and choose Software resource.
- Use the Search filter, if necessary, to locate and select Microsoft Office 2007 Enterprise Edition.
- Click OK to add the resource to the MSD.
- Note that by default a command line and package will be selected. A Detection rule will also be selected, so ensure all settings are as you intend them. Normally this is not an issue unless you have multiples of any item.
- Click the Add + button and choose Software resource.
- Ensure the Software Resources are in the right order. Select and move entries using the up and down arrows. In this example it is imperative to put Antivirus first!
- For the Advanced options for each Software Resource, see the previous section labeled Advanced options.
If one of the applications, such as Symantec Endpoint Protection, requires a reboot, suppress the reboot in the command-line and set a reboot as an after successful completion action within the Advanced options.
- Add a filter to the Policy
- Expand the Schedule section.
- Add a schedule to the MSD.
- Click Save changes at the bottom to complete the process!
As always, fully test your Managed Software Delivery Policy before attempting to roll it out on any medium or large scale. Tests will reveal issues and allow you to adjust the configuration to address them before full rollout.
Testing
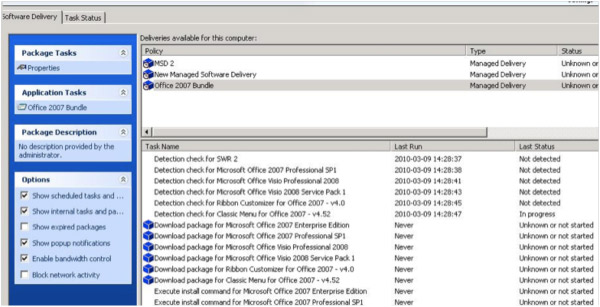
Tracking the execution of an MSD on the client helps the testing and troubleshooting process. To access the UI and view the execution, follow these steps:
- On the client computer double-click on the Symantec Management Agent icon. If the icon is not visible (hidden per policy), browse under C:\Program Files\Altiris\Altiris Agent\ and execute AeXAgentActivate.exe.
- Select the Software Delivery tab.
- From the list of available software, highlight the MSD to view (Office 2007 Bundle in this example).
- The lower pane will show the progress of the MSD execution, as shown in this screenshot:
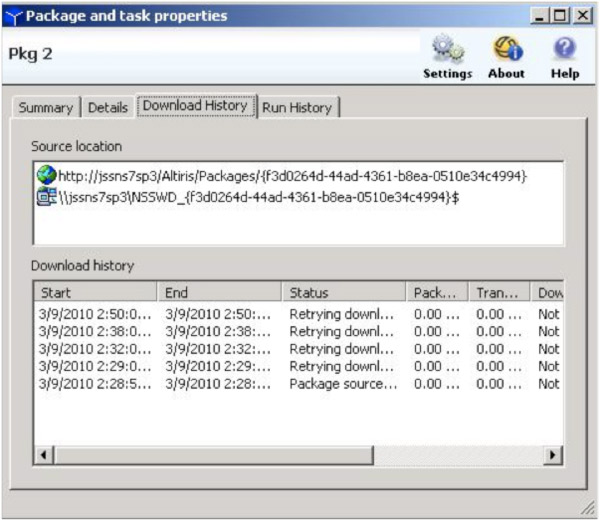
- To see the details of a particular download or execution, double-click on a line in the bottom pane that has a blue package icon next to it. You can review the details of the execution, including the download and run histories.
- The following screenshot shows an issue with a package download:
Rules
This section covers how Rules are executed within a Managed Software Delivery Policy.
- Detection Rules - Before anything else runs, the detection rules for an MSD runs. If an application is detected, the associated Software Resource will NOT be executed. The status will show as Detected.
- Consider this rule one that ensures you aren't rolling the same software to a system that already has it.
- Applicability Rules - For those resources that were not detected, if an Applicability Rule exists it will be executed against the system. Unlike Detection Rules, only if the Applicability Rule is detected will the MSD execute!
- A common Applicability Rule is Windows Version. The update or Software may not support Windows 7, for example, so the rule will only succeed on Windows systems that are not 7.
- Another type of Applicability Rule is an update to software that has to exist on the target system. This helps stop those executions that will fail the prerequisite check from throwing an error. Better if it doesn't run when it doesn't need to.
Rules add intelligence to the Software Management Process. In version 6.1 of Software Delivery, all intelligence had to be handled at the server end. Inventory provided what we knew was already on the system, and the NS provided the SQL logic in a Collection to automatically roll out Software to those systems that needed it. This was far from real-time and sometimes resulted in machines executing Software it didn't need or already had. It didn't take much to be out of sync between the Server and the client as Inventory had to update so the NS would know what had changed.
Rules execute real time, so they will know the moment they run if a system is compliant or not. If not compliant, it runs remediation to resolve the compliance issue.
Manual Execution
By default Managed Software Delivery Policies can be executed locally at the Agent User interface. This helps when troubleshooting an MSD execution or if you simply need to run a compliance check ASAP. The following process details how to execute the MSD manually:
- On the client computer double-click on the Symantec Management Agent icon. If the icon is not visible (hidden per policy), browse under C:\Program Files\Altiris\Altiris Agent\ and execute AeXAgentActivate.exe.
- Select the Software Delivery tab.
- From the list of available software, highlight the MSD to view (Office 2007 Bundle in this example).
- Look under the Application Tasks heading. The link here will execute the MSD immediately.
When executing an MSD in this manner, it does not mean the applicable Software Resources will automatically install. The same Rules are applied as in a normally scheduled delivery. Detection and Applicability checks will occur and influence what items run or are skipped.
Software Publishing
Managed Software Delivery policies can be requested from the Software Portal. This allows users to add an application or suite of applications for automatic deployment and management. This will be covered in detail under the Software Portal section of this document.
Return to Symantec Software Management 7.1 Best Practices, Part 4
Coming Soon: Symantec Software Management 7.1 Best Practices, Part 6