Whether you are planning to implement a Vendor TLS Certificate in the future, or you are having trouble applying a certificate you've already obtained, this article walks through the best practices. The details include all the steps to properly install the right items and resolve issues we've encountered up to this point. This article applies to Out of Band Management Solution 7.0, included with Client Management Suite 7.0. Since certificates introduce tight encryption security, if the right items and steps are not in place or followed, it can break the ability of AMT systems to provision with Remote Configuration.
Introduction
Why is Configuring a vPro capable system important? Without setup and configuration, the functionality provided by vPro is not accessible within your Symantec Client Management Suite environment. Out of Band Management Solution allows setup and configuration to occur automatically using Remote Configuration.
Using Remote Configuration to setup and configure your Intel AMT vPro capable computers takes the work out of the process, after some initial setup. AMT systems that come preconfigured with versions 2.2, 2.6, 3.0+, 4.0+, and 5.0+ will automatically use Remote Configuration to setup and configure with a valid Provisioning Server. Out of Band Management provides such a server. The hashes from vendors (AMT 3.0 includes Verisign, GoDaddy, Comodo) are already configured in the firmware, and upon connection to power and the network, will begin to send out requests for configuration. Thus in this way the managed vPro systems are already prepared to be configured without any intervention by the IT staff.
Usually the issues we see with the Remote Configuration process originate on the server-side process of adding a certificate from the before mentioned vendors. Obtaining and installing a vendor TLS Remote Configuration certificate needs to be done the correct way so that authentication can succeed. Once in place, provisioning will roll forward without any further intervention as long as the certificate remains valid. This article focuses on applying the server-side certificate so that setup and configuration can move forward automatically.
Obtaining a Remote Configuration Certificate
This subject has been covered previously. I wanted to lightly touch upon this as there is a vital step that should be taken so that if anything goes wrong we can correct it. First, the following article covers how to properly obtain a certificate:
Note that part of obtaining a Remote Configuration is submitting the request from the Server you plan to install the certificate onto. This process creates the private key for the server-side certificate, and this item will not be available until partway through the application of the crt (or cer) file obtained from the vendor. The specific step that provides the full key, both private and public, is when the certificate is exported into a PFX format after the initial import, checking the option to export the private key will give you a complete backup of the full certificate in case it is needed in the future. If something happens, or if the application doesn't go right, we'll need both, so it's essential to export this as soon as possible.
During the steps to install the certificate emphasis will be given on the step where the export should take place.
Certificate Authority (CA)
In order to use Remote Configuration with Out of Band Management the Microsoft Certificate Authority services must be installed on the Notification Server or the OOB Site Server. Use the following steps to install if it is not installed:
-
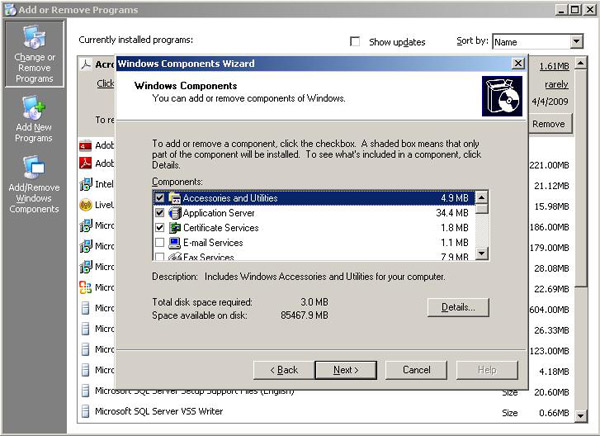
Go to Start > Administrative Tools > and click on Add or Remove Programs.
-
In the left-side button bar click the button Add/Remove Windows Components.
-
Check the option labeled Certificate Services. See this screenshot for details:
-
You'll receive the pop-up:
After installation Certificate Services, the machine name and domain membership may not be changed due to the binding of the machine name to CA information stored in the Active Directory. Changing the machine name or domain membership would invalidate the certificates issues from the CA. Please ensure the proper machine name and domain membership are configured before installing Certificate Services. Do you want to continue?
-
Click Yes to continue once your system has the intended identity. Click Next.
-
Choose what type of CA to create. If you are not installing a hierarchy of CAs you can leave the stand-alone root CA option selected. Click Next.
-
Input the name the CA will be known by. This must match what is in the hierarchy or by what the Remote Configuration certificate name will be known by.
-
The Distinguished Name is generated automatically in an AD Environment and will be the suffix of the system.
-
Click through the rest of the options, noting where the services data files are stored.
-
You will be prompted to restart IIS. This is required during the installation.
-
Click Finish to complete the installation.
-
Done! The NS or Site Server is now prepared to handle certificates in the Remote Configuration process.
Installing the Certificate
The recommended application for a Remote Configuration certificate is to let the certificate dictate where to be installed. However this process has sometimes resulted with the certificate installed to an incorrect place. When this occurred we've had headaches trying to clean up the system to properly install the certificate. Why this occurs is unclear. For reference I'm including the process of adding a certificate automatically here:
NOTE: You must install the certificate while logged onto the server as the Notification Server Account, the Application Identity, or the account used to install Notification Server and Out of Band Management.
-
Save the acquired cer or crt file from the vendor onto the Notification Server or the Site Server for Out of Band Management.
-
Right-click on the file and choose Install Certificate.
-
Click next on the Welcome screen.
-
Leave the radial option on 'Automatically select the certificate store based on the type of certificate' and click Next.
-
Click Finish to complete the installation. You'll receive a confirmation pop-up that the certificate installed successfully.
While I won't advise against using this method, the below steps uses the manual installation method to ensure the certificate is installed to the correct place.
I've condensed the steps required into the following list. This process works for all vendors once you've obtained a certificate. Note that these steps are provided to consolidate both recommended steps and documentation into one whole.
-
Go to Start > Run > type mmc > and click OK.
-
In the resulting console click under File and choose Add/Remove Snap-ins...
-
Near the bottom of the resulting window click the Add button.
-
From the list that appears select Certificates and then click the Add button.
-
Leave the radial button selected on 'My user account' and click Finish.
-
From the same list select Certificates again and click the Add button.
-
From the resulting window change the radial select to 'Computer account' and click Next.
-
Leave the selection at 'Local computer: (the computer this console is running on) and click Finish.
-
Click the Close button in the window offering you the list of available snap-ins.
-
At the original add/remove snap-in screen verify that you have two entries:
-
Certificates - Current User
-
Certificates (Local Computer)
-
Click OK.
-
Expand both trees in the left-hand pane within the console. You should see the full certificate stores as shown in this screenshot:

-
Right-click on the Personal folder under the Current User certificate store and highlight 'All Tasks' and click on 'Import' in the pop-out menu.
-
Click Next on the Welcome page of the Certificate Import Wizard and click the Browse button.
-
Browse to the cer or crt file provided by the vendor, highlight it, and click Open.
-
Click Next, and leave the radial option on 'Place all certificates in the following store', which should be set to 'Personal'. Click Next.
-
Under the Completing section of the wizard, Click Finish. You should receive a pop-up indicating the certificate was successfully installed.
-
NOTE! This is the vital step mentioned previously in the article. We will now export the certificate with both public and private keys, which will give us the full set and allow us to remove and reapply if necessary. In the MMC select the newly imported certificate > right-click > and choose All Tasks > Export...
-
Click Next on the Welcome screen. In the resulting list you should have an active option for 'Personal Information Exchange - PKCS #12 (.PFX)'. If this option is not available (grayed out as shown in this screenshot), there is a problem with the certificate and the private key is not accessible:

If this occurs please note the following items:
-
The application of the public key, or cer/crt file, must be done on the server where the key was requested.
-
If this is not your Provisioning Server you'll need to contact the Vendor of the certificate to resolve the discrepancy.
-
If you did request this certificate from the server you are operating on, you'll also need to contact the vendor to explain that the private key is not found when exporting the certificate after initial application.
-
Follow the wizard, and ensure you select the option 'Yes, export the private key'. When saving the file, it will prompt you to set a password to protect the private key (this is recommended for security reasons). The export should leave you a PFX file. Keep this in a safe place, preferably in line with your company's encryption certificate backup policy.
-
Next we need to import the full key into the Computer store. Start back in the MMC > under the Local Computer certificate store > right-click on the Personal folder > select All Tasks > Import...
-
Click Next on the Welcome screen and click the Browse button on the subsequent screen.
-
Browse to the newly exported PFX file. Note that you will need to change the 'Files of type' to include the PFX format. Click Next.
-
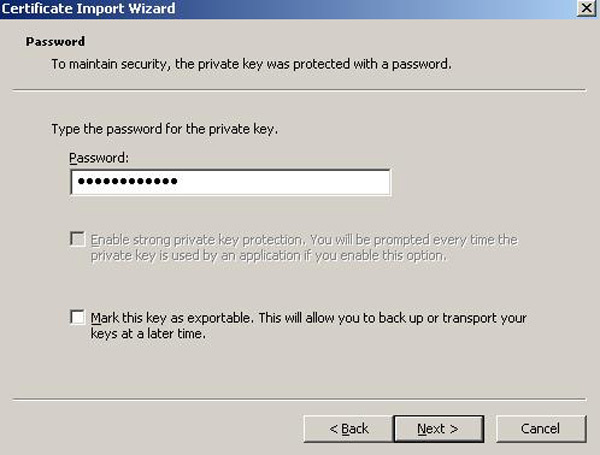
The Password screen prompts for the password you set when you exported the key in step #20, as shown in the following screenshot. Enter the password and click Next.
-
Choose or leave the select to 'Place all certificates in the following store'. The value should be Personal. Click Next.
-
Click Finish on the end details page to complete the import.
-
Done!
NOTE: In Out of Band Management 6.x, with Intel SCS 3.x or earlier, a separate utility was required to load certificates into Intel SCS so the Provision Server was aware of them. This is no longer required as Intel SCS 5.x possesses intelligence to automatically acquire all installed Intel vPro Remote Configuration encryption certificates.
Reinstalling the Certificate
If you need to reinstall the certificate and you have a PFX file, you can do so by opening both certificate stores (User and Local Computer) as outlined in the previous steps. Browse through the certificate stores and delete any instance of the vendor certificate. This will remove any associations and allow a clean application of the certificate to occur. Look for the following:
-
The name matching the name of the cer or crt file obtained from the vendor
-
The vendor's certificate (the entry will contain the vendor name).
NOTE: Be careful when removing vendor certificates as they may not be part of the Remote Configuration. The best example is Verisign, which may have many entries. If unsure, leave the certificate in place, or export it before deleting it so you can restore it if necessary.
Enabling Remote Configuration
To ensure that Out of Band Management is setup to use Remote Configuration as a valid setup and configuration method, follow these steps:
-
In the Symantec Management Console browse under Home > Remote Management > and click on Out of Band Management.
-
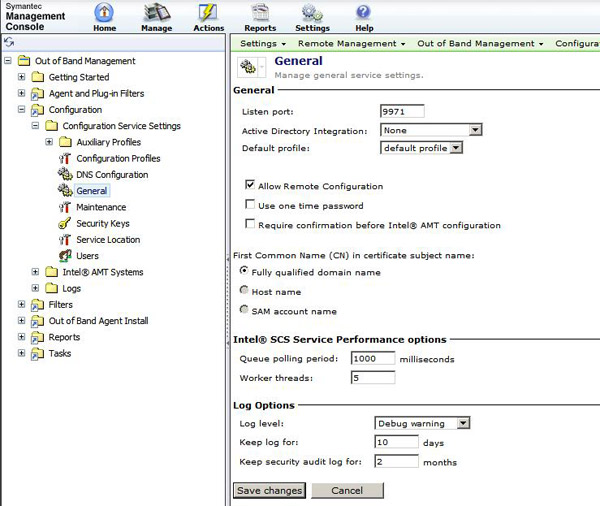
In the left-hand tree browse under Configuration > Configuration Service Settings > and select General.
-
In the resulting page ensure that the option labeled Allow Remote Configuration is checked. If it is not, check it. See this screenshot for an example:
-
If you needed to check the option, be sure to click Save Changes to register the change.
That should do it for the certificates. You've now completed the steps required to install and enable Remote Configuration in the Out of Band Management Environment. However you are not done yet! Certain infrastructure components are required to make this process seamless. Proceed to the next section for details.
Other Setup Requirements
The following items will be used to automate the setup and configuration process. Remote Configuration will use these to locate and communicate with the Provisioning Server (Out of Band Management).
ProvisionServer
Each zone within DNS should have a ProvisionServer entry to ensure that Remote Configuration requests are properly routed to the Server. This will also help properly resolve names during the authentication process. Use the following steps to add ProvisionServer to DNS:
-
Go to Start > Run > type mmc > and click OK.
-
In the resulting console click under File and choose Add/Remove Snap-ins...
-
Near the bottom of the resulting window click the Add button.
-
From the list that appears select DNS and click Add and click Close.
-
Click OK in the next Window.
-
Browse in the tree to the Forward Lookup Zones.
-
Right-click the entry for the Notification Server computer and choose New Alias.
-
Type ProvisionServer as the Alias name, in this manner: ProvisionServer
-
Done!
Though simple, this is the key to directing the automatic Remote Configuration hello packets from enabled vPro systems to the Notification Server or Site Server. Without this step no setup and configuration of vPro systems will occur.
To test, log onto a system on the subnet you're trying to conduct Remote Configuration from. Run a command prompt and use the following command:
We should see the responding IP Address by the IP Address of the Notification Server, or, if you've set it up this way, the Intel SCS Server conducting provisioning. Another test you can try is to run the following command:
We should get the data on the Notification Server's Fully Qualified Domain Name (FQDN).
DNS Zones
In a multiple domain structure this is especially important, but all environments need to have the right data in DNS to properly pass and authenticate in a TLS environment. The DNS Primary Zone should be set to the Domain path contained within the certificate. For example, if the certificate name is MyNSServer_My1Domain_local, the DNS Primary Zone should be My1Domain.local. Without this, authentication can fail as the FQDN is used during authentication, and if the name being transmitted across the wire doesn't match what's in the certificate, authentication will fail. Here is another example:
-
Certificate: MyNSServer_My1Domain_local.crt
-
DNS Primary lookup Zone: My1Domain.local
DHCP Option
Another Network related requirement may be DHCP Option 15. While I'm not sure why this has proven to be required in some environments and not others, creating this option has resolved failed authentication issues within Remote Configuration.
In DNS, create an entry for Option 15, with the value of the domain path. This will often be the same as what is located in the DNS Primary Zone. The following details are an example:
-
Certificate: MyNSServer_My1Domain_local.crt
-
DNS Primary lookup Zone: My1Domain.local
-
DHCP Option 15: My1Domain.local
Conclusion
Following the above procedure should allow remote configuration to occur without problems. Once in place, the configuration will move forward with automatic setup and configuration for all vPro enabled systems that support Remote Configuration.