What EDDA is good at:
True Event Driven Automation.
=> Allowing outside systems
(programs, applications, scripts, SAAS solutions, etc.) to send events to
Automic and trigger Automic Objects intelligently as a response. All of that on
a large scale: up to 15k events per second.
How EDDA Works:
Edda works by providing a simple &
secure Rest interface that allows sending Events to AE (from anywhere) and
automatically filtering / processing the content of those events via
rules (new object type in AE). The rules map Events to Automic Executable Objects
and their variables / Promptsets.
What you need to know before you start:
Edda is very scalablebecause built on
top ofApache KafkaandApache Flink(=Streaming Platform and
Rules Engine). This post is not about those technologies so that is as far
as we will go here on this topic :).
Edda is integrated into Automic’s Analytics
component, therefore the Rest endpoint is the same and the URLs / requests
are very similar. The port for the Rest Endpoint is also the same for Analytics
and EDDA.
Sending Events to Edda willrequire an API
key(to keep it secure and within a bounded scope (ex: a particular AE
Client)). Such API Key can be generated by a Rest call to Edda.
Generating API Keys requires you toknow
your own System API Key(see below on how to retrieve it).
Edda introduces 2 new objects to AE:
- a newVARA Objectof type: EVENT_DEFINITION
- a newEVENT Objectof type: SIMPLE_RULE
=> both objects can be
found by typing “IA” in the search bar when creating objects (if you must
know, IA = Intelligent Automation :))
EVENT_DEFINITION:
=> basically describes attributes expected in a given Rest Event
=>
ex: “count” as a “number”
=>
ex: “success” as a “boolean"
SIMPLE_RULE:
=>
describes a set a Rules for filtering events & their content (ex: if
attribute “count” is > 2 & if attribute “success” is “True”)
=>
also describes an Action (an AE object to execute when a Rest event matches the
Rules) (ex: Map “Count” to Variable &COUNT# and execute JOBP Object
accordingly)
Lastly but importantly: get familiar
with this post: https://community.automic.com/discussion/10794/getting-started-with-the-rest-api-for-automic-v12-1 and
download the zip file attached to it (all the examples showed below with are
contained within this file and uses Postman).
Part 1: Sending Events to EDDA
Since Edda exposes a Rest Endpoint,
sending events to Edda is done through (POST) Rest Requests, and since Edda is
secure, you need to first generate one or several API keys for the Rest
Requests to work. In order to generate your API keys, you first need to
retrieve yoursystem API key.
A- Getting your System API Key:
From the server where
AWI (Automic Web Interface) is installed, navigate to the AWI folder structure
and locate your “plugin.properties” under the “web-plugin-analytics”
folder. You should be able to find it under (in most cases):
C:\Automic\External.Resources\apache-tomcat-7.0.81\webapps\awi\config\webui-plugin-analytics\plugin.properties
Open the file and
locate “backend.api_key”, write down your api key somewhere. The
line will look something like this:
backend.api_key=513a5133-0909-44cb-a33b-b226c5bf4717
B- Generating
your EDDA API Keys:
Use a POST
Request to generate your first EDDA API Key.
=> the request’s header
should contain an “Authorization” key with yourSystem API Key (see
above) as a value:
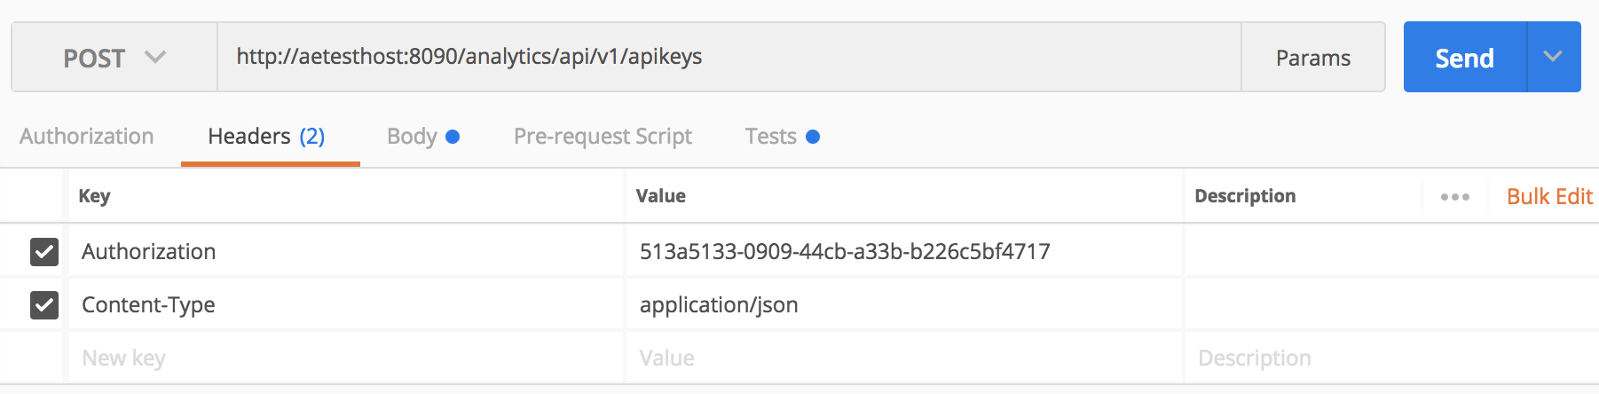
=> the request’s Body
should contain a JSON structure specifying a “scope”, adescriptionand aclient number(to limit the scope of the Key to a given AE
client):

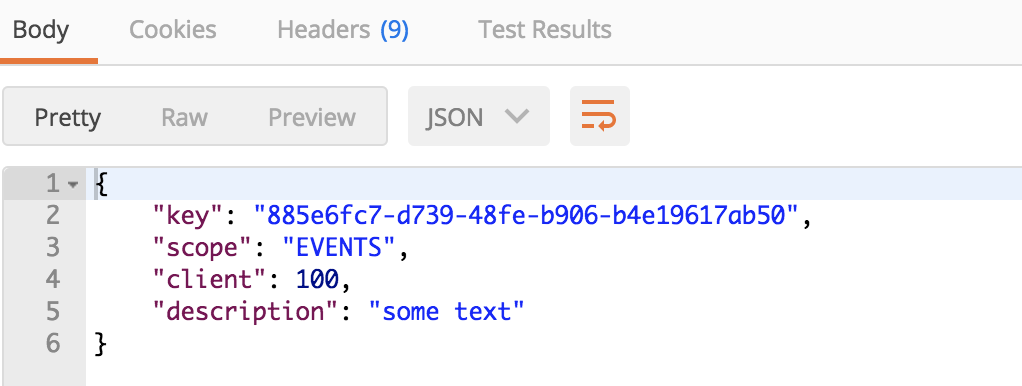
Execute the request: you
should get a response similar to below: Write the “key” somewhere:
that’syour first EDDA API Keyyou will use to send Rest Events!
C- Sending / Writing an Event:
A Rest Event is very simple. It uses
the EDDA API Key and a “type" to specify the scope of the event, and
sends values through the Body of a POST Request.
The EDDA API Key needs to be specified in
the Header of the request (“Authorization”):

![]()
The Body of the request is a JSON structure and needs to
contain:
- “type”: this needs to be the
name of the EVENT_DEFINITION (VARA) Object you will create in AE (see
EVENT_DEFINITION above for description and below for creation)
- “timestamp”: in the same format
as below, it does not need to be right now, it can be in the past (you can use
the one below)
-a set of values: THIS is the actual
content of the Event. It can contain any numberof
actual “key/value” pairs but is restricted to3 types:
-Strings(ex: “message” below)
-Numbers(ex: “count” below)
-Booleans(true or
false, ex: “success” below)
=> the values you are
passing will depend on what you are trying to achieve.. they could contain
anything, for example: a ticket number in ServiceNOW, a description of a
ticket, the status of a process running somewhere else, an ID number that
needs to be processed, etc.
Ex:

At this point, youwill not be able to
send an event to AE: we first need to create the Objects in AE that are
necessary to the processing of this event. So let’s put this aside for now.
Part 2: Processing Events with EDDA & AE:
The purpose of EDDA is to Trigger
AE Objects based on the content of an event. EDDA Maps the attributes from your
Rest Body to the Variables needed for an AE Object to run.
Ex: I want to pass the value of my
attributes “count”, “message” and “success” to a SCRI Object and
run it.
EDDA does this by reading the attributes of
an event, mapping them to PROMPTSET Variables of an AE Object and then
submitting the AE Object accordingly.
(All Automic Objects below can be found in the zip file attached to this post).
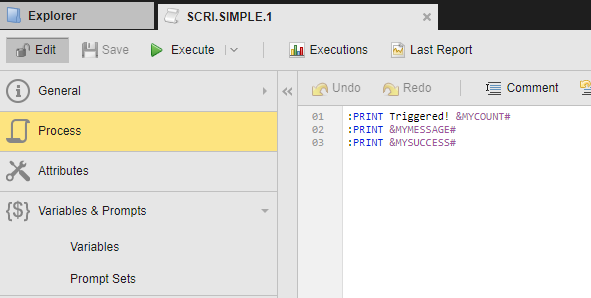
A- Let’s create the SCRI object
and its PROMPTSET first then. Here is an example:
My SCRI Object:
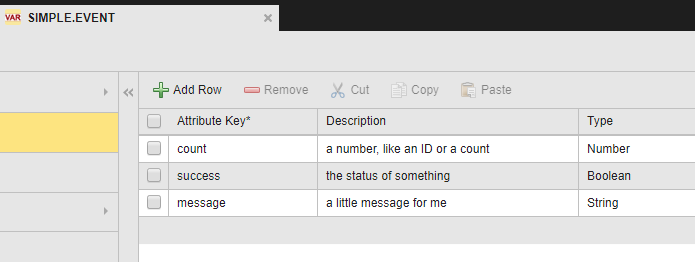
And
its promptest:

(Number represents variable
&MYCOUNT#, Message represents &MYMESSAGE# and Success is
&MYSUCCESS#)
B- Let’s now create the mapping between our
Rest Event and the SCRI execution:
Create an
EVENT_DEFINITION VARA Object.
In it, specify the
structure that you are expecting to extract (the list of attributes from the
body and their type, essentially):
=> this (I suspect) is
only used internally to list all the attributes that need to be extracted by
EDDA from the Event (Ex: the event could contain any number of other useless
attributes, only listing the ones we need here offers better performance when parsing
the body of the Request)
Create a SIMPLE_RULE
EVENT Object.
In it, specify the VARA Object you created in the previous step.
In
the “Conditions” tab, specify what constitutes a “Valid” event. This
allows you to filter events depending on their content.
=>
you need to use this particular syntax for attributes “event.<name
of attribute>”. Ex:event.count, event.message, event.success
In
the “Action” tab, specify which AE Object you want to trigger if an Event
passes the “Conditions” successfully
=>
you should Map your attributes to Promptest Variables for the object you
want to trigger.
Here is a complete example of this:

Execute your SIMPLE_RULE
Object
=> you should see it run
in the Process Monitoring and it should have an “Event Count” of 0 (in the
Details):

Go back to Postman and send your Event as
previously defined (play with the values in it to see what happens):

The “Event Count” should
increment every time you trigger an event:

The “RULE” will also
trigger “children jobs” every time:

And each one of these
should trigger your SCRI object with the values taken from the Event’s
attributes:
