Symantec Access Management

 View Only
  • 1.  Update Vmware Image's Dynamic IP Address to Static IP (outside of the image)

    Posted Dec 24, 2017 03:10 AM

    Team,


    If you wish to share a virtual image, and the virtual images does NOT allow re-assignment of IP addresses, this can be a challenge.


    Fortunately, there is a method to address.


    If you have moved or copied a vmware image (snapshot copy), the generate MAC address within the *.vmx configuration file may also change.    When you restart your moved/copied image, the IP address assigned by Vmware DHCP services will provide a new IP address.


    One method is to roll-back the MAC address to the older version, if this is your own HOST OS vmware system.


    If this is a copy to share with others, it will be necessary for the user to update their own (NAT) to the same IP range, or setup a new HOST-ONLY with the same IP range.


    To force the SAME IP address to be used, the following configuration files may be edited for Vmware Workstation/Player.   Vmware Fusion has similar files with different names.


    If you find this useful, please let me know.


    I am using this process for the CA Identity Suite virtual application solution; when I build "sandbox" environments for customers to share.


    Cheers,


    A.


  • 2.  Re: Update Vmware Image's Dynamic IP Address to Static IP (outside of the image)

    Broadcom Employee
    Posted Jan 03, 2018 12:44 PM

    Thank you Alan.

    For those who have attempted this or going to try this, it will be easier to use "VMware Workstation Pro" as opposed to "VMware Player" since the "vmware network editor" is not available by default with the Player. There are a few hacks to get over this, however your mileage may vary depending on the exact version of VMware Player, host OS, barometric pressure etc.

    And also note that "VMware Workstation Pro" versions v14 onwards could be sensitive to the host CPU/Architecture for virtualization support (especially on Windows OS).


    This is the combination that has worked for me:

    - Windows 10 64-bit on i7 quad core host

    - VMware Workstation Pro 12.5.8


    Hope that helps


  • 3.  Re: Update Vmware Image's Dynamic IP Address to Static IP (outside of the image)

    Posted Jan 03, 2018 06:02 PM

    Thanks Vikram,


    Agree that Vmware Workstation Player has additional challenges without use of the VMware network configuration GUI tool.


    Without the GUI tool, multiple manual edits would need to occur.

    Note:  The files under C:\ProgramData\Vwmare are the same for VMware Workstation Pro, however there are static values in the MS Windows Registry that would also need to be updated.


    1) HKLM\Software\Wow6432\Vmware, Inc\VMnetLib\VMnetConfig\vmnet8      [Update IPSubnetAddress to correct 192.168.***.0  range]

    2) HKLM\System\CurrentControlSet\Services\VMnetDHCP\Parameters\VirtualEthernetSegment\8\HostIpAddress     [Update HEXADECIMAL address for HOST NIC]      

         - Use 3rd party sites to convert HEX to IP format and back.   Enter the new  192.168.***.1  address for the host]

    3) Update both C:\ProgramData\VMware\vmnetdhcp.conf & vmnetnat.conf with a search/replace from 192.168.AAA  with 192.168.***

    4) Edit the DHCP lease file   C:\ProgramData\VMware\vmnetdhcp.lease  to remove the virtual host entry

    5) Capture the MAC address from the above file, and then add the virtual host entry to force a fixed IP address to the C:\ProgramData\VMware\vmnetdhcp.conf   file.

    6) Bounce both the NT Services of "VMware DHCP Service" and "VMware NAT Service"

    7) Restart the Vmware Image, and validate it is now able to communicate over the new IP range.


    Cheers,


    A.


  • 4.  Re: Update Vmware Image's Dynamic IP Address to Static IP (outside of the image)

    Posted Jan 18, 2018 12:07 PM

    Follow up:    Request from customer to use the sandbox image on MS Windows Hyper-V.  

    Customer's corporate desktop policies allow use of Hyper-V, but not Vmware Workstation.


    ### ###


    Note:   Vmware Workstation will not work on a workstation/laptop(s) that have MS Windows Hyper-V enabled and running.

    If you plan to use both, you will need to switch Hyper-V on/off as needed.


    Hyper-V Conversion of VmWware Disk On Local Workstation

    Step 1: Install MS Hyper-V Converter Tool

    https://technet.microsoft.com/en-us/library/dn873998(v=ws.11).aspx

    https://www.microsoft.com/en-us/download/details.aspx?id=42497


    Step 2: Deploy Hyper-V Components/Features on local workstation  [via powershell or DISM]

    Enable-WindowsOptionalFeature -Online -FeatureName:Microsoft-Hyper-V  -All

    DISM /Online /Enable-Feature /All /FeatureName:Microsoft-Hyper-V


    Step 3: On / Off Hyper-V Service on local workstation   [Note:  Vmware workstation will NOT function with MS HyperVisor Service Enabled]

    bcdedit /set hypervisorlaunchtype auto    /  bcdedit /set hypervisorlaunchtype off


    Step 4: Convert VMDK (Vmware) to VHDX (MS) Disk format via Powershell from MS Hyper-V Converter Tool.

    Import-Module 'C:\Program Files\Microsoft Virtual Machine Converter\MvmcCmdlet.psd1'

    ConvertTo-MvmcVirtualHardDisk -SourceLiteralPath 'C:\temp\vmware\IMAGE_NAME.vmdk' -VhdType DynamicHardDisk -VhdFormat vhdx -destination 'C:\temp\vmware\NEW_PATH_FOLDER


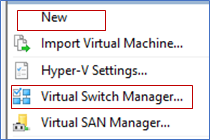
    Step 5: Use MS Hyper-V Manager GUI

    Create a NEW “Generation 1” Image & 16384 MB RAM & use existing “converted” Hard Drive & Create a new virtual NIC to be referenced by the image

    Select “Virtual Switch Manager”, create a new NIC name & checkbox as Internal; accept all other defaults.

    Open MS Windows (on host) Network Properties for this new virtual NIC; and add IP address for “host” that will be on same SUBNET as the new “guest” image.    This process assumes that “guest” IP is STATIC.

    Note:  There is NO default DHCP service with MS Hyper-V solution  [Not like Vmware Network Service]


    Step 6: Start up “guest” image

    If “guest” image does NOT already have a static IP, allow solution to continue (with errors), until a command line login prompt is provided.   Ensure static IP is in same subnet as “host” NIC.

    Login to solution and update the Linux CentOS 6.x network services files.

    /etc/sysconfig/network-scripts/ifcfg-eth0      [BOOTPROTO=none; IPADDR= IP_ADDRESS_HERE]

    /etc/udev/rules.d/70-persistent-net.rules     [Ensure one entry with correct MAC address of guest image or delete all entries, e.g.   echo -n > 70-persistent-net.rules]; then reboot image


    Step 7: After successful re-start with new NIC, create a Hyper-V checkpoint


    Step 8:  Done.  Login to user console / remote web services to validation conversion has no issues.


    ### ##


    Example of the two (2) files on the vmware guest, that require static values for Network settings:


    Minimal information required for /etc/sysconfig/network-scripts/ifcfg-eth0

        -  Add HWADDR=   if needed but not required with single NIC.


    Two (2) options:  Empty & allow auto-regeneration or replace MAC address in /etc/udev/rules.d/70-persistent-net.rules


    Cheers,


    A.