Team,
Since early days of the CA Identity Suite solution, there has been a provisioning SDK that would allow an approved process to extend the CA Identity Manager's IMPD (provisioning directory) schema from the default of 99 user custom fields to 999 user custom fields. These 99 user custom fields are in addition to the standard 40-50 default user profile fields, e.g. givenName (First Name), sn (LastName), userID, telephone #, etc.
Typically, CA Identity Suite (Identity Manager) Provisioning Tier does NOT attempt to be a meta-directory, but act as a virtual directory to the 1000's of managed endpoints/userstores/applications. As long as the "explore" operation was successful, there will be a "pointer" object that references the correct location of the endpoint accounts. And when a "correlation" operation occurs, this endpoint account "pointer" object is attached (via inclusion referential objects), to the associated global user ID.
By using this "virtual directory" architecture, it is possible for IM business rules or 3rd party tools to directly view the 1000's of managed endpoints "real data" and not a "stored" representation of this data.
However, some clients do wish to "collect" the native data, and store this within the IMPD provisioning store, as SNAPSHOT data, to monitor for non-approved / OOB (out-of-band) access. If some fields are dedicated to select endpoints, the default of 99 custom fields may quickly run out.
The CA Identity Suite contains a Provisioning SDK download, and there is a readme file included within the install.
After running through the exercise of adding 999 user custom fields, I wanted to clarify some of the steps in the readme file, and outline a step-by-step process. & include screen shots of the process.

#### ###### REVISED STEPS HERE #### ####
#### ###### REVISED STEPS HERE #### ####
#### ###### REVISED STEPS HERE #### ####
Updated the steps mentioned in the README.txt file found in CA\Identity Manager\Provisioning SDK\admin\samples\COSX
#######################################
#### README FILE UNDER COSX FOLDER ####
#######################################
The COSX Sample shows how to extend the number of custom global user attributes in your CA Identity Manager or eTrust Admin installation. Follow the steps listed here and you will introduce from 1 to 900 new custom global user attributes. For instance, if you decided to add 30 new attributes, those new global user attributes would be named
eTCustomField100 through eTCustomField129 and corresponding "name" attributes would be defined in the SystemSettings object named eTCustomFieldName100 through eTCustomFieldName129
If you later want to increase the number to 60 over the standard 99 attributes, you would just follow this procedure again. However, reducing the number of attributes shouldn't be done if you've ever assigned values to the attributes you want to delete.
The steps you'll follow are to be performed on Windows:
NOTE: Steps 0-3b may be performed on a remote MS Windows Workstation with Internet Access.
0a. Install MS Visual Studio 2010 VC Express (free) or full MS Visual Studio 2010 (Fee/License required)
- Note: NOT MS VS 2010 VB Express
- 4/2018 Note: Use https://my.visualstudio.com/Downloads?q=visual%20studio%202012&wt.mc_id=o~msft~vscom~older-downloads
- The MS VS 2010 VC Express is available as web-download; will need INTERNET access.
- Recommend this exercise be done on a workstation with INTERNET access & then copy the resulting output files to the CA Directory/IMPS servers.
- Size: nmake is 70KB, but requires the supporting VC folder of 7 MB. The download includes other files; and will require 1.1 GB free install space.
0b. Add MS VS 2010 VC Bin folder to the Win OS PATH
1. Install the CA Provisioning SDK package, including this sample.
- cd C:\Program Files (x86)\CA\Identity Manager\Provisioning SDK\admin\samples\COSX
- open command line window as OS Administrator to avoid "Access Denied" messages from the creation of a new output file.
- Right click CMD process, and select "Run as Administrator"
2. Run "gencosx 30" to create the parser table input file cosxparse.pty
that defines the 30 new attributes.
- Note: Max in batch file is limited to 900.
- May take 5-10 minutes depending on how large the number selected is.
- Output file: cosxparse.pty
3a. In same command line window, execute the MS VS 2010 VC variable batch file, to ensure win32.mak dependency "nmake" file is found.
"C:\Program Files (x86)\Microsoft Visual Studio 10.0\VC\vcvarsall.bat"
- Otherwise: set INCLUDE=%INCLUDE%;"C:\Program Files (x86)\Microsoft SDKs\Windows\v7.0A\Include"
3b. Run 'nmake' to compile the parser table input file into a compiled
parser table cosxparse.ptt (placed automatically in the ..\..\data folder).
4a. Use ftp or copy program to place the new cosxparse.ptt file under the IMPS_HOME/data/ folder
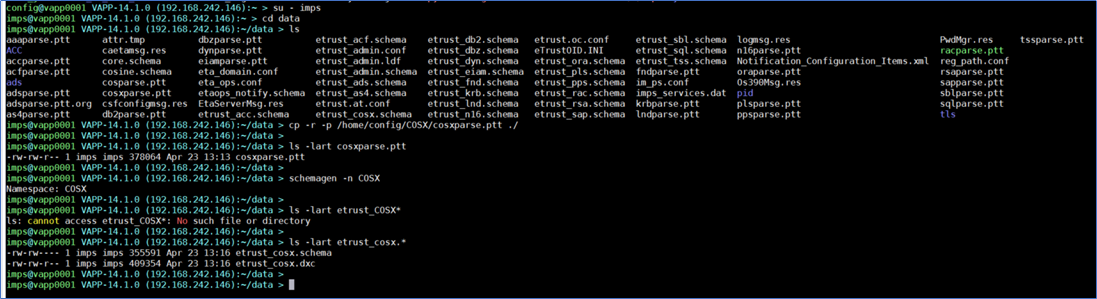
- If using the Identity Suite vApp, use the config user to place this file under /tmp
- then "su - imps" & copy this file to the data folder: cp -r -p /tmp/cosxparse.ptt ./data/cosxparse.ptt
4b. Copy the cosxparse.ptt file that was just built from the place where it
was created
..\data\cosxparse.ptt
to its installed location
....\Provisioning Server\data\cosxparse.ptt
5a. As the imps user, run 'schemagen -n COSX' to create the COSX schema files:
etrust_cosx.schema -- the SLAPD schema file
etrust_cosx.dxc -- the ETD schema file
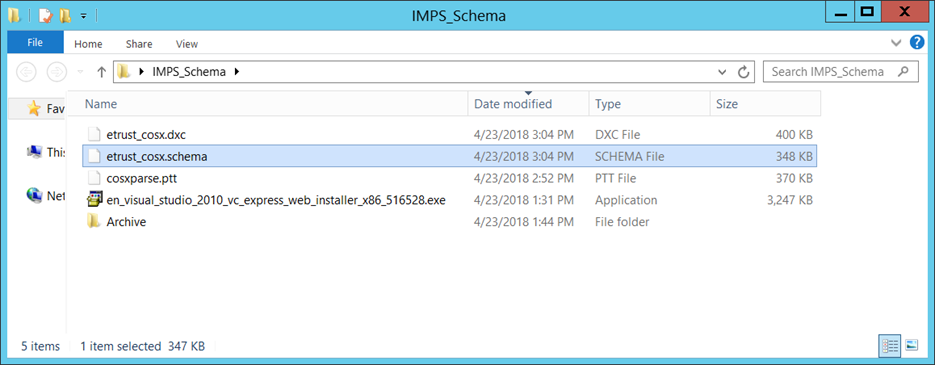
5b. Use ftp or copy program to place the two (2) new files on the remote MS Windows box for future placement.
- Keep three (3) files together, for tracking purposes: cosxparse.ptt, etrust_cosx.schema, etrust_cosx.dxc
6. Install these files wherever schema and parser table files are normally installed:
a. *.dxc files go to CA Directory systems. And if not already
linked in, you'll need to edit the impd.dxg file to include
this new etrust_cosx.dxc file.
- Include CA Directory router for the IMPS servers, if CA Directory IMPD data DSA are on remote server.
- May validate with Jxplorer, that the new schema is viewable.
- Use grep: grep etrust_cosx impd.dxg under DXHOME/config/schema to validate this schema is sourced: source "etrust_cosx.dxc";
- Important: Restart or Re-init DSA_NAMES
b. *.schema files go on provisioning server systems and C++ connector
server systems (but not manager workstations). And if not already
linked in, you'll need to edit the etrust_admin.conf file to
include the new etrust_cosx.schema file.
- Use grep: grep -i cosx etrust_admin.conf under IMPS_HOME/data to validate this schema is referenced:
include "/opt/CA/IdentityManager/ProvisioningServer/data/etrust_cosx.schema"
- Important: Restart these servers: [ imps stop/imps start | net stop im_ccs/net start im_ccs ]
c. *.ptt files go on provisioning server systems, C++ connector server
systems and remote manager workstations.
- Important: Restart these servers: [ imps stop/imps start | net stop im_ccs/net start im_ccs | shutdown/restart IMPM GUI]
- Validate with IMPM GUI - Should see 999 object under "System/Global Properties/Custom User Fields."
- Scroll down to the last field: Add a label.
- Navigate to a Global User, right click to view properties, to view larger screen.
- Select "Custom Fields" TAB. Should see the 999 object with the new label.
7. To expose these new user custom fields to the upper tier of the Identity Manager IME, the Provisioning Server (Directory.xml) must be exported & then updated with the 999 new fields.
8. To associate these 999 new fields to IME userstore fields, the IME Provisioning Mapping (Advance Settings) in the IM Management Console, will need to be updated.
####### REVISED STEPS ABOVE ##### #####
####### REVISED STEPS ABOVE ##### #####
####### REVISED STEPS ABOVE ##### #####
Step 0: MS Visual Studio 2010 VC Express [ May be done on a workstation to generate the primary file]


Exercise may be done on a workstation, to avoid adding one-time files/installation.


Two (2) new files created from processes: gencosx.bat & nmake

Copy the cosxparse.ptt file to the IMPS server, and execute the command to generate the schema files
Copy the etrust_cosx.dxc to ALL CA Directory servers (including the routers) - validate impd.dxg does reference this file already (newer version of Identity Suite).

Copy all files together to all better tracking of where to place these files:
Update the IMPM GUI (Provisioning Manager GUI) data folder:

In the following order, bounce the following services:
1) CA Directory Data DSA for IMPD: dxserver stop all / dxserver start all (or re-init dxserver init all )
2a) CA CPP / C++ Servers: Windows (net stop im_ccs / net start im_ccs)
2b) CA IAMCS (JCS) with embedded CPP / C++ Servers: Windows (net stop im_jcs / net start im_jcs)
3) CA Provisioning Servers: Linux ( su - imps; imps stop / imps start) | Windows (net stop im_ps / net start im_ps)
4) CA Provisioning Manager GUI: Stop & Re-Start.

Step 7 & 8 are common processes, that already have excellent examples.
If you find this of use, please leave some feedback.
Cheers,
Alan