See the draft of a procedure attached. It was not created by me. I was going to create in the previous version that only had the "default", but with the upgrade appeared the "mobile" channel that it needed.
If didn't work, or need an "official" procedure, open a "case" with the CA support.
Regards,
This procedure explains the steps involved in adding new Actions and Channels to RiskMinder, as we don’t have built –in UI support to add actions and channels from admin console, this is based on the DB scripts that are provided along with the product.
Thought this document and ‘arcot-db-config-for-custom-channel-3.1.01.sql’ is based on Microsoft SQL Server database.
- DB Script ‘arcot-db-config-for-custom-channel-3.1.01.sql’, have several sections and each section was explained adding new channels section.
- This script is based on the “DEFAULT” channel available in RiskMinder and will create channel similar to “DEFAULT” channel (new channel will have same actions, txn elements and their operators as DEFAULT channel).
- If we want to add new actions and channel, it is suggested to add actions first and then update channel creation script with new action details.
- In case there are rule specific to a channel, those rules will be evaluated only when channel name is mentioned in the risk evaluation request.
- In case there are rules specific to channel, action, those rules will be evaluated only channel name and action details are available in the risk evaluation request.
Adding New Actions to RiskMinder
- In order to have new actions for a channel, we need to have txn type available in ARRFTXNTYPE table.
- Insert new txn type into ARRFTXNTYPE, below insert statement
- Link the new txn type to channel.(This can be done during channel creation)
- We also need to define (create) channel txn type elements for this channel and action type.
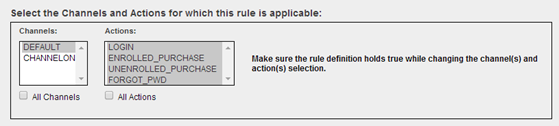
- Available ‘Actions’ in RiskFort Rule Builder
The following statement will insert new Transaction type 'TEST'.
Note: update sequenceid, Txntypeid and other details before you insert new txn type.
INSERT INTO ARRFTXNTYPE
(SEQUENCEID
,ORGNAME
,Txntypeid
,TXNTYPENAME
,Displayname)
VALUES
(5,null,5,'TEST','txt.risk.txntype.t5.display')
Link new txn type to channel. This can be done during the channel creation, in the channel creation sql script there are 4 insert statements for the table ‘ARRFCHANNELTXNTYPE’, add one more insert statement with the new That looks similar to the one shown below,
Note: Update SEQID, CHANNELID, TXNTYPEID and other details.
INSERT INTO ARRFCHANNELTXNTYPE
(SEQID
,ORGNAME
,CHANNELID
,TXNTYPEID)
VALUES
(8,null,3,5);
We need to update ARRFCHANNELTXNTYPEELEMENTS table with transaction elements that supports this action
Sample script:
Note: Update CHANNELID and TXNTYPEID for your case
DECLARE @temp_var_ChannelTxnTypeElemSeq INT;
EXEC @temp_var_ChannelTxnTypeElemSeq = nextVal 'ARRFCHANNELTXTYPEELEMSEQ';
INSERT INTO ARRFCHANNELTXNTYPEELEMENTS (SEQID,ORGNAME,CHANNELID,TXNTYPEID,ELEMNAME) VALUES (@temp_var_ChannelTxnTypeElemSeq,null,3,5,'USERNAME');
- The above insert uses ‘USERNAME’ element which is already available, if new elements are added,
- These new elements need to be linked to channel in “ARRFCHANNELELEMENTS” table.
- Those operators corresponding to new elements needs to be updated in ‘ARRFELEMOPREGIONMAP’ table.
- Refresh the server cache, and then this action will be available for that channel.
Adding new channel to RiskMinder
We can add new channels in riskminder by making changes in the database. We can define rules specific to a channel and those rules will be evaluated only if request specifies the channel name,
The script “arcot-db-config-for-custom-channel-3.1.01.sql“has all the required database changes to add a new channel, this script can be used as reference to add new channels.
Note: Make sure that you update script with the name of the channel, i.e, replace” <CHANNEL_NAME>” with the new channel name. Also use name in UPPER CASE or LOWER case (in case of labels like: txt.risk.channel.<CHANNEL_NAME>.category.basic) where ever applicable. Also update channel short name for <CHNL>.
The DB script ‘arcot-db-config-for-custom-channel-3.1.01.sql’ will cover the following DB changes.
- We need two extra tables for each channel, one is for sys audit log and other is for case transactions.
- Typically sys audit log table be named as “ARRFSYSAUDITLOG_<CHANNEL_NAME>”
- Case txn table can be named as ARRF_CASE_TXN_<CHANNEL_NAME>
Where <CHANNEL_NAME> represents the name of the new channel.
Note: make sure to change the PRIMARY KEY CONSTRAINT names in both create statements.
2. We need to update the following
- ARRFCHANNEL
- New channel specific data will be inserted.
- ARRFCHANNELDETAILCATEGORY
- Channel category details will be updated.
- ARRFCHANNELELEMENTS
- Linking transaction elements to channel.
- ARRFELEMOPREGIONMAP
- Linking operators to transaction elements, channel.
- ARRFCHANNELMSGPROPERTIES
- Updating message/label properties
- ARRFCHANNELTXNTYPE
- Linking transaction types to channel.
- ARRFCHANNELTXNTYPEELEMENTS
- Binding txn type, transaction elements to channel.
Update index names to include channel name.
Once we update these tables, restart the Riskfort service and admin console application.
Steps to enable channel in admin console
- Login to admin console for your organization and go to ‘Organizations’ tab.
- Search for your organization and click on your organization.
- Go to ‘Riskfort Configuration’ tab.
- Select the checkbox corresponding to your channel under ‘Select Channels to Associate’ column.
- Click on ‘Save’ to save the configuration.
- Refresh cache:
- Go to ‘Services and Server Configurations’
- Select ‘Administration Console’
- Select ‘Refresh System Configuration’ and ‘Refresh Organization Configuration’
- Click ‘Ok’.
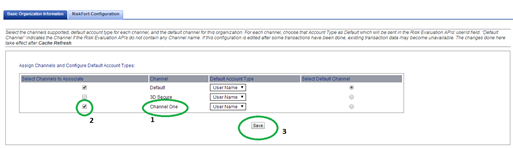
- See that the channel you have added is available.
- Select the channel to associate with this organization.
- Save the settings.
Creating new rule with new channel details
- Login to admin console for your organization and go to ‘Organizations’ tab.
- Search for the organization and click on your organization.
- Go to ‘RiskFort Configuration’ tab.
- Click on “Rules and Scoring Management” under ‘Rules Management’.
- Select Ruleset that is active for your organization from the ‘Select the Ruleset’ dropdown.
- Click on ‘Add a new rule’ link.
- Channel details:
- Fill Name, Mnemonic and Description for the rule.
- Deselect “All Channels” checkbox and select the channel applicable for this Rule.
- Update the rule fragment(s) and click ‘Add’ to save them to ‘Saved Rules’.
- Click on ‘Create’ to create the rule.
h. Once the rule is added, update its Risk Score and Priority and Enable it. Increase the priority for this rule and put it before any rule that is applicable for ‘All Channels’, So that this will be evaluated once the channel in the request is matched.
i . Save the setting by clicking on ‘Save’ button.
j. Migrate to production:
- Click on “Migrate to Production” link in ‘Migrate to Production’ section.
- Select the ruleset that you have updated and click on ‘Migrate’ button, in the next confirm the migration.
Once the ‘Migrate to production’ is done, Refresh the server cache (refer ‘Refresh cache’ in ‘Steps to enable channel in admin console’ section).
Now we have a custom rule which is applicable for a specific channel, pass channel name also in the risk evaluation request

Rule builder:
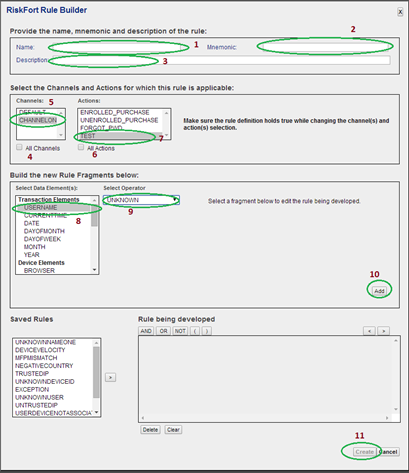
- Name of the rule
- Mnemonic for the rule
- Description
- Deselect “All Channels”.
- Select the channel newly created.
- Deselect “All Actions”.
- Select the channel applicable.
- Select Transaction element.
- Select the operator
- Add the rule
- Click on ‘Create’ to create the rule.