CA Mobile Application Analytics (MAA) Tuesday Tip by Bryan Whitmarsh, Sr Principal Technical Consultant for Tuesday, May 26, 2015
In this Tuesday tip we will walk you through how to setup Android Studio to automatically wrap your mobile application with the MAA SDK leveraging the Gradle build system. In many ways this is the easiest and most logical wrapping method. The wrapping process happens as a natural part of the build process, and as a result the wrapping process is reliable and interoperates properly with obfuscation.
Step 1
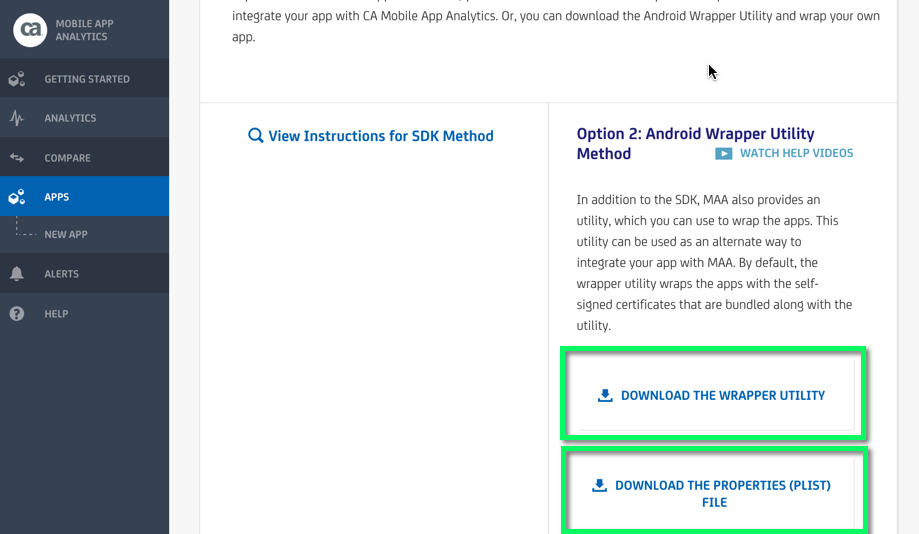
Download the Wrapper Utility and application PLIST file from the MAA Console, which can be found under the “APPS” menu.
Step 2
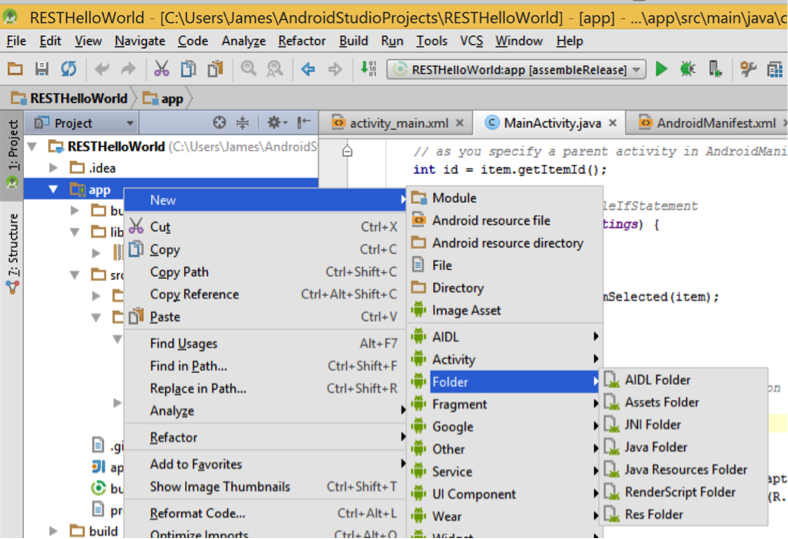
Add the .plist to your project. The file needs to be copied to the “assets/conf” directory in the project. If this directory doesn’t exist it will need to be created. (In Android Studio, in the project hierarchy, right-click on the “app” element, click on the “New” menu, then the “Folder” menu, and finally the “Assets” folder, as shown below)
A confirmation dialog is displayed. Don’t change anything. Just click “Finish”.
A new folder called “assets” under the project’s “src/main” folder will be created.
Right-click on this “assets” folder. Click the “New” menu and then select the “Directory” option.
A dialog will appear asking for the folder name. Enter “conf” and click OK, as shown below.
Now copy your <app_name>.plist to this new conf directory.
Step 3
Copy the downloaded wrapper to a more convenient location. The purpose of this step and the next is to set a CA_EMM_HOME environment variable pointing to the “emm” subfolder of the location where the MAA wrapper script was downloaded. As an example we will copy the wrapper to the C:\maa directory for Windows and the ~\maa directory for Mac OS X. Unzip the downloaded MAA wrapper zip file to this directory. After doing this you should have the ca-maa-android-sdk-wrapper-nn.n.jar and wrap.sh files in the “maa” directory and an “emm” subdirectory.

Step 4
Create the CA_EMM_HOME Environment Variable. Exit Android Studio if it is running.The environment variable CA_EMM_HOME must be set to C:\maa\emm on Windows, and ~/maa/emm on Mac OS X. The instructions for doing this follow.
Windows:
Start the Control Panel.
Choose the “System and Security” icon.
Choose the “System” icon.
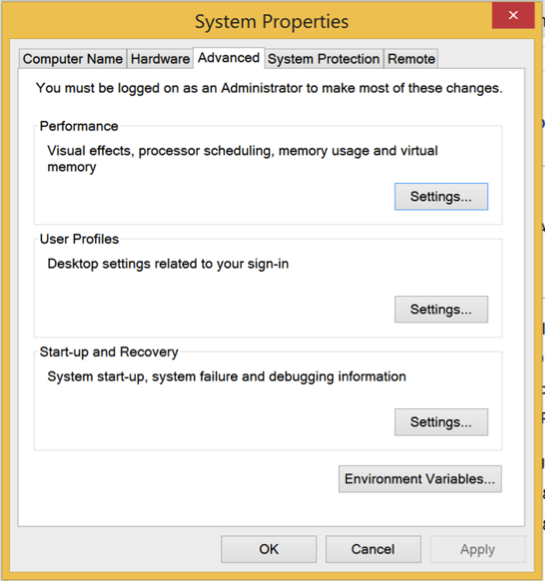
Choose the “Advanced System Settings” option. You should see a screen like this:
Add a new ‘User Environment Variable”: click the “Environment Variables” button. There are two buttons labeled “New…”. Click the topmost “New…” button. Create a new CA_EMM_HOME “User Environment Variable” as shown below:

Mac OS X, start the Terminal.
Enter the following command: launchctl setenv CA_EMM_HOME ~/maa/emm
Step 5
Configure Gradle Plugin settings. (Gradle is the Android Studio build system. It supports a “Plugin” architecture to allow new build tasks to be integrated. The MAA Android Wrapper library provides a Gradle plugin that provides a new “wrapper” task that can be called by Gradle during the app build process)
In the project organizer view double-click the entry for the “build.gradle” file. The contents of the file will be displayed in the editor window. BE CAREFUL: there are two instances of “build.gradle”. Make sure you are editing the one in the project root, AND NOT the one under the “app” directory in the project, as shown below:

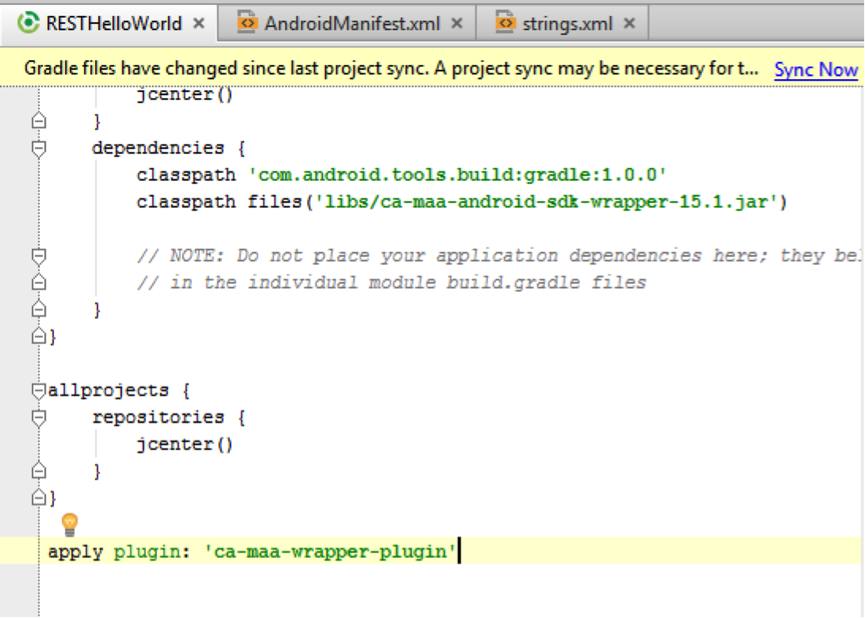
Add the following line of text at the location shown below to the build.gradle:
Windows: classpath files('C:/maa/ca-maa-android-sdk-wrapper-nn.n.jar') Note that forward slashes (“/”) are used instead of the usual Windows backslash (“\”).

Mac OS X: Using the value of CA_EMM_HOME you recorded earlier, add the equivalent line to build.gradle:

Windows and Mac OS X: Add the following to the end of the gradle.build file: apply plugin: ‘ca-maa-wrapper-plugin’, as shown below:
As can be seen in the screenshot above a yellow bar saying that “A project sync may be necessary…” with a blue “Sync Now” link. This link should be clicked if it appears.
Verify that things have worked: Click the “Gradle” link at the very right-hand side of the screen where shown below, and expand the tasks to verify that the “maaWrapperTask” has been added. If you do not see this re-check these instructions and try again

Step 6
Integrate Wrapping into the Gradle Build script. Now that the MAA Gradle plugin is available to Android Studio the final stage is to define the Wrapping process to Gradle. For this stage we will be working with THE OTHER build.gradle file, underneath the “app” folder in the project organizer view as shown below:
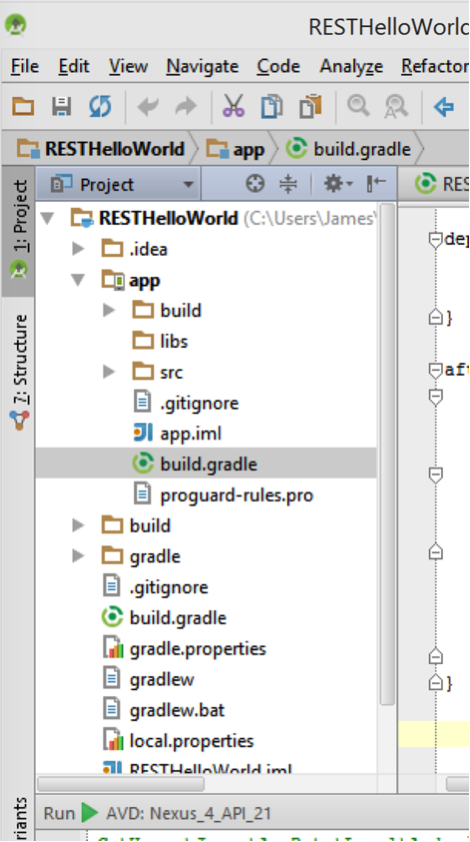
Add the following lines to the end of the build.gradle file:
afterEvaluate {
android.applicationVariants.all { variant ->
def newWrapperTask = tasks.create(name: "${variant.name}MAAWrap", type: com.ca.android.wrapper.gradle.CAMAAWrapperTask)
variant.outputs.each { output ->
newWrapperTask.ext.apkFilePath = output.outputFile.toString()
newWrapperTask.dependsOn output.packageApplication
}
newWrapperTask.ext.plistFilePath = 'app/src/main/assets/conf/RESTHelloWorld_camdo.plist'
variant.assemble.dependsOn newWrapperTask
}
}
Another “yellow bar” requesting a “project sync” will appear. As before click the blue link to synchronise the project.
Step 7
Build and test the app. Ensure that the “Gradle Tasks” window on the right-hand side of the screen is still open. If not use the “Gradle” button at the extreme right of the Android Studio screen to re-open it. Expand the tasks underneath “app”:

Note that there are various build tasks such as “assembleRelease”, “assembleDebug” etc. Ensure that the Gradle console is displayed by clicking the “Gradle Console” button at the bottom right of the Android Studio window. 4. From the Gradle Tasks, double-click the assembleDebug entry. The Gradle Console window will show the progress of the build process. After a short time the MAA wrapping sequence will begin. When the wrapping is complete the location of the newly-wrapped APK file is shown.
You now have a one step process to build and wrap your Android application.