Document Purpose/Summary
This document is intended to guideadmins through installing a TIM on a virtual environment while avoiding typical pitfalls. This document addresses TIM from APM Version 9.1.x and later only (installed on a 64Bit architecture on RedHat 5 and RedHat 6 for APM 9.6 and later).
Intended Audience
Technical field staff admins having to deal with an APM 9.x installation.
Even though an installation can be done without any other knowledge if everything goes right, having Linux command line skills and knowing how to correctly configure the network settings on a Linux host are of a big help in case troubleshooting is required.
Introduction
The TIM installation process itself is handled in 2 steps. However the OS installation on a virtual machine is over-simplified by the Virtual Machine software manufacturer. So – the following steps will be handled in this document:
- Hardware requirements (Virtual in this case)
When talking about the “Host” – the Hardware the ESX Server is running on is meant. When talking about the “Guest” - the Virtual machine which is running the RedHat 5uX/6uX suitable to run the TIM is meant.
Note: as for each and every TIM Setup, (The importance of clean traffic for APM CEM )clean network data is mandatory! Nothing is worse than false positives the TIM will Monitor if the network data is corrupt or doubled or etc.
Hardware requirements (Virtual)
As the TIM will be running on a virtual Environment, we need to account for the overhead induced by the Virtualization layers, and anything that can be an issue for the TIM process to work correctly.
- 3.2GHz CPU on the Host CPU
Make sure the CPU of the Host running the Virtual machine will have 200Mhz more than the TIM requires – hence 3.2GHz as the TIM requires 3GHz for itself. If you use a lower speed CPU, expect the performance to be degraded. - 2 CPU Cores minimum. UP to TIM 9.6 uses only one core for itself – but the 2nd Core will handle everything around. From TIM 9.7+ on, the TIM installer will configure the TIM to run as many workers as there are CPU's available to the OS. Note however that the Virtualization layer will slow down the multiworkers too.
- 6GB Memory for the OS
The Memory requirements need to fit the current release as per Hardware requirement guide. Make sure that for TIM up to 9.6 you use 6GB of Ram assigned to the TIM. For TIM 9.7+, use the following formula:
2GB for the OS + 2GB per TIM Worker. If 4 CPU's are assigned to the VM, that would amount to 2 + 4x2=10GB of RAM. - This TIM can’t be vmotioned because the SPAN feed will be plugged into a physical ESX host – if the TIM VM is vmotioned to another host, someone basically has to walk into the datacenter and physically move the cable with the SPAN feed from one box to another (that’s not going to happen).
- If you’re SPANing a lot of external traffic to the TIM it can put a significant load on the ESX virtual switch.
Dedicated Host Network Card for the Virtual Mirror port on the TIM.
Due to the impact any switch has on the mirrored (SPAN'd) network traffic (realignment of Tx/Rx into one Tx data-stream to the TIM Mirror port), the virtual switch which is running on the ESX Host is Software only – so it is way less efficient than a real Switch. Any interaction from other traffic has to be avoided, hence the requirement to have a dedicated physical Network card dedicated to the Interface assigned to the TIM Virtual machine Guest Mirror-Port.
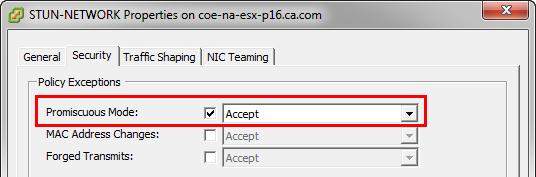
The Virtual Network Device assigned to the “SPAN” port must have Promiscuous mode set to “Accept”.
- Please note that in case this Virtual TIM is to Monitor a highly loaded application – configure the ESX host to explicitly dedicate these resources to the TIM Guest!
Resource problems cannot be detected by the TIM if running inside a virtual machine. Packet loss and other weird behavior will be seen, but any logs you may provide will not reveal the real cause of this behavior.
OS Installation
- Copy the ISO image to one of the datastores accessible from the blank VM, either using the Datastore Browser in the vSphere client or whatever other local mechanism they use (scp, file share, etc.)
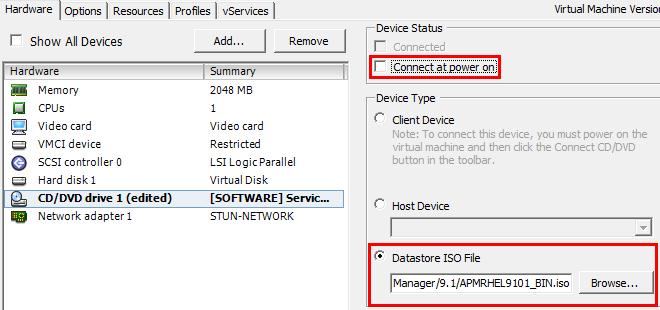
- In the vSphere, can edit the virtual machine settings for the blank VM. On the hardware tab choose CD/DVD drive, click Browse and then choose the ISO image. Check “Connect at Power On”, then start the VM and it should boot from the ISO.
- Copy the ISO Image on the Datastore of the ESX Host that will host your VM.
- Avoid Easy Installation if using the CA provided Kickstart ISO Image.
Very often the installation is made using the official ISO Image and configuring that one as Virtual CD Drive.
However – the ESX Server has a so called “Easy Installation” mode. Avoid that one. It bypasses the Kickstart-Installer, and tries to install something else – and with the CA official and unofficial Images – it will fail.
So make sure you choose "I will install the Operating system later" option.

Credits & Acknowledgments
Thanks to Hal German, David Lewis, Gary Jones and Barry Hemphill for comment, input etc.