Rapid development of Action Packs
Actions are pre-defined tasks for executing single operations as part of the Workflow. They simplify constructing workflows by providing reusable, ready-to-use, and tested building blocks for frequently needed operations. Most actions are so-called CLI actions. Many of those already contain small Java programs that are delivered together with the action pack to accomplish more complex tasks. Although existing product capabilities already support an easier creation process, developing action packs still requires a lot of knowledge about Automic Automation objects as well as Automic Script. With the Action Pack Development Kit (APDK) the development of simple Java actions can be done with Java only. Enjoy this new developer experience without the need to dig into Automic Automation details!
Goals of this Tutorial
- Kick-start the development of Java actions
- Action pack development at a glance
- Behind the scenes - what Action Pack Development Kit (APDK) does for you
Prerequisites
Kick-start the development of Java Actions
Create a Maven project for your action pack
Use the
action-pack-archetype to create a template Maven project for your custom Action Pack:
mvn archetype:generate -B -DarchetypeGroupId=com.broadcom
                          -DarchetypeArtifactId=action-pack-archetype
                          -DarchetypeVersion=1.0.0
                          -DgroupId=com.mycompany
                          -DartifactId=my-action-pack
                          -Dversion=1.0-SNAPSHOT
Based on the applied Maven archetype the following project structure will be created:
my-action-pack
|-- src
| |-- main
| |-- java
| | |-- com
| |   |-- mycompany
| |     |-- CustomAction.java
| |     |-- CustomActionPack.java
| |-- test
|   |-- com
|     |-- mycompany
|       |-- CustomActionTest.java
|-- pom.xml
Apart from a working sample implementation of an action pack (CustomActionPack.java), an action (CustomAction.java) and a JUnit 5 test for the action (CustomActionTest.java), it contains a pom-file that defines all required dependencies as well as the build steps that are needed to create a zip-archive that contains the generated action pack. The latter can be taken and installed as Action Pack in CDA.
Build your Action Pack
Make sure that you're in the project folder and execute the following command:
mvn package
Maven will build the project and create an executable JAR file as well as a zip-file that contains the generated Action Pack. You'll find both files in the folder target.
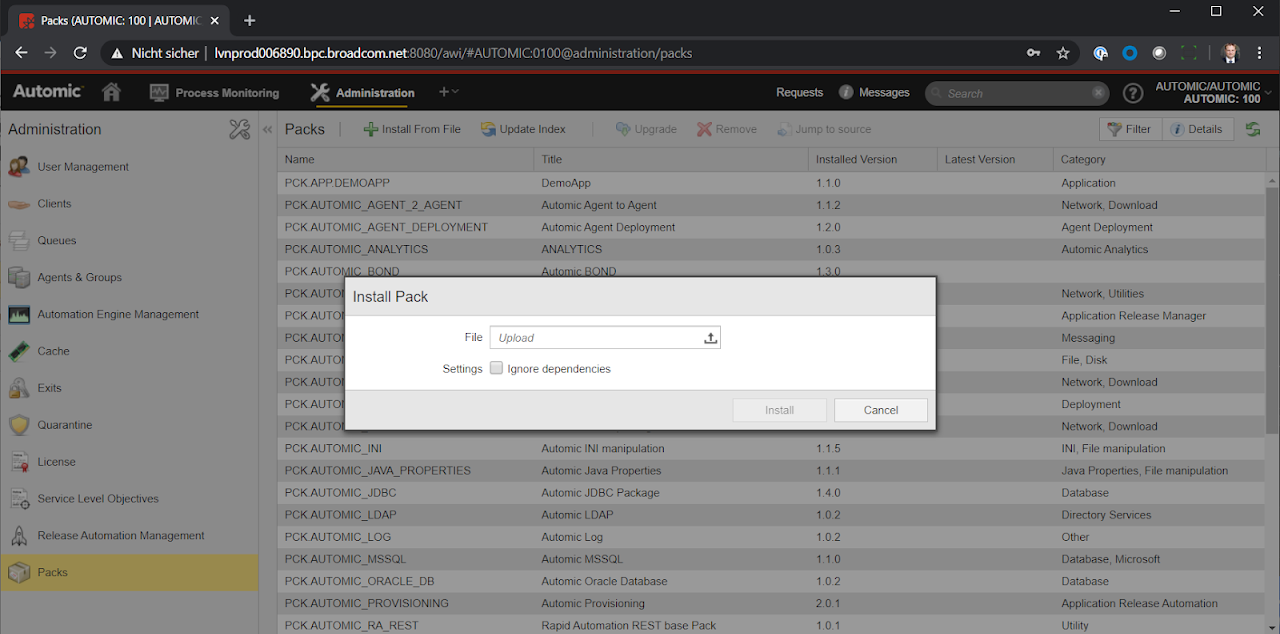
Install your Action Pack
Login to the UI and switch to Administration. If the Plugin Manager UI plugin is installed you'll find the Packs section in the left-side navigation. You can use this view to manage already installed Action Packs and install new ones by upoading the zip-file that contains the action pack. Click on Install From File, select your built zip-file and install your Action Pack!
Action Pack development at a glance
Implementing the IActionPack interface
There must be at least one class in your project that implements the IActionPack interface. It's highly recommended to achieve this by extending the BaseActionPack class that ensures the proper initialization of the approriate class members by evaluating the @ActionPack annotation. Apart from the definition of some meta data this class doesn't contain any further logic.
@ActionPack(
  name = "PCK.CUSTOM_SIMPLE",
  title = "My first Java action pack",
  category = "Custom Actions",
  company = "MyCompany",
  homepage = "http://www.mycompany.com"
)
public class CustomActionPack extends BaseActionPack {

}
Note: If the values for the fields name, packageFormatVersion and version are not overwritten they'll be initialized automatically. The field name will contain the name of your class with the prefix "PCK.CUSTOM_", the field packageFormatVersion will per default contain the value "0.3.0" and the field version will contain the version defined in your project's pom-file (the latter may not work in your IDE unless there's a MANIFEST file that contains this information) or "1.0.0" if no version information was found.
Implementing the IAction interface
Each action in your project must implement the IAction interface. It's highly recommended to achieve this by extending the BaseAction class that ensures the proper initialization of the approriate class members by evaluating the @Action annotation.
@Action(
  name = "HALLO_ACTION",
  title = "Say Hallo action",
)
public class CustomAction extends BaseAction {

  @ActionInputParam
  String yourname;

  @ActionOutputParam
  String greeting;

  @Override
  public void run() {
    greeting = yourname != null ? "Hallo " + yourname : "What's your name?";
  }
}
Override the run method to implement the business logic of your Action. In case your action required input and/or output parameters annotate the appropriate fields of your class with the @ActionInputParam respectively @ActionOutputParam annotation.
Note: The Action Pack Development Kit supports basic logging. Use the inherited LOGGER object to create log messages:
LOGGER.info("This is a log message");
Per default logging is disabled. If you want to enable logging you need to execute your project's binaries with the command line argument-l followed by the desired log level like in the following example:
java -jar my-action-pack-1.0.0-SNAPSHOT.jar -r com.mycompany.CustomAction yourname="Max" -l info
Parameter adapter
Input parameters are passed as command line arguments and therefore as Strings. In your action, you can define fields with any data type as input parameters. The Action Pack Development Kit automatically takes care of the convertion of primitive types (byte, short, int, long, float, double, boolean, char) and their corresponsing wrapper classes (Byte, Short, Integer, Long, Float, Double, Boolean, Character), LocalDate, LocalTime, LocalDateTime and enum.
Let's assume that you have a field of a custom type User defined as output parameter for your action:
public class User {

  private String username;
  private String password;

  public User(String username, String password) {
    this.username = username;
    this.password = password;
  }

  public void setUsername(String username) {
    this.username = username;
  }

  public String getUsername() {
    return this.username;
  }

  public void setPassword(String password) {
    this.password = password;
  }

  public String getPassword() {
    return this.password;
  }
}
In order to mark the field user as output parameter of your Action you already added the @ActionOutputParam annotation. Since the used datatype is unknown to the Action Pack Development Kit you need to implement an adapter and reference this adapter by adding the @ActionParamAdapter annotation to your field declaration:
@ActionOutputParam
@ActionParamAdapter(UserAdapter.class)
User user;
The adapter itself must extend the ParamAdapter class that is provided by the Action Pack Development Kit. The type parameter must match the class that should be converted to String and vice versa with the help of the adapter. Furthermore the two methods convertToString and convertToType must be implemented:
public class UserAdapter extends ParamAdapter<User> {

  @Override
  public String convertToString(User value) {
    String username = value.getUsername() != null ? value.getUsername() : "";
    String password = value.getPassword() != null ? value.getPassword() : "";
    return "\"" + username + "\",\"" + password + "\"";
  }

  @Override
  public User convertToType(String value) {
    String[] attributeValues = value.split(",");
    if (attributeValues.length == 2) {
      String username = attributeValues[0];
      String password = attributeValues[1];
      if (username.length() >= 2 && username.startsWith("\"") && username.endsWith("\"")) {
        username = username.substring(1, username.length() - 1);
      }
      if (password.length() >= 2 && password.startsWith("\"") && password.endsWith("\"")) {
        password = password.substring(1, password.length() - 1);
      }
      return new User(username, password);
    }
    return null;
  }
}
Behind the scenes - what Action Pack Development Kit does for you
Structure of a generated Action Pack
As a result of building your action pack project with Maven a zip-file will be generated that contains a ready-to-use action pack that can be imported and installed in your Automic Continuous Delivery Automation (CDA) instance. After installing such an action pack the typical folder structure will be created. Furthermore some objects (italic) will be created. The VARA object in the root folder of your action pack contains the meta data that you defined in your action pack class using the @ActionPack annotation of by overriding the appropriate getters. The STORE object contains the built binaries of your Maven project:
PCK.CUSTOM_SIMPLE
|-- ACTIONS
|-- CONFIG
| |-- PCK.CUSTOM_SIMPLE.PUB.PROMPT_EXTERNAL_MAP
|-- DOCUMENTATION
| |-- PCK.CUSTOM_SIMPLE.PUB.DOC
| |-- PCK.CUSTOM_SIMPLE.PUB.LICENSES
|-- RESOURCES
| |-- INTERPRETERS
| |-- LIBS
| | |-- PCK.CUSTOM_SIMPLE.PRV.STORE
| |-- SCRIPTS
|-- SOURCE
|-- TEMPLATES
|-- PCK.CUSTOM_SIMPLE.PUB.VAR.METADATA
Note: Please note that the actual name of the objects can of course vary since they depend on the name of your action pack!
Structure of a generated Action
For every action a new folder will be created inside the SOURCE folder. This folder contains all objecs that were generated for your action to work:
- PromptSet (PRPT): This object contains elements for all defined input parameters.
- Jobs (JOBS for Windows and Unix): These objects actually do the work. Apart from some preprocessing they call your action pack binariers via the command line and specify which action to run. Furthermore input parameters from the linked PromptSet will be passed via the command line as well. During the post processing the output parameters will be retrieved and passed to the appropriate object variables of the parent workflow.
- Workflow (JOBP): That's the object that actually represents the action. This workflow contains the JOBS objects for Windows and Unix as well as the PromptSet that reflects the defined input parameters.
PCK.CUSTOM_SIMPLE
|-- ACTIONS
| |-- BROADCOM
| |-- PCK.CUSTOM_SIMPLE.PUB.ACTION.HELLO (Link)
|-- CONFIG
| |-- PCK.CUSTOM_SIMPLE.PUB.PROMPT_EXTERNAL_MAP
|-- DOCUMENTATION
| |-- PCK.CUSTOM_SIMPLE.PUB.DOC
| |-- PCK.CUSTOM_SIMPLE.PUB.LICENSES
|-- RESOURCES
| |-- INTERPRETERS
| |-- LIBS
| | |-- PCK.CUSTOM_SIMPLE.PRV.STORE
| |-- SCRIPTS
|-- SOURCE
| |-- HELLO
| |-- INTERNAL
| |-- INCLUDES
| |-- JOBS
| | |-- PCK.CUSTOM_SIMPLE.PRV.JOB.HELLO@UNIX
| | |-- PCK.CUSTOM_SIMPLE.PRV.JOB.HELLO@WINDOWS
| |-- PROMPTSETS
| | |-- PCK.CUSTOM_SIMPLE.PRV.PROMPTSET.HELLO
| |-- ROLLBACK
| |-- VARIABLES
| |-- PCK.CUSTOM_SIMPLE.PUB.ACTION.HELLO
|-- TEMPLATES
|-- PCK.CUSTOM_SIMPLE.PUB.VAR.METADATA
Advanced APDK features
Action Pack development has never been that easy! Apart from the basic features presented in this blog, APDK provides some advanced features like the support of CDA mappings for fields or CDA Custom Types. If you want to know more, have a look at the
APDK wiki on Github!