Introduction
Network Discovery and Computers
Credential Management
Troubleshooting Tips
Pluggable Protocol Architecture
Troubleshooting Tips
Initial Network Discovery
Considerations
Troubleshooting Tips
Introduction
This document is meant to help provide users guidance in using both Network Discovery and Agentless Inventory, and to provide details, processes, and tips to avoid issues and troubleshooting problems. In way of explanation, the engine that collects data for both Network Discovery and Agentless Inventory is the same engine. Before the technology was acquired by Altiris some time ago, the two products were one in the same. Much iteration later they are two distinct products, but Agentless does use the same engine for gathering data.
Note that Network Discovery must run successfully on a device before an Agentless Inventory can be collected for that device. Without a Network Discovery, Agentless does nothing. Consider Agentless an SNMP extension of Network Discovery.
Additional NOTE! Network Discovery is first and foremost a network device inventory/discovery tool. While it is capable of finding computers, there are other methods that may be better suited for that purpose, such as an AD Import of computer objects, or the Domain Discovery provided by the Platform in relation to finding systems to install the Symantec Management Agent.
Network Discovery and Computers
An often hot topic in support is the way Network Discovery handles computer discovery. When used alongside AD Import, Domain Discovery, and Symantec Management Agent installation, often duplicates can be created. These duplicates cause problems with reporting, target and filter management, and any aspect or picker in the Console where these duplicates may show up.
To combat duplication of computer records, consider the following:
- Avoid discovery of computers by Network Discovery.
- Run Network Discovery after the Symantec Management Agent has been installed.
- Clean up DNS so that Discovery gets the correct Name.Domain primary key. This primary key is the main way computers are identified uniquely in discovery circumstances.
- Use AD Import or Domain Discovery instead of Network Discovery for the purpose of finding systems to install the Symantec Management Agent on.
- Do not use AD Import or Domain Discovery if Network Discovery is meeting your needs. The three different discovery methods are redundant in a lot of cases so it may be best to choose one of the three to use.
- Delete duplicates after a Network Discovery if the situation cannot be avoided.
Not all of these items are doable depending on the circumstances. Network Discovery is looking to help the duplicate issue by reevaluating the items used to identify unique machines already registered in the Symantec Management Platform.
The following process is used when looking up existing systems within the Symantec CMDB Database. There are 2 primary keys used by Network Discovery in order to avoid creating duplicates and instead updating existing records in the database. These keys are:
- NetBios Name, Domain (name.domain key)
- MAC Address
This comparison is done against the results from the stored procedure tmBuildTargetDeviceCache which uses the vTaskTargetDevices view which obtains MAC addresses from the Inv_AeX_AC_TCPIP table. This table is populated by the Symantec Management Agent as part of Basic Inventory, or is populated by Stand-alone Inventory, AD Import, or Domain Discovery. Most discovery or agent inventory pieces contain this data class.
Note: vTaskTargetDevices returns information about only one NIC for each computer. So relevant information may be ignored for computers with multiple NICs. While certain dummy NICs are ignored (those with IP addresses 0.0.0.0 or 127.0.0.1). Of the remaining NICs, the NIC about which information is returned is arbitrarily selected. So a different NIC may be returned by vTaskTargetDevices each time it is run.
With Network Discovery using ICMP or SNMP, ND creates and/or modifies the following resource keys
- hostname = CL-XP-01
- nbname.domain = CL-XP-01.EPM
- macaddress = 00-50-56-05-41-76
Additionally Network Discovery creates and/or modifies the FQDN resource key with the devices short name, for example:
Whereas the Altiris agent also creates and/or modifies the FQDN resource key with a longer name, for example:
- fqdn = CL-XP-01.EPM.LOCAL
Note: This discrepancy causes the resource key to alternate between these two values. I am not aware of any adverse effects of this discrepancy.
Thus if the MAC address or netbiosname.domain values do not match up, a duplicate will be created.
See more in the Troubleshooting section to understand how to troubleshoot duplicate issues. Also see the section on the Discovery Engine to see how Network Discovery is finding and capturing data on computers.
Credential Management
Before we dive into Network Discovery, we need to ensure that the proper credentials are setup. These credentials will be used by Network Discovery to gather data on a specific device. While not all credentials are necessary, it is good to have as many available to allow the best results with the Discovery.
To review what credentials are provided by default, follow these steps:
- In the Symantec Management Console, browse under Settings > All Settings > Monitoring and Alerting > Credential Settings > and select Credentials Management.
- The list of credentials will be listed. Note that some credentials may only be set to default and will not show up at this location.
Add what credentials are necessary. The subsequent steps will walk you through the most typical credentials used for a Network Discovery. Again not all need to be used.
- Click the Add Credentials button.
- Under the Credential type, select SNMP V1 V2 Read Credentials.
- Provide a Name for the credentials (this will be the label for the credentials provided).
- Provide all Community Strings used in your environment. Multiple strings can be added using space delimited.
- If needed, set the Expiration date and limit who can use the credentials.

- Click OK to save the credentials.
- Click Add Credentials.
- Choose WMI Credentials from the Credential type dropdown.
- Provide a Name.
- Provide a Domain for the credentials to use. As WMI is a Windows-based protocol this should be the Domain your Windows systems belong to.
- Provide a Username and Password that has local administrator rights on your target Windows computers. Admin rights are generally required for WMI interaction.
- If needed, set the Expiration date and limit who can use the credentials.
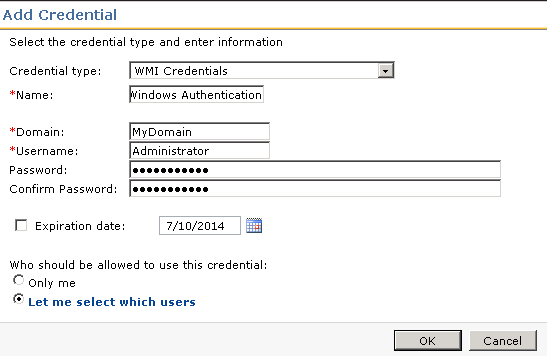
- Click OK to save the credentials.
- Click Add Credentials.
- Choose SSH Credentials from the Credential type dropdown.
- Provide a Name.
- Provide a Username and password that has access to your Mac systems.
- If needed, set the Expiration date and limit who can use the credentials.
- Click OK to save the credentials.
- Not all available credentials are used by Network Discovery, but the above are the most common.
Now that we’ve setup the proper credentials for use with Network Discovery, we can now configure a Connection Profile to use the set of Credentials.
Troubleshooting Tips:
- If SNMP Community strings are not working, try using the default, which is public only. “public” is the default community string for all network devices and will work unless it has been changed.
- Try specifying only one community string at a time if authentication and SNMP gathering does not appear to be working. This allows you to test specific credentials.
- WMI credentials use Windows-based authentication, typically via AD. If WMI information is not being gathered, check your WMI credentials against a system to ensure that user has rights to the local system. You can test WMI with the following process:
- Log onto the Symantec Management Platform server.
- Launch Windows WMI utility by going to Start > Run > type wbemtest > and click OK.
- Click the Connect button.
- The Namespace was given \\computername\root\cimv2, so type this into the Namespace area if it is not already set.
- Use the Authentication fields to provide the user you’ve specified in the WMI credentials.
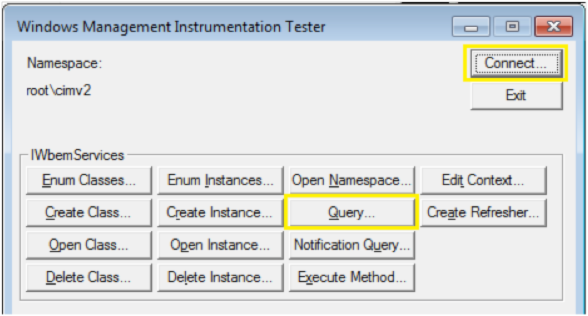
- Click Connect. By using the Computer Name in the Namespace and providing the authentication, this utility will attempt to connect via WMI, and we can see if WMI is working properly from the NS to the target computer.
- You can run a WMI query using the query button for further testing, such as querying SELECT * FROM Win32_Processor
- Make sure to add Public if you create your own SNMP credential as it will catch any devices that have not had their community strings updated.
Pluggable Protocol Architecture
Pluggable Protocol Architecture, or PPA, provides a profile that allows you to use multiple credentials and protocols for tasks needed by the Notification Server. Network Discovery requires the use of a connection profile from PPA in order to authentication and use the various protocols it supports. In the previous section we created the credentials needed, and now we’ll tie them together using a connection profile in PPA.
The following steps walk through setting up a Connection Profile for use with Network Discovery.
- In the Symantec Management Console, browse under Settings > All Settings > Monitoring and Alerting > Protocol Management > Connection Profiles > and select Manage Connection Profiles.
- Click the Add settings button.
- Provide a Connection profile name, such as “Network Discovery Protocols”.
- In the list of protocols, use the arrow to expand the section for ICMP.
- Increase the Timeout to 1000 miliseconds.
- Increase the Retry count to 2.
NOTE: Increasing the timeout and retry count will increase the time it takes for a Discovery to run
- Turn on the protocol by clicking the red light indicator dropdown and selecting “On”.
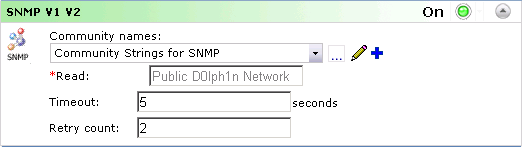
- In the list of protocols, use the arrow to expand the section for SNMP V1 V2.
- From the community names: dropdown, select the credentials created previously for SNMP V1 V2. Note that if you did not need to create a credential for this, i.e. public is the correct community string for all devices, the default credential will work.
- Review the Read field to ensure you have the correct community strings listed.
- Timeout and Retry count values are generally sufficient.
- Turn on the protocol by clicking the red light indicator dropdown and selecting “On”.
- In the list of protocols, use the arrow to expand the section for SSH.
- In the dropdown, select the credentials you created for SSH.
- Check the details to ensure the Username is the one you intend for the Discovery process.
- Change the Port if needed, and increase the Timeout only if timeouts are suspected.
- Turn on the protocol by clicking the red light indicator dropdown and selecting “On”.
- In the list of protocols, use the arrow to expand the section for WMI.
- In the dropdown, select the credentials you created for WMI.
- Check the details to ensure the Domain and Username is the one you intend for the Discovery process.
- Timeout and Retry count values are generally sufficient.
- Authentication Level is generally sufficient being unchecked.
- Enable and check the settings for any other protocol you may be using, such as AMT.
- Click OK to save the connection profile.
When complete, ensure all desired protocols are turned on. The following screenshot shows and example of the completed profile, without SSH since no Mac systems were to be discovered:

You are now ready to run a Network Discovery!
Troubleshooting Tips
- If you are getting inconsistent results, where some devices are discovered and others are not, increase the timeout settings for both ICMP and SNMP. If latency on the network causes a timeout to occur, we may not gather data on a device. For ICMP triple the numbers, and for SNMP double them. Play with these settings as it will increase the time it takes to run a Network Discovery, so you can find the lowest timeout value possible that will work in the environment.
- For WMI if it is not working as you would suspect, and you’ve successfully used wbemtest to connect to it, you may need to enable Use authentication level. There are a number of values so they will need to be tested in order to find the right one. It is recommended to test against a single Windows computer as you work to find a valid setting.
- Disable protocols not being used. If all Protocols are enabled, each protocol will be attempted against each IP Address found as part of the Discovery process. This will increase the amount of time it takes to complete a Network Discovery.
Initial Network Discovery
Unless you already know all the make and model information for your network devices, often an initial Network Discovery needs to take place. This allows the discovery to return information on devices which will then allow us to properly add Device Classifications. If you’ve already run a Network Discovery, then this part is complete.
Steps to run through the initial discovery are listed here:
- In the Symantec Management Console browse under Manage > Jobs and Tasks > in the left-hand tree browse under System Jobs and Tasks > Discovery and Inventory > and select Network.
NOTE: You can create a Network Discovery Task from whatever location you wish within the Jobs and Tasks tree. The above is just a typical place to create such a task.
- 2. Right-click on the containing folder and select New > Task.
- 3. From the left-hand tree, locate the folder for Discovery and Inventory, and select Discover Network.
- 4. Provide a name for the discovery, such as “Full Network Discovery”.
- 5. From the Connection profile dropdown select the connection profile we created previously, or that you have configured separately.
- 6. Configure the scan type, either Targeted (Ping), or ARP or seed device. This can be edited later after creating the Task. For this example I selected Seed Device (Scan network devices (ARP)).

- Click OK to save the Task.
- In the main console the task will now load in the tree and the details within the right-pane.
- Check the considerations listed below before scheduling the discovery.
- Click the New Schedule option.
- If you choose the Now radial, the discovery will execute immediately. It can also be set to a Schedule to run during off-peak times, if that is required.
- Click the Schedule button.
- Done!
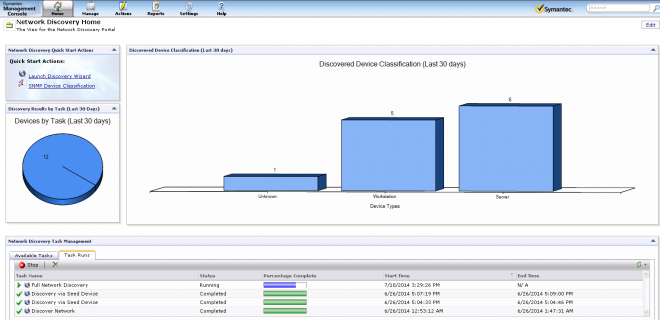
To check progress, in the Symantec Management Console browse under Home > Discovery and Inventory > and select Network Discovery. This will provide an overview of all Discoveries, but note that at the bottom webpart, under the Task Runs tab, there is a Percentage Complete, as shown in this screenshot:
Considerations:
- IP Ranges will take considering longer if a large range is included. We will start by pinging every IP Address, waiting for the timeout and executing the retry count. Take this into mind when scheduling a range.
- A huge range, such as a class B subnet, is not recommended. A class B subnet has thousands and thousands of IP Addresses in the range so a discovery will take a very, very long time.
- Find out what specific ranges are being leased on the network so that those ranges can be added.
- When selecting a Seed Device the ARP table, or every device and its IP that it knows about, will be used to check what IP Addresses to query against. Most Seed devices will provide what is directly connected to them, and will have the ARP tables of other routers and switches it knows about. This may create a very large discovery, so IP ranges may be needed in very large environments.
Troubleshooting Tips:
- If a Discovery does not kick off, Try restarting the Altiris Object Host Service. This is the Task Server service that Network Discovery uses. Task Server executes the Discovery engine, so if Task Server is having problems restarting that service may allow the Discovery to execute.
- If a Network Discovery instance is not starting and you wish to try and schedule another, it is recommended to delete the first instances so they do not overlap, or the previous one kicks off later.
- When Network Discovery Tasks perpetually do not kick off typically this can be a Server task or Job Task Server issue. Please refer to the following KB for possible cause and resolution: www.symantec.com/docs/TECH209754.
- Trace logging can be very useful in troubleshooting problems with the Discovery process. Check the section for Troubleshooting Network Discovery for more details.
Network Discovery and Agentless Inventory 7.1, 7.5 Best Practices and Troubleshooting, Part 2
Network Discovery and Agentless Inventory 7.1, 7.5 Best Practices and Troubleshooting, Part 3
Network Discovery and Agentless Inventory 7.1, 7.5 Best Practices and Troubleshooting, Part 4