Objectives
Objectives of this article are:
- Create an NSQL Query ready to consume as a web service
- Download Apache Axis
- Generate stub classes using Apache Axis' wsdl2java emitter.
- Create your own class to consume the web service
- Create a project in Eclipse that can be built and compiled
- Export to a .jar file that you can call from the command line to run.
- Call a PPM NSQL query through the web service and iterate through the record results
- View the raw query response, to enable further manipulation of the document using XSLT or other tools
- Correctly expose 'null' attribute values in the responses
In summary, this aims to provide an end-to-end setup, code, build, and run of an application written in Java than can consume a CA PPM web service (SOAP / XOG) call.
Assumptions
Before we begin:
- These steps will assume a Windows development environment machine
- Java JDK will be installed on the machine, and the path to java.exe and javac.exe and jar.exe will be present on the PATH
- If using another IDE than a modern release of Eclipse, the instructions will need to be adjusted to suit the needs of that IDE
Create an NSQL Query ready to consume as a web service
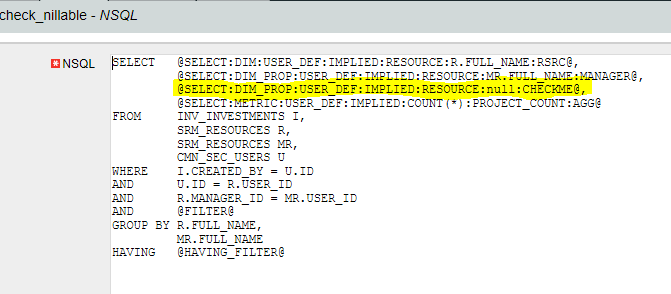
There is a small change to be made to the default query text provided when making NSQL Queries that we want to add in this demonstration, so that we can be sure to capture examples of both nulled and non-null fields in the results.
We will also reference the query by its 'code' or 'id' in subsequent steps, so if using another query code in your instance of PPM, you will need to adjust the later steps accordingly.
- Login to CA PPM as an 'admin' user that has access to navigate to Administration > Studio: Queries and go there.
- Click on New and populate the required fields with the values: check_nillable
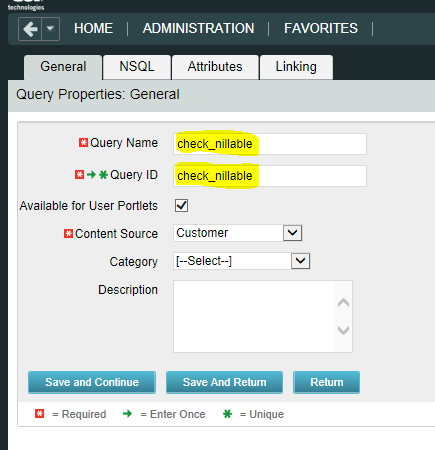
- Click Save and Continue, where you'll be prompted to modify the query. Add the line '@SELECT:DIM_PROP:USER_DEF:IMPLIED:RESOURCE:null:CHECKME@,' as shown. The rest of the query is unchanged from the default.
- Click Save and Continue. You are now done with this part.
Download Apache Axis
If you view the current (CA PPM 15.2) release notes, it will say that the supported Third Party SOAP Integration Toolkit is Apache Axis 1.6 (source).
From 1.5 and up, strictly speaking, it is Apache Axis2 and so the highest version of Apache Axis created was 1.4.
The documentation on XOG WSDL states that for WSDL Emitter Tools, Apache Axis 1.3 or newer is needed (source). Further, the instructions to generate a proxy API using the emitter is also using Apache Axis 1.4 or lower, and not the syntax or classes for Apache Axis2 1.5 and higher (source).
Therefore, please note that the information contained within this document is covering Apache Axis 1.4.
To download Apache Axis 1.4 in a ready-to-use format, please download and extract the contents of this archive:
http://archive.apache.org/dist/axis/axis/java/1.4/axis-bin-1_4.zip
Generate stub classes using Apache Axis' wsdl2java emitter
Open a command prompt and navigate to the folder where Axis 1.4 was extracted. Then run the following command:
java -classpath lib\* org.apache.axis.wsdl.WSDL2Java -W http[s]://hostname[:port]/niku/wsdl/Query/check_nillable -o c:\projectx\check_nils\src
- Change 'http[s]://hostname[:port]/niku/wsdl/Query/check_nillable' to your PPM protocol, hostname, (optional) port number, and query code. E.g. http://myclarity/niku/wsdl/Query/check_nillable
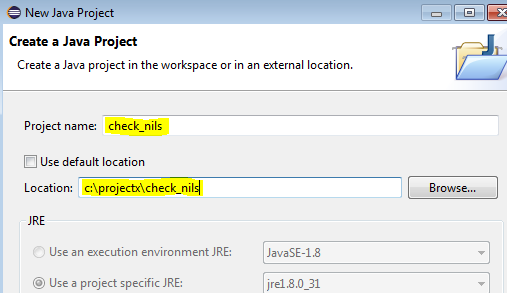
- Change 'c:\project\check_nils\src' to where you would like the generated classes to be saved. In this example, you will create an Eclipse java project at c:\projectx\check_nils if using this value.
- You may receive the following warning. For the purposes of this demo, that is OK.
- Unable to find required classes (javax.activation.DataHandler and javax.mail.internet.MimeMultipart). Attachment support is disabled.
A check on the files/folders should reveal something similar to the following if this worked:
C:\ProjectX\check_nils>dir /a-d /s /b
C:\ProjectX\check_nils\src\com\niku\www\xog\Query\Auth.java
C:\ProjectX\check_nils\src\com\niku\www\xog\Query\Check_nillableFilter.java
C:\ProjectX\check_nils\src\com\niku\www\xog\Query\Check_nillableQuery.java
C:\ProjectX\check_nils\src\com\niku\www\xog\Query\Check_nillableQueryPort.java
C:\ProjectX\check_nils\src\com\niku\www\xog\Query\Check_nillableQueryResult.java
C:\ProjectX\check_nils\src\com\niku\www\xog\Query\Check_nillableQueryService.java
C:\ProjectX\check_nils\src\com\niku\www\xog\Query\Check_nillableQueryServiceLocator.java
C:\ProjectX\check_nils\src\com\niku\www\xog\Query\Check_nillableQuerySoapBindingStub.java
C:\ProjectX\check_nils\src\com\niku\www\xog\Query\Check_nillableRecord.java
C:\ProjectX\check_nils\src\com\niku\www\xog\Query\Check_nillableSlice.java
C:\ProjectX\check_nils\src\com\niku\www\xog\Query\Check_nillableSliceResult.java
C:\ProjectX\check_nils\src\com\niku\www\xog\Query\Check_nillableSort.java
C:\ProjectX\check_nils\src\com\niku\www\xog\Query\Check_nillableSortColumn.java
C:\ProjectX\check_nils\src\com\niku\www\xog\Query\Login.java
C:\ProjectX\check_nils\src\com\niku\www\xog\Query\LoginResponse.java
C:\ProjectX\check_nils\src\com\niku\www\xog\Query\Logout.java
C:\ProjectX\check_nils\src\com\niku\www\xog\Query\WrappedLogin.java
C:\ProjectX\check_nils>
Create your own class to consume the web service
Run the following command to create the folder structure we want for this demo from your 'c:\projectx\check_nils' folder. The package name in our class has the same structure:
C:\ProjectX\check_nils>md src\com\ca\ppm\demo
C:\ProjectX\check_nils>
Now create the file CheckNils.java in the newly created folder using the following code:
package com.ca.ppm.demo;
import java.rmi.RemoteException;
import javax.xml.rpc.ServiceException;
import org.apache.axis.AxisFault;
import com.niku.www.xog.Query.*;
public class CheckNils {
private static String username;
private static String password;
private static String url;
private static String sessionId = null;
private static Check_nillableQueryServiceLocator service;
private static Check_nillableQueryPort port;
private static Check_nillableQueryResult result;
private static Auth auth;
private static Logout logout;
public static void main(String[] args) throws ServiceException,
RemoteException {
ParseArgs(args);
CreateServicePort();
Login();
if (sessionId != null) {
RunQuery();
ShowResults();
ShowRaw();
Logout();
}
}
private static void Logout() throws RemoteException {
port.logout(logout);
}
@SuppressWarnings("deprecation")
private static void ShowRaw() throws AxisFault, ServiceException {
System.out.println(service.getCall().getMessageContext()
.getResponseMessage().getSOAPEnvelope().toString());
}
private static void ShowResults() {
for (Check_nillableRecord record : result.getRecords())
System.out.println("Resource: " + record.getRsrc() + " Manager: "
+ record.getManager() + " CheckMe: " + record.getCheckme());
}
private static void RunQuery() throws RemoteException {
result = port.query(new Check_nillableQuery(), auth);
}
private static void Login() throws RemoteException, ServiceException {
Login login = new Login(username, password, null);
try {
sessionId = port.login(login);
} catch (AxisFault e) {
System.out
.println("\nLogin failed. Check username and/or password and try again.\n");
ShowRaw();
}
if (sessionId != null) {
System.out.println("Logged in as " + username + ":" + sessionId);
auth = new Auth();
auth.setSessionID(sessionId);
logout = new Logout();
logout.setSessionID(sessionId);
}
}
private static void CreateServicePort() throws ServiceException {
service = new Check_nillableQueryServiceLocator();
service.setcheck_nillableQueryServiceEndpointAddress(url + "/niku/xog");
port = service.getcheck_nillableQueryService();
}
private static void ParseArgs(String[] args) {
boolean showUsage = true;
if (args.length == 1) {
String param = args[0];
int slashPosition = param.indexOf("/");
if (slashPosition > 0) {
int atPosition = param.indexOf("@", slashPosition);
if (atPosition > 0 && atPosition < param.length()) {
username = param.substring(0, slashPosition);
password = param.substring(slashPosition + 1, atPosition);
url = param.substring(atPosition + 1);
showUsage = false;
}
}
}
if (showUsage)
ShowUsage();
}
private static void ShowUsage() {
String fqname = CheckNils.class.getName();
System.out.println("Usage: " + fqname + " username/password@url");
System.exit(0);
}
}
Create a project in Eclipse that can be built and compiled
- Launch Eclipse and go into a new / empty workspace.
- Provide the name check_nils and the location c:\projectx\check_nils and then click on Finish.
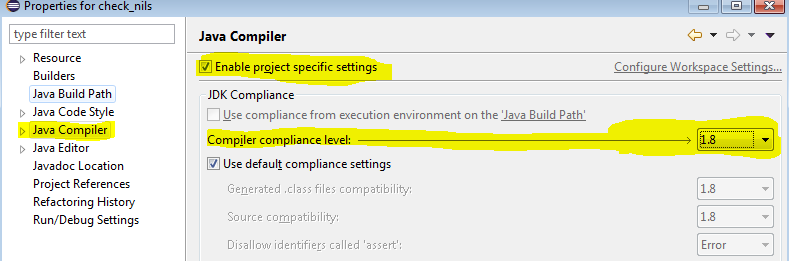
- In the Package Explorer, right-click the check_nils project and go to Properties > Java Compiler and click on Enable project specific settings.
- Under Compiler compliance level, choose your JDK version, and then click on Apply.
- You may be prompted to Build your project - whether you do or do not at this moment, it doesn't matter. It probably won't work anyway, as we're not finished setting up yet.
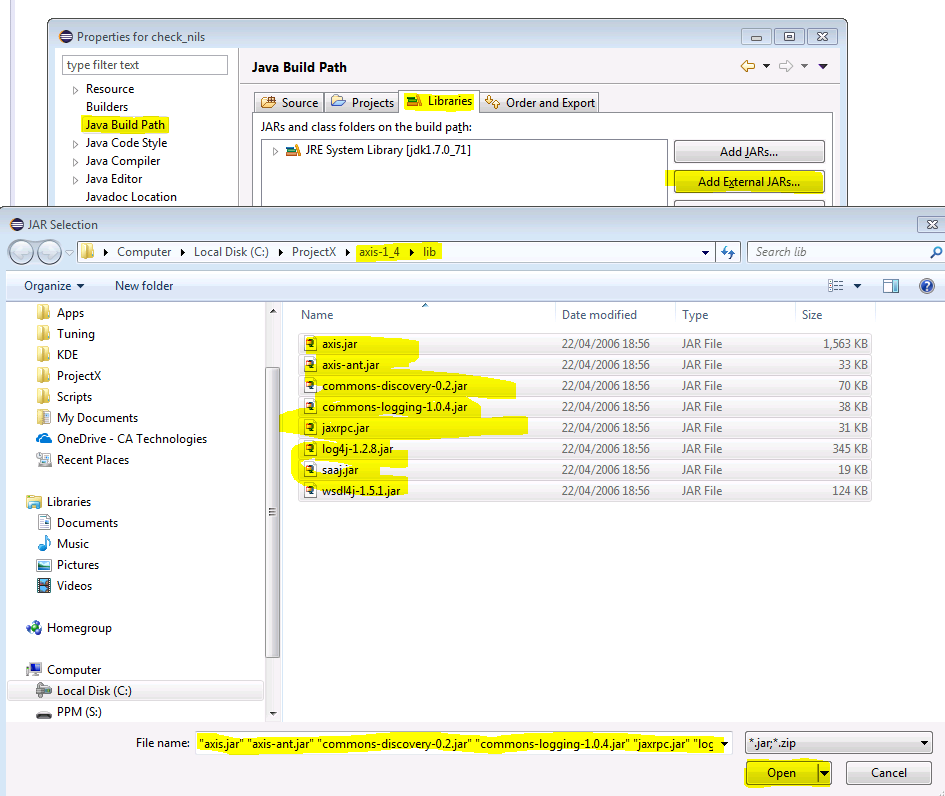
- Next go to the Java Build Path section in the same properties dialog. Here you will want to go to the Libraries tab and click on External Jars.
- Browse to the /lib folder where you extracted Axis 1.4 to, and select all the .jar files, and then click on Open.
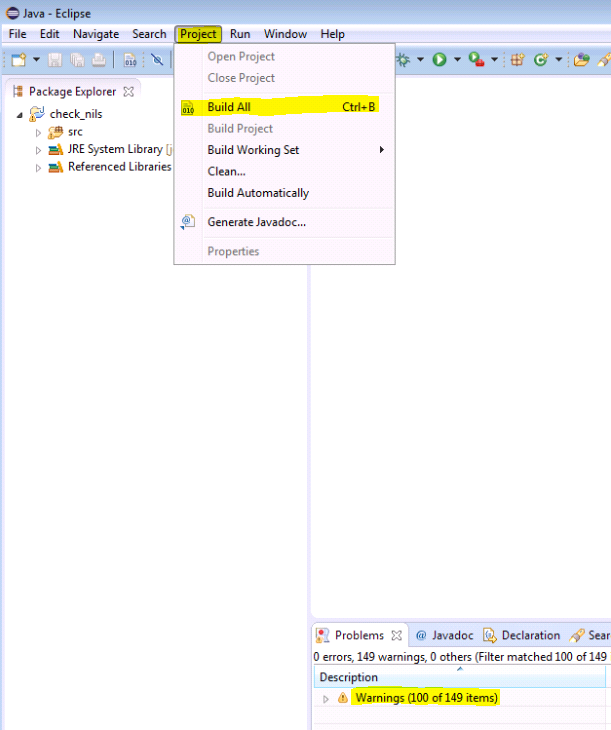
- At this point you should have everything in place to be able to build successfully. Try now by going to the Project menu and selecting Build All.
At this point, the code should build/compile successfully. If you check the Problems tab, there should be no errors. There can still be a large number of warnings though - more than 100 - but these do not stop the program executing correctly.
Export to a .jar file that you can call from the command line to run
You now have a .class file that can be invoked from the command line (using the java.exe launcher to start the virtual machine to host it), but rarely are applications run directly this way. Instead, java applications are usually bundled into a Java Archive file, or JAR file. Eclipse can assist with creating this correctly.
- Right-click your project in the Package Explorer window and choose Export...
- Find the Java > JAR file option, then click on Next.
- Uncheck the files in the right-hand panel (normally .classpath and .settings) and make sure that your src folder is checked/selected in the left panel. Put the jar filename and path you want to create in the export destination field JAR file property, e.g. C:\ProjectX\check_nils\bin\demo.jar, and with all of this set, click again on Next

- In the packaging window that comes up, click on Next again (no further changes there).
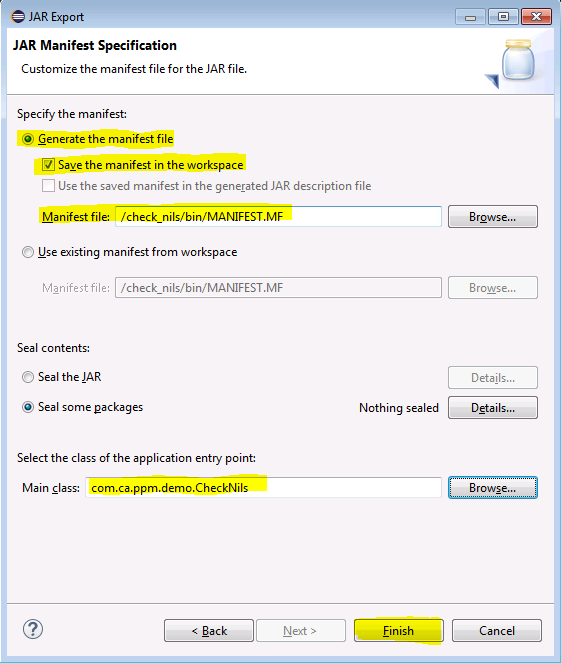
- For the JAR Manifest Specification tab, you will need to do some selections. Click Generate the manifest file, and Save the manifest in the workspace. For the Manifest file location prompt, you can enter /check_nils/bin/MANIFEST.MF (it is normal for the manifest file to be in all-caps and with this file extension). Click on Browse for the Main class entry point, and choose the com.ca.ppm.demo.CheckNils option. It should be the only one.
- Click on Finish, and if you are prompted to update or overwrite anything, you can just click Yes / OK.
Call a PPM NSQL query through the web service and iterate through the record results
We are almost there. If you look in your C:\ProjectX\check_nils\bin folder you should now have a demo.jar file ready - mine is almost 40KB in size.
To run the application, it expects to receive a parameter to tell it who to login is, and where. This is similar to the syntax used for the XOG client login, but not exactly. The parameter is in the format username/password@url where url is of the format http[s]://yourhostname[:port]
In my case, I connect to CA PPM using http://claritynam17 in my browser, and the username and password 'admin', so I would use the following syntax: admin/admin@http://claritynam17
The program appends /niku/xog onto the end automatically, so do not specify it here. The program has minimal validation, exception handling, or input handling, in order to keep the code simple to reference just the web service calling.
Note: I haven't yet tried it with https protocols. That comes soon!
You will also need to construct the java classpath for the program, which will consist of the Axis .jar files and your own one. So the full syntax I would use to launch the program from the command prompt, specifically from the bin folder where the demo.jar file resides, would look like this:
java -classpath c:\projectx\axis-1_4\lib\*;./demo.jar com.ca.ppm.demo.CheckNils admin/admin@http://claritynam17
And on a brand new installation of CA PPM without any real data, I may get the following result displayed:
- Unable to find required classes (javax.activation.DataHandler and javax.mail.internet.MimeMultipart). Attachment support is disabled.
Logged in as admin:5357081__C5499B54-809F-4101-8D79-EDBEB074769B
Resource: Administrator, PPM Manager: Administrator, PPM CheckMe: null
<soapenv:Envelope xmlns:soapenv="http://schemas.xmlsoap.org/soap/envelope/" xmlns:xsi="http://www.w3.org/2001/XMLSchema-instance"><soapenv:Body><QueryResult xmlns="http://www.niku.com/xog/Query">
<Code>check_nillable</Code>
<Records>
<Record>
<rsrc>Administrator, PPM</rsrc>
<manager>Administrator, PPM</manager>
<checkme xsi:nil="true"/>
<project_count>16</project_count>
</Record>
</Records>
<Slice>
<Number>0</Number>
<Size>1</Size>
<Total>1</Total>
</Slice>
</QueryResult></soapenv:Body></soapenv:Envelope>
C:\ProjectX\check_nils\bin>
Granted, if you have a lot of users in your system who have created projects, you may get a LOT more results and may want to tune the program accordingly. Please try running it on new installations or a non-production system like a Development environment. Good luck!
View the raw query response, to enable further manipulation of the document using XSLT or other tools
This is already included in the above output, it is the last thing that the program emits before it ends, in the <soapenv:Envelope> tags. Whilst it is indeed cool to be able to loop through and manipulate the results directly using Java classes, methods, and fields, sometimes you need to pass the results over to other tools or systems, or to leverage a technology like XSLT to help with processing the data further.
To do that, you can tap into the Axis 'engine' directly and access the raw response and request. Check the ShowRaw() method of the program to see how this data can be accessed and used.
Correctly expose 'null' attribute values in the responses
Part of the reason for this demo, and for showing how to access the raw SOAP message data, is for the correct handling of null values.
In the records where fields are accessing the values directly, such as with the call to record.getCheckme(), you will see that Java can see that the field value is directly a null and it can be tested accordingly (e.g. if( record.getCheckme() != null) { ... }).
However, for processing with XSLT you need to be able to access and parse the xsi:nil="true" attribute correctly. If you just get the <QueryResult> block from the XML to process, you will see that the XML namespace declaration for xsi will be missing - because it was declared and present at the root element <soapenv:Envelope> instead. This problem will be clear if you use the XOG client to make your Query wsdl call, as then you also only get the data from <QueryResult> down, and the xsi namespace is not present.
Using the method shown in this document, that will not be an issue and XSLT will be able to parse the namespaces correctly and find the corresponding element/attribute values, including being able to test with either XSLT 1.0 or XSLT 2.0 like these examples:
XSLT 2.0:
...
<xsl:if test="not(nilled(xog:Checkme))">
...
XSLT 1.0:
...
<xsl:if test="not(xog:Checkme/@xsl:nil='true')">
...